Transforming a spare room into a walk-in closet can be a rewarding project, but it often generates a significant amount of debris. One efficient way to handle this waste is by using a small dumpster. Using a small dumpster helps manage the disposal of old shelves, drywall, and other materials easily, keeping your workspace clean and organized.
Before starting your project, it’s crucial to plan your walk-in closet layout. Measure your space accurately and decide on the core elements like shelving units and hanging rods. This proactive step ensures you only purchase what you need and minimizes waste.
Once your layout is set, prepare your space by removing any existing fixtures and making necessary repairs. Renting a small dumpster will streamline this phase, allowing you to quickly dispose of unwanted items and focus on the exciting parts of your DIY walk-in closet project such as installation and accessorizing.
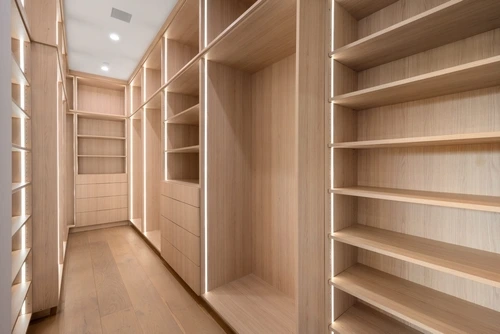 When creating a walk-in closet, it’s essential to choose the appropriate materials and tools and ensure your design incorporates the necessary shelves, rods, and drawers for optimal organization and storage.
 Putting the final touches on your DIY walk-in closet project includes personalizing the decor and conducting a thorough quality check to ensure everything is in top shape. These steps will help you create a space that is both functional and appealing.
Key Takeaways
- Plan your layout and measure your space accurately
- A small dumpster efficiently manages demolition waste
- Focus on installation and accessorizing for a functional closet

Planning Your Walk-In Closet Layout
Creating a walk-in closet requires careful planning to maximize space and ensure functionality. Focus on accurate measurements and elegant design to make the most out of your project.Determining Dimensions and Measurements
Start by measuring the available space. Use a tape measure to determine the length, width, and height of the area. Ensure that your measurements are precise to avoid any miscalculations as you plan your layout. Create a rough sketch with the dimensions marked. This sketch acts as a roadmap for your project. Remember to allow space for doors to open and close without obstruction. Use graph paper or a digital tool to draw the layout. Grid lines can help you convert your measurements to scale, making it easier to visualize the final outcome. Accurate dimensions ensure you utilize every inch effectively.Designing for Functionality and Aesthetics
When designing the layout, consider both functionality and aesthetics. Think about how you plan to use different parts of the closet to store your items. Incorporate different storage options such as hanging rods, open cubbies, and baskets. These choices organize clothing and accessories efficiently. Incorporate elements like a bench or a small rug. These additions not only enhance the functionality but also make the space inviting. Use color schemes and materials that complement your home’s interior design. Experiment with different designs virtually before finalizing. This helps you adjust based on visual and functional needs. A well-thought-out design balances practical storage with an appealing, organized look.Preparing the Space
Before you can build your DIY walk-in closet, you need to ensure the space is properly prepared. This involves a thorough cleaning, making necessary repairs, and priming the walls for installation.Cleaning and Clearing the Area
Start by removing everything from the room. This includes furniture, wall hangings, and any other items. If the room has carpeting, consider removing it to have a more solid foundation for your closet build. Ensure you sweep, mop, or vacuum the floors to remove any dust and debris. Clean the walls with a damp cloth to remove dirt and grime. If there is wallpaper, now is a good time to strip it off. Check for mold or mildew, especially in older homes. These issues need to be addressed before moving forward. Use a mold-killing solution or consult a professional if needed.Repairing and Prepping Walls for Installation
Examine the walls for any damage, such as holes, cracks, or water stains. Use spackle or joint compound to fill holes and cracks. Sand the patched areas smooth once they dry. For larger repairs, you may need to cut out damaged drywall and replace it. Apply a coat of primer to the walls to create a surface ready for paint. This helps hide imperfections and provides a better finish. Consider using mold-resistant primer if the area is prone to moisture. Finally, remove any trim or baseboards that may interfere with your build. If you plan to reinstall them, keep them safe during the construction phase. Now your space is ready for the next steps in creating your custom walk-in closet.Selecting and Installing the Core Elements
When creating a walk-in closet, it’s essential to choose the appropriate materials and tools and ensure your design incorporates the necessary shelves, rods, and drawers for optimal organization and storage.
Choosing the Right Materials and Tools
Selecting high-quality materials is critical for durability and aesthetic appeal. Choose solid wood or high-grade plywood for shelves and drawers. These materials are robust and offer a refined look. Additionally, choosing metal rods ensures longevity for hanging clothes. You’ll need tools like a table saw or circular saw for precise cuts and a drill for assembling components. Make sure to use sturdy fasteners to attach shelves and brackets securely. Visiting Home Depot or similar stores can provide a range of materials and tool options to fit your specific needs.Building and Fixing Shelves and Rods
To maximize space, strategically place shelves and rods. Start by measuring the closet area and marking the locations where the shelves and rods will be installed. Attach studs securely to the wall, and fix the shelves to these studs using heavy-duty brackets. For the shelves, use the high-quality wood cut to your specifications, ensuring they fit snugly into the designated space. When adding rods, make sure they are parallel and properly spaced to accommodate hanging clothes comfortably. Always double-check the levelness of both shelves and rods to ensure a clean, professional look.Incorporating Drawers and Additional Storage
Drawers are essential for increasing your closet’s storage capacity. Frame the drawers using durable plywood, ensuring exact measurements to fit the designated space. Mount the drawers using heavy-duty slides for smooth operation. Consider incorporating modular storage systems for extra flexibility. These systems often come with a variety of components like bins and additional shelving, allowing you to customize your storage solution further. Careful planning and precise installation of these elements can significantly enhance the functionality and organization of your walk-in closet.Accessorizing Your Walk-In Closet
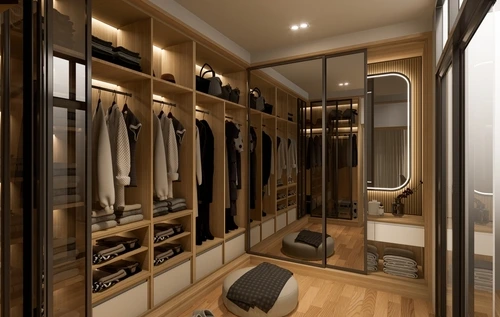
Enhancing your walk-in closet involves strategic solutions to optimize storage for shoes and jewelry, along with thoughtfully placing mirrors and lighting to elevate the space. Each element plays a critical role in ensuring that your walk-in closet is both functional and stylish.Innovative Solutions for Shoe Storage
Maximize your shoe storage by leveraging vertical and horizontal spaces. Use stackable shoe racks or clear shoe boxes to keep your footwear visible and organized. Floating shelves offer a sleek way to store high heels and boots without taking up floor space. Over-the-door shoe organizers are effective for storing flats and sneakers. Rotating shoe carousels can also hold multiple pairs, making them easy to access without clutter.Optimizing for Accessories and Jewelry
Organizing accessories and jewelry requires a combination of creativity and practicality. Install hooks on the walls for hanging necklaces to prevent tangles. Use drawer organizers with compartments for storing rings, bracelets, and earrings. Hanging organizers with small pockets are ideal for keeping items like watches and cufflinks visible. A dedicated jewelry box with multiple layers and sections can also keep valuable pieces secure while ensuring they are easy to find.Strategic Use of Mirrors and Lighting
Mirrors and lighting significantly impact the functionality and aesthetic of your walk-in closet. Position full-length mirrors on the closet doors or walls to assist with outfit checks and make the room appear larger. LED strip lights under shelves or above hanging areas provide excellent visibility. Pendant lights or a small chandelier add a touch of elegance while ensuring the space is well-lit. Consider dimmable lighting options to create the right ambience for different times of the day.Adding Finishing Touches
Putting the final touches on your DIY walk-in closet project includes personalizing the decor and conducting a thorough quality check to ensure everything is in top shape. These steps will help you create a space that is both functional and appealing.
Applying Decor for Personal Flair
Begin by selecting a carpet that complements your overall closet design. This adds warmth and comfort underfoot. Choose matching hangers to maintain a cohesive look, giving your closet a polished appearance. Adding artwork or framed photos brings personality to the space. Install shelving to showcase decorative items like vases or small sculptures. Consider using decorative baskets or storage bins to keep items organized while adding a touch of style. Use putty to fill in any visible nail holes or imperfections. Apply caulk along any gaps in the trim to create a seamless look. Place small plants to add a fresh, lively element. Finally, a good vacuuming will ensure the area is spotless and ready for use.Final Walkthrough and Quality Checks
Start your final walkthrough by inspecting shelves and rods for stability. Make sure all brad nails are secure and nothing is loose. Check that all drawers and doors open and close smoothly. Verify that all organizers and accessories are properly installed. Look for any unfinished surfaces or edges that need touching up with paint or putty. Ensure that all light fixtures are functional and properly positioned. Test the vacuum for any missed dust or debris to make certain your closet is exceptionally clean. By carefully inspecting each aspect, you’ll ensure your DIY walk-in closet is both beautiful and durable, providing a final result you can be proud of. For tips on applying the finishing touches, you can refer to House Digest.Frequently Asked Questions
Building a DIY walk-in closet with a small dumpster can be cost-effective and efficient. Detailed below are various affordable solutions and practical tips for optimizing your space.How can I build a walk-in closet in a small space on a budget?
Use affordable materials like plywood and maximize vertical space. Consider repurposing existing furniture and installing shelves, rods, and hooks to organize clothing and accessories. For more ideas, explore DIY walk-in closet tips on a budget.What are some affordable DIY closet organization ideas?
Install hanging shelves and rods, use plastic bins for storage, and incorporate functional storage solutions. Utilize items like cubbies and baskets. Check out these clever small walk-in closet ideas for more inspiration.Can I convert an existing room into a walk-in closet by myself?
Yes, with the right tools and planning, you can convert a room into a walk-in closet. Begin by marking your desired layout and use basic woodworking skills to construct frames and install shelves and rods.What are the minimum size requirements for a DIY walk-in closet?
A DIY walk-in closet can be as small as 4×4 feet. Ensure sufficient space for hanging rods along at least one wall and storage units. Consider the type of clothing and accessories you plan to store to determine necessary space.How can I maximize storage space in my DIY walk-in closet design?
Think vertically by using hanging shelves and tall storage units. Install rods at multiple levels and incorporate pull-out bins and baskets for smaller items. Effective use of every inch can be seen in these organization tips.What are some tips for doing a budget-friendly closet makeover using IKEA products?
Select IKEA basics like the KALLAX shelves or BILLY bookcases. Customize with inexpensive add-ons like hooks and baskets. IKEA hacks can help you achieve a personalized look without spending a lot. Use IKEA’s modular options to fit your needs.RECENT BLOGS
 A Homeowner’s Guide to Flash Flood Preparation, Cleanup, and Long-Term Protection
Date: May 27 ,2025
 Everything You Need to Know About Garbage Bin Rental: Sizes, Costs, and Practical Tips for Every Project
Date: May 14 ,2025

 Safe Disposal Methods for Refrigerators: Recycling, Donation, and Removal Options
Date: April 29 ,2025

Our Reviews


LATEST BLOGS
