April 8, 2024 - Benjamin Ehinger
How to Build a Walk-In Closet in an Existing Room: Step-by-Step Guide
CALL NOW 844-762-8449
Transforming an existing room into a walk-in closet can be a rewarding home improvement project that not only adds value to your property but also provides a customized storage solution for your clothing and accessories. If you have a spare room or an underutilized space in your home, consider the potential of turning it into a well-organized, walk-in closet. This undertaking involves careful planning, from designing the layout to suit your personal storage needs to selecting the right components that will make up your closet. Remember, as with many renovation projects, you may accumulate waste, and renting a local roll-off dumpster could be an essential part of managing debris efficiently.
Embarking on this journey requires a step-by-step approach, starting with the careful preparation of the chosen room. This includes measuring the space, deciding on the type of storage elements you need, and determining whether you’ll undertake the project yourself or seek professional assistance. Next, constructing the closet framework sets the foundation for the installation of rods, shelves, and drawers. Finally, personalizing the space with finishing touches such as paint, lighting, and decorative elements ensures that your closet is both functional and aesthetically pleasing. With the right tools and guidance, building a walk-in closet is an achievable task that can bring organized tranquility to your daily routine.
Factor in your storage needs—how you plan to use the closet will determine the layout. Allow for a mixture of hanging space, drawers, and shelves. Contact your local building department to confirm if you need a permit and to ensure your plan complies with building codes, especially if structural changes are planned. Set a project budget as early as possible to guide your decisions on materials and design complexity.
 Before embarking on the construction of your walk-in closet, it is essential to set up the foundation of the room. You will need to address the existing walls and floors to ensure a sturdy and clean base for your build.
 After assembling the fundamental structure of your walk-in closet, focusing on the finishing touches will transform the space into an organized and aesthetically pleasing haven. Pay close attention to the details of painting, decorating, and lighting to ensure your walk-in closet is not only functional but also reflects your personal style.
Key Takeaways
- Transforming a spare room into a walk-in closet adds value and customized storage.
- Planning includes design, selecting materials, and preparation for waste management.
- The project’s success relies on solid framework construction and personalized finishing details.
Planning Your Walk-In Closet
Before embarking on constructing your walk-in closet, it’s crucial to thoroughly plan the layout and understand the space you’re working with. Ensuring your plans align with your storage needs and the dimensions of the existing room will save time and resources.Assessing Space and Location
Firstly, survey the existing room you intend to convert. Identify the best location within the room for your closet, taking into account accessibility and the flow of the room. Space is a premium, so consider vertical options for maximizing storage. Take note of any obstructions like windows or doors that could impact your closet space. Also, consider potential future room use to ensure the closet placement won’t become an issue.Measuring for Success
Measurements are the backbone of your plan. Begin with the ceiling height and work your way down to the floor, noting the dimensions of each wall. Your measurements must be precise; even a small mistake can have big implications during the build. Use a tape measure for accuracy, and write everything down in a table for easy reference.| Wall | Width | Height |
|---|---|---|
| North | 8 feet | 9 feet |
| South | 8 feet | 9 feet |
| East | 6 feet | 9 feet |
| West | 6 feet | 9 feet |
Designing the Closet Layout
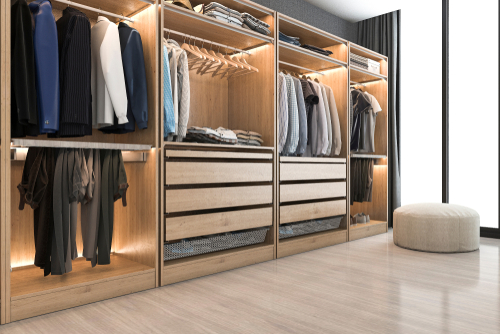
When creating the layout for your walk-in closet, your primary goals should be to choose a design that reflects your personal style and to maximize the storage space. Every inch counts, and the right design will cater to your wardrobe and lifestyle needs.Choosing the Right Design
Begin with assessing your wardrobe. Consider the types of clothing, shoes, and accessories you own. Different clothes require different types of storage—hanging space for dresses and coats, shelving for sweaters, and special racks for shoes. Thinking about your personal style will influence the overall design aesthetic of your closet. Choose custom cabinetry that complements the decor of the adjacent room for a cohesive look. The materials you choose, whether wood or a modern mix of metal and glass, can significantly impact the final look of your walk-in closet. Choose finishes that are both durable and align with your personal taste.Maximizing Storage Space
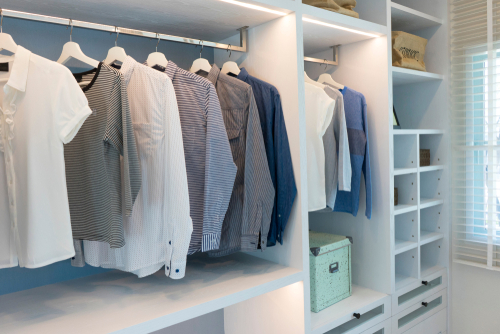
To maximize storage space, smart organization is key. Utilize a combination of hanging space and shelving to store your clothes and ensure easy access. For example, double hanging rods can effectively double your hanging area for shirts and pants. Drawers are essential for items like underwear and jewelry, and pull-out shelves can help you neatly store and access your shoes. Adjustable shelves are particularly useful for adapting to your changing wardrobe needs over time. Remember to take advantage of vertical space—high shelves are great for seasonal items that you aren’t using daily. Include specialized storage like tie racks or velvet-lined jewelry drawers to protect and organize specific items. With careful planning, even a small walk-in closet can be transformed into a highly functional wardrobe powerhouse.Preparing the Room
Before embarking on the construction of your walk-in closet, it is essential to set up the foundation of the room. You will need to address the existing walls and floors to ensure a sturdy and clean base for your build.
Clearing and Cleaning
- Remove all furniture and belongings: Clear out the area where the closet will be constructed.
- Cleaning: Thoroughly clean the walls and floors to remove dust and debris. If you have carpet, consider removing it to expose the subfloor for your new closet structure.
Preparing Walls and Floors
- Assessing existing walls: Identify any load-bearing walls and locate the studs which will be crucial for attaching new closet components.
- Floors: Ensure they are level and clean. If working with drywall, check for damage and repair as necessary to provide a sound surface for attaching closet systems.
- Materials: You may need new drywall or underlayment depending on your room’s condition.
Building the Closet Framework
Building a walk-in closet requires precise measurements and careful construction of the framework, which serves as the skeleton for the entire closet. It is this framework that will define the closet’s layout, strength, and durability.Constructing Walls and Sections
To build a closet, start by using a stud finder to locate the studs in your existing room’s walls. Once you have identified the stud locations, create a detailed outline of your closet’s dimensions using a tape measure and mark them with a permanent marker. Next, cut the wood for the new walls using a circular saw. Measure and cut the top and bottom plates and the vertical studs from the wood, typically 2x4s. Framework construction is a methodical process:- Corner placements are crucial. Install full-height studs at each corner for stability.
- Place the vertical studs between the plates approximately 16 inches on center to secure the wall’s integrity.
- Secure the plates and studs with 16d nails, ensuring each section is perfectly vertical with a level before fastening.
Installing Doors and Headers
When planning for doors, ensure adequate space for the header—a horizontal support over the door. Cut two pieces of wood to span the door’s width and a pair of jack studs to support them. Stack and nail these together. The process of installing a door includes:- Insert the header into the door space and shim it to ensure it is level.
- Carpentry skills are pivotal when setting the door frame, as errors can cause issues with door operation.
- Use 16d nails to affix the door frame into the prepared opening, checking for plumb and level throughout the process.
- Finally, install the doors once the closet’s interior is completed, selecting a style that complements the sections of your new walk-in closet.
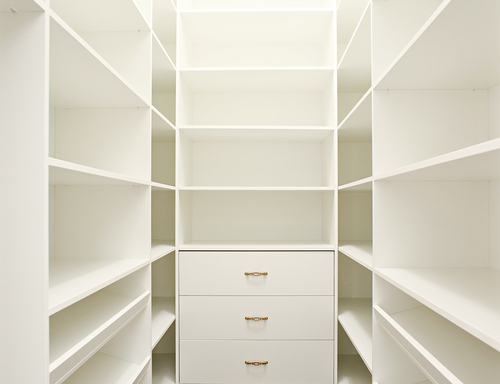
Adding Closet Components
When designing your walk-in closet, the selection and placement of shelves, rods, and other components are crucial for achieving maximal storage and functionality.Setting Up Shelves and Rods
Begin by determining the height and width of your shelves and rods to accommodate items like coats and dresses which require more hanging space. For shoe storage and folded clothes, shelves should be spaced about 10 to 12 inches apart. To install, you’ll need a level, wood or wire shelving, brackets, and screws. Start with the shelving high up for less frequently used items and move down to double-hang space for shirts and pants, ensuring efficient use of space. When installing rods, they should be at least 42 inches from the floor for long-hanging items, and a secondary rod can be added below for shorter items, doubling your hanging rods capacity. Ensure all fastenings are secure in the wall or wood backing for stability to support the weight of heavy items.Fitting Drawers and Accessories
Next, incorporate drawers and accessories that fit neatly into the design. For optimal organization, include a variety of drawer sizes to store accessories and smaller items. Drawers should be constructed from durable materials like wood and can be customized with dividers for items like jewelry or belts. When adding accessories such as hooks and baskets, consider your most-used items. Hooks are ideal for bags and hats, while baskets can be perfect for scarves or workout gear. Ensure there’s a place for everything. Adding storage systems for specific accessories helps maintain order and accessibility. Don’t forget to install adequate lights to maintain visibility, sticking to a neutral paint that complements your room yet highlights your clothing for a functional yet aesthetically pleasing closet.Finishing Touches
After assembling the fundamental structure of your walk-in closet, focusing on the finishing touches will transform the space into an organized and aesthetically pleasing haven. Pay close attention to the details of painting, decorating, and lighting to ensure your walk-in closet is not only functional but also reflects your personal style.
Painting and Decorating
Choosing the right paint for your walk-in closet walls is crucial. Select a hue that complements your decor and enhances the perception of space. Applying a light, neutral color can make your closet feel more open and airy. When decorating, consider incorporating a statement piece such as a full-length mirror which adds functionality and a spacious feel. For an organized look, use matching hangers and storage baskets to keep clutter at bay and give your belongings a dedicated spot.- Paint Tips:
- Choose semi-gloss or satin finish for durability.
- Utilize painters tape for clean edges.
- Decorating Ideas:
- Use wall-mounted hooks for accessories like scarves or ties.
- Incorporate a plush rug for a cozy touch.
Lighting Installation
A meticulously designed lighting plan is essential to find your items with ease and showcase your closet. Install bright yet warm lighting fixtures that illuminate the contents of your closet without being harsh. Consider LED strip lights for shelves and drawers for enhanced visibility. Task lighting in particular areas can be achieved with recessed or pendant light fixtures.- Lighting Suggestions:
- Select adjustable or dimmable lights to suit different times of the day.
- Ensure even distribution to avoid shadows and dark corners.
Customization Options
Crafting your walk-in closet to meet your specific storage needs and personal style is critical. It’s about selecting the right elements that not only maximize space but also reflect your lifestyle.Personalizing Storage Solutions
For custom cabinetry within your walk-in closet system, assess the volume and types of items you plan to store. Adjustable shelves offer the flexibility to store items of various sizes, from bulky sweaters to delicate scarves. Incorporating storage options such as drawers for jewelry and cubbies for shoes allows you to design a closet that caters specifically to your collection.- Storage Needs:
- Shirts/Blouses: Hanging Rods
- Pants/Dresses: Longer Hanging Sections
- Shoes: Customizable Shelving/Cubbies
- Accessories (Ties, Scarves): Specialized Organizers
Additional Features for Convenience
Your closet should be more than just storage; it’s a functional space that can offer convenience. A valet rod provides a place to set out outfits for the next day or to hang clothing as you unpack. Dress up the space with a chandelier for a touch of elegance and to ensure proper lighting, highlighting the contents of your closet in clear view.- Convenience Add-Ons:
- Lighting: Bright LEDs, Accent Lights, or a Chandelier
- Mirrors: Full-length for Outfit Assessment
- Seating: A Bench or Chair for Comfort
- Accessory Storage: Velvet-lined Drawers for Watches and Jewelry
Maintaining Your Closet
Maintaining your walk-in closet involves two key practices: organization and upkeep. An organized space not only looks appealing but also enhances functionality, while regular checkups ensure everything continues to serve your storage needs efficiently.Keeping Your Closet Organized
To keep your walk-in closet organized, you must first assess your storage needs. Investing in a mix of storage options such as shelving, drawers, and hanging rods allows you to allocate a place for every item according to its use and frequency of use. For instance:- Shelving: Best for items you often reach for, like daily wear or accessories.
- Drawers: Ideal for smaller items to keep them neatly tucked away.
- Hanging rods: Separated by length can cater to dresses, suits, and shirts efficiently.
Regular Checkups and Adjustments
Your walk-in closet will evolve with your changing lifestyle and storage needs. Schedule regular checkups every quarter to:- Evaluate if the current configuration fits your needs.
- Adjust shelving heights or compartment sizes to accommodate new items.
- Inspect for wear and tear—it’s easier to replace a damaged shelf or rod before it causes a bigger storage headache.
Frequently Asked Questions
Building a walk-in closet in an existing room requires careful planning, smart budgeting, and a touch of creativity. This section will address some common questions to guide you through the process.What are the essential steps to frame a closet in an existing room?
To frame a closet, you need to design the layout, measure the space accurately, construct the frame using studs, and ensure everything is properly secured and level. Detailed tutorials like this DIY walk-in closet build can provide step-by-step guidance.How can you build a budget-friendly walk-in closet using DIY methods?
A budget-friendly walk-in closet can be created by repurposing existing furniture, using budget materials, and doing the labor yourself. Research and planning, as suggested in resources like Storables’ guide, can help maximize your budget.What are the best practices for converting a small bedroom into a walk-in closet?
When converting a small bedroom, start by decluttering and planning your layout to optimize space. Aim for a balance of hanging areas, shelves, and drawers, focusing on maximal visibility and accessibility for your items. Incorporating design elements that reflect personal taste can turn it into a stylish and functional closet space, as highlighted in Closet America’s guide.What are the estimated costs associated with constructing a walk-in closet in an existing room?
The costs can vary widely depending on size, materials, and whether you hire professionals or do it yourself. Prices can range from a few hundred dollars for a simple DIY project to several thousand for a high-end renovation. Keep in mind that factors like electrical work and custom cabinetry will contribute to the overall cost.How can someone incorporate a walk-in closet into a space without an existing closet?
Incorporating a walk-in closet without an existing closet structure is achievable by sectioning off part of the room or by adding a freestanding closet system. Utilize room dividers or build new walls to create a separate closet space within the room. Home Atlas’ guide to adding closets may provide valuable insights.What considerations should be made when planning to add a walk-in closet to a house?
Consider the location, accessibility, lighting, ventilation, and how the addition will affect the flow of your home. It’s also important to think about the resale value and whether the changes will be appealing to future buyers. Good planning and design can result in increased functionality and overall home value.RECENT BLOGS


Our Reviews

Glenda Lanier Prowell
1721758635
I have ordered an 11 yard dumpster to be delivered to my house.Lonier was extremely helpful and answered all my questions. The rate was very reasonable.

Cedric Smikle
1721660395
Amber was extremely professional and courteous. She answered all of my questions and even some that I didn’t know I needed to ask.

Cait Kaider
1721243051
I highly recommend Waste Removal USA for their responsiveness and how the staff work hard to provide exceptional customer service. They have done well by us and our clients. Thank you!

Easom Family
1721223306
Louiner Pierre-Louis Is awesome! Did a great job. Will definitely be using this same company for all my dumpster needs because of his awesome customer service! Thank you!!!

tabitha Vazquez
1720539988
Wonderful and fast customer service!
LATEST BLOGS
