February 28, 2024 - Benjamin Ehinger
DIY Basement Finishing: Essential Steps for a Successful Remodel
CALL NOW 844-762-8449
Embarking on a DIY basement finishing project can transform an underutilized space into a vibrant part of your home, whether you’re creating a cozy family room, an organized storage area, or a functional home office. The journey to a completed basement involves several steps, beginning with thorough planning and preparation, which set the foundation for a successful renovation.
One of the initial and crucial steps in preparing for basement renovation involves addressing the disposal of construction debris. Securing a home dumpster rental is an efficient way to manage waste, ensuring your work area remains clean and safe. Following waste management, the process continues with framing basement walls, installing electrical and plumbing systems, and selecting the right insulation and vapor barriers. Attention to detail is paramount when drywalling, choosing flooring, and considering ceiling options to achieve the best results for your living space.
 When finishing your basement, framing the walls is a critical step that will define the layout and structural integrity of your space. Selecting the right materials and following a comprehensive installation process are essential for a successful DIY basement finishing project.
 When finishing your basement, properly installing insulation and vapor barriers is crucial for maintaining a comfortable, moisture-free space.
 When finishing your basement, choosing the right flooring is critical for both the functionality and the aesthetic of your space. Flooring selection depends on the expected usage of your basement and the conditions native to below-ground environments.
Key Takeaways
- Planning and preparation are the foundation of a successful DIY basement finishing project.
- A home dumpster rental ensures efficient waste management and a tidy workspace.
- High-quality craftsmanship in framing, insulation, and finishing touches maximizes comfort and value.
Planning Your Basement Finishing Project
Finishing your basement yourself can add significant value to your home and provide extra living space. The key to a successful DIY basement finishing project lies in thorough planning and meticulous attention to detail.Assessing Your Space
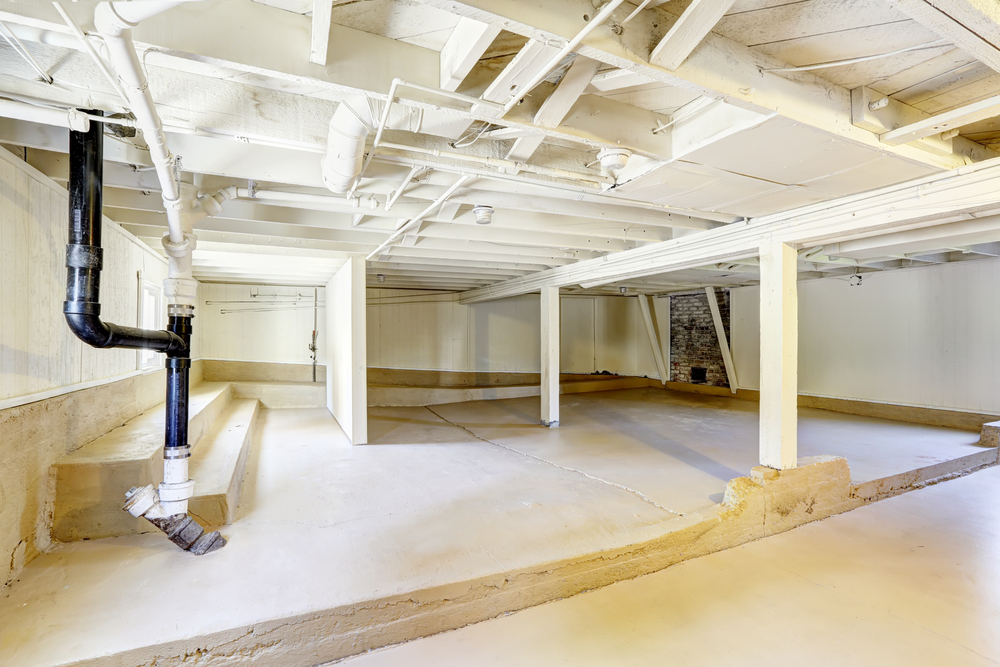
Before diving into your basement project, assess the current condition of your space. Check for any signs of moisture or water damage, as these issues need to be addressed before any work begins. Ensure that your foundation and basement floors are structurally sound and note the location of utilities which may affect the design.Design and Layout Ideas
Planning the layout is essential to maximize the functionality of your space. Consider how the basement will be used: will it be a family room, a home theater, or perhaps a spare bedroom? Think about traffic flow and plan for adequate lighting and electrical outlets. Use design software or sketch out your ideas on graph paper to visualize the layout.Budgeting and Cost Estimates
Create a detailed budget, itemizing each aspect of your project:- Materials: Drywall, insulation, flooring, etc.
- Tools: May need to be bought or rented.
- Labor: For tasks you might not perform yourself.
- Contingency: Typically 10-20% extra for unexpected costs.
Securing Permits and Understanding Building Codes
Check with your local municipality to understand what permits you must secure before starting work on your basement. Local building codes will influence various aspects of your project, including electrical wiring, plumbing, and egress windows. Compliance with these regulations is crucial for your safety and project legality.Preparing Your Basement
Turning your unfinished basement into a well-organized and inviting space involves some initial steps to ensure the longevity and safety of the renovation. It’s imperative to address moisture issues and check for structural integrity before moving forward with your DIY basement finishing project.Waterproofing and Damp Proofing
Before you start framing or insulating, it’s crucial to prevent any water problems. Begin by inspecting the interior and exterior of your basement walls for cracks or signs of moisture. For common problems, apply a sealant or use waterproof paint to protect the interior surfaces. However, more severe issues might require the installation of drain tiles, a sump pump system, or professional waterproofing measures to effectively divert water away from the foundation.Addressing Structural Issues
As you continue preparations, examine your basement for any structural concerns. Look closely at support beams, posts, and floor joists for signs of stress or damage. Any cracks in the foundation walls greater than about 1/4 inch should be evaluated by a professional. Should you find any issues, it’s imperative that these are corrected before continuing with the finishing process to avoid costly repairs down the line. If repairs are needed, consult with a structural engineer to ensure that your DIY efforts will result in a safe and stable living environment.Framing Basement Walls
When finishing your basement, framing the walls is a critical step that will define the layout and structural integrity of your space. Selecting the right materials and following a comprehensive installation process are essential for a successful DIY basement finishing project.
Choosing Materials
Before starting, it’s important to select the appropriate lumber for the frame. Pressure-treated lumber is often recommended for the bottom plate that directly contacts the basement floor, as it’s more resistant to moisture and decay. Above that, standard 2×4 or 2×6 lumber depending on your insulation requirements might be used for the vertical studs and top plates. For proper insulation, you can consider using rigid foam insulation boards or fiberglass batt insulation post framing. Ensure all materials you choose comply with local building codes.Installation Process
Start by marking your wall locations on the floor and ceiling, ensuring straight lines with a chalk line. Lay out the bottom and top plates side by side, and use a tape measure to mark the locations for your studs, typically 16 inches on center.- Assemble the wall by nailing the top and bottom plates to the studs.
- Raise the wall into place and ensure it is level and plumb, adjusting as necessary.
- Secure the bottom plate to the concrete slab using concrete nails or anchor bolts, and the top plate to the floor joists with nails or screws.
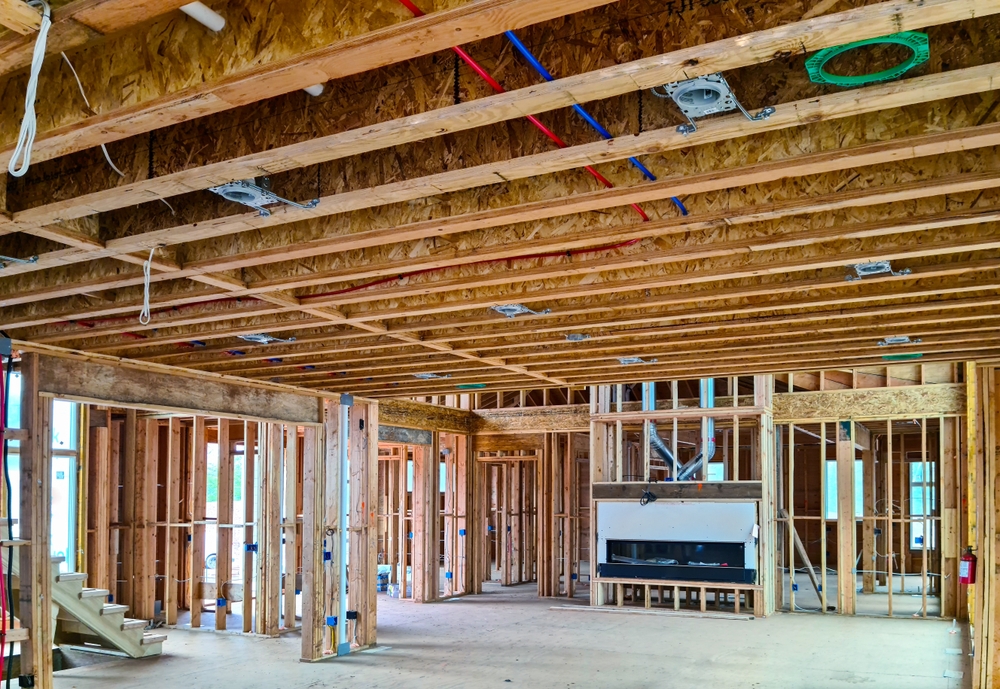
Electrical and Plumbing Systems
In the process of DIY basement finishing, ensuring the proper installation of electrical and plumbing systems is critical for both functionality and safety. It’s imperative to adhere to local codes and regulations.Wiring Basics
Before you begin, understand that wiring your basement involves more than just running cables. First, determine your electrical needs—the types of fixtures, outlets, and appliances you plan to install. You will likely need to install a subpanel, especially if your existing panel does not have sufficient capacity. All work should conform to the National Electrical Code and local amendments. Plan Your Circuit Layout:- Lighting Circuits: Consider dedicating circuits to areas or major fixtures.
- Outlet Circuits: Install GFCI outlets in areas exposed to moisture.
- Appliance Circuits: Provide individual circuits for heavy-duty appliances.
- Always switch off the main power before starting electrical work.
- Use a voltage tester to ensure wires are not live.
- Run cables correctly and secure them with cable clamps.
- Wire strippers
- Cable clamps
- Voltage tester
Plumbing Considerations
Plumbing in a basement can be challenging due to the need to ensure proper drainage and prevent backflow. Begin by mapping out your plumbing layout and consider future access for maintenance. Essential Steps:- Install a Sump Pump: Prevent water accumulation and protect against flooding.
- Sewage Ejector System: Necessary if bathroom fixtures are below the sewer line.
- Backwater Valve: Install to prevent sewage backup into your basement.
- PVC or PEX pipes
- Pipe cutter
- Wrenches
Insulation and Vapor Barriers
When finishing your basement, properly installing insulation and vapor barriers is crucial for maintaining a comfortable, moisture-free space.
Insulation Types
You have various options for basement insulation:- Fiberglass batts: Easy to handle but can absorb moisture if not properly protected
- Rigid foam boards: Provide excellent moisture resistance and are ideal for DIY basement finishing
- Spray foam: Seals gaps and cracks, however, it’s more expensive and typically applied by professionals
Installation Techniques
Proper installation is essential for insulation and vapor barriers to function correctly.- Preparation: Remove all debris and obstructions from walls. Make sure the surfaces are clean and dry.
- Cutting and Fitting: Measure your insulation material accurately and cut it to fit snugly between wall studs.
- Vapor Barrier Application:
- Apply an adhesive or mechanical fasteners to secure the vapor barrier (Steps to install a vapor barrier) to the wall.
- Overlap seams and seal with tape to prevent moisture seepage.
- Insulation Installation: Install your chosen insulation. For fiberglass batts or rigid foam, fit them against the vapor barrier, ensuring there are no gaps or spaces.
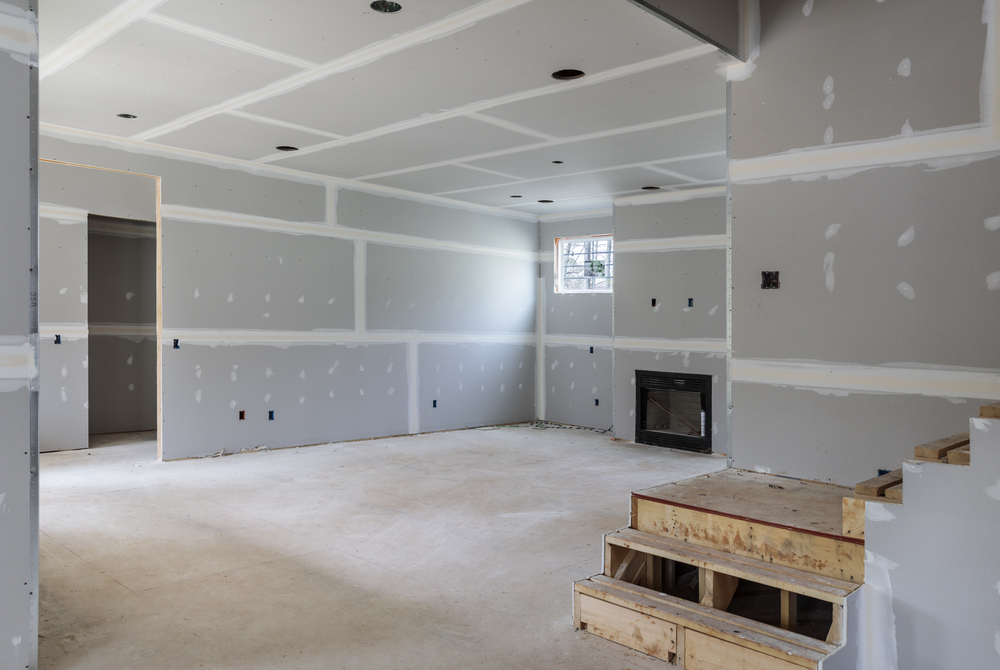
Drywalling and Finishing Walls
Finishing your basement walls correctly can transform your space into a dry, warm, and inviting area. Utilizing drywall is a popular method for finishing basement walls due to its ease of installation and ability to create a seamless canvas for decoration.Drywall Installation
When installing drywall, accuracy is essential for a professional look. Begin by measuring your walls and cutting the drywall to fit. Ensure you have the following tools for installation:- Tape measure
- Utility knife
- T-square
- Drywall saw
- Power drill
- Screws
Mudding and Sanding
After installation, the next step is mudding and sanding. Mudding covers the screw holes and seams, while sanding smooths it out for a flawless finish. It’s a three-phase process:- Apply joint compound (mud): Use a drywall knife to spread the joint compound over seams and screw holes.
- Tape the seams: Apply drywall tape over the wet mud along the seams, pressing firmly.
- Sand for smoothness: Once dry, sand the areas to a fine finish. Be sure to wear a dust mask and goggles to protect yourself from the fine dust.
Painting and Decorating
Lastly, painting and decorating are what will bring your basement to the next level. Choose a moisture-resistant primer and paint to protect against the typical humidity of a basement. Tools and materials needed include:- High-quality primer
- Interior paint
- Rollers and brushes
- Paint tray
Flooring Options
When finishing your basement, choosing the right flooring is critical for both the functionality and the aesthetic of your space. Flooring selection depends on the expected usage of your basement and the conditions native to below-ground environments.
Subfloor Requirements
Moisture Resistance: Your subfloor should provide a moisture barrier to protect against the dampness common in basements. Options like dimpled plastic underlayment can facilitate air flow and combat moisture. Insulation: To ensure comfort, your subfloor should have insulative properties. Rigid foam insulation can be coupled with plywood or OSB (Oriented Strand Board) to create a warmer surface above the concrete.Choosing Flooring Materials
- Epoxy Paint: A cost-effective and DIY-friendly option is applying a waterproof coating like epoxy paint. It is particularly suitable for areas like workshops or utility rooms.
- Vinyl: Luxury vinyl tile or planks provide durability and moisture resistance, making them an ideal choice for a finished basement that might experience occasional leaks or spills.
- Carpet: For a cozier feel, carpet tiles can be easily replaced if damage occurs. Select a style with a built-in moisture barrier to prevent mold and mildew growth.
- Tile: Porcelain or ceramic tiles are superb for their water resistance. They also offer a wide range of styles and are capable of withstanding heavy foot traffic.
Ceiling Considerations
When finishing your basement, the ceiling is a pivotal element that affects both aesthetics and functionality. Choosing the right type of ceiling for your space can enhance its appearance and meet practical needs like accessibility and sound control.Drop Ceilings Versus Drywall
Drop Ceilings: Often referred to as a suspended ceiling, a drop ceiling consists of a metal grid hung by wires from the overhead structure. Tiles or panels are placed into this grid. This option allows you easy access to plumbing and electrical systems. An advantage of drop ceilings is the ability to replace tiles individually and a variety of styles to fit your design.- Pros:
- Accessible for repairs
- Easier to install
- Flexible design options
- Cons:
- Reduces ceiling height
- May look more commercial
- Pros:
- Clean, finished appearance
- Can be cost-effective
- Better for creating a traditional room feel
- Cons:
- Harder to access utilities above
- More difficult to install
Acoustic Treatments
Improving the sound quality in your basement is another crucial factor. Acoustic treatments can reduce noise transfer and enhance the listening environment within the space.- Absorption Materials: They decrease echo and reverb by absorbing sound. This can be implemented through acoustic ceiling tiles or panels specifically designed for sound management, which can be part of your drop or drywall ceiling structure.
- Isolation Techniques: Use methods such as resilient channels or soundproof insulation to isolate sounds from the floors above. This is especially useful if the basement will serve as a media or entertainment area.
Lighting and Electrical Finishes
When you undertake a basement finishing project, the proper selection and arrangement of lighting and electrical fixtures are crucial to creating a space that is both functional and inviting.Selecting Fixtures
Choose lighting fixtures that match your basement’s intended use. If it’s a workspace, bright, direct lights such as LED panel lights are a practical choice. For a cozy living area, consider softer, diffused lighting options like wall sconces or dimmable overhead fixtures. Ensure all your electrical products are rated for safe use in a basement environment, which can be damper than other areas of your home.Lighting Design
Your lighting design should strategically illuminate the entire basement without leaving dark corners. Combine various types of lighting such as ambient, task, and accent to achieve a balanced look. For instance, recessed lighting can provide overall ambiance, while track lighting or under-cabinet lights can serve as task lighting above workspaces. Always plan for enough electrical outlets to cater to entertainment systems, appliances, and chargeable devices.Interior Design and Final Touches
Once you have the structure of your basement in place, it’s time to focus on the interior design and final touches that will transform your space into an inviting and personalized area.Baseboard and Trim Work
After painting, install baseboards and trim work to give your basement a finished look. Choose trim that complements both the paint color and the flooring for a cohesive design. Accurate cutting and measurement are vital for a professional appearance, so take your time with this step. For a detailed guide, consider checking out The Ultimate Basement Finishing DIY Guide.Furniture and Decor
Next, select furniture and decor that align with the intended use of your basement, whether it’s a home theater, a playroom, or a guest suite. Opt for furnishings that maximize both comfort and functionality. Area rugs, lighting fixtures, and wall art are the elements that will inject personality into your space. For inspiration and ideas, explore 16 Basement Ideas – Bob Vila.Safety and Inspections
Before diving into the hands-on work of finishing your basement, prioritize understanding safety norms and inspections. These steps ensure your space complies with regulations and is safe for occupation.Egress Requirements
For your safety, building codes require that livable basements have an emergency exit. This egress must meet specific size dimensions: a minimum opening area of 5.7 square feet and a minimal height and width of 24 inches and 20 inches, respectively. For convenience, the Family Handyman offers more details on how these requirements might apply to your project.Final Inspection Checklist
Once your basement project nears completion, prepare for a final inspection to ensure everything is up to code. A comprehensive checklist includes:- Smoke detectors: Installed and functionally tested.
- Electrical system: All wiring, outlets, and panels confirmed to code.
- Plumbing: Drains, supply lines, and fixtures checked for leaks and proper installation.
Frequently Asked Questions
Navigating the complexities of DIY basement finishing can raise several questions, from costs to task prioritization. These FAQs provide focused answers to help you plan effectively.What is the average cost of DIY finishing a basement?
The cost of finishing a basement yourself can range from approximately $4,700 to $22,850, varying based on the size of your basement and the materials you choose.What is the right dumpster size for my DIY basement finishing project?
Selecting the correct dumpster size for your project typically depends on the scale of your renovation but starting with a 10-yard dumpster or 20-yard dumpster is common for residential DIY basement projects.What are some budget-friendly ideas for finishing a basement?
You can keep costs down by opting for cost-effective materials like laminate flooring and by doing tasks such as painting or installing trim work yourself.What steps are involved in finishing a basement on your own?
Finishing a basement includes a sequential process of planning, waterproofing, framing, electrical work, insulation, drywalling, and finally, decorating.How should I prioritize tasks when finishing my basement?
Your first priority should be addressing any moisture issues, followed by framing, electrical, insulation, and drywall in that sequence. Always start with structural and safety-related tasks before the cosmetic touches.What is the first step in the DIY basement finishing process?
The initial step in DIY basement finishing is planning your layout and understanding local building codes, followed closely by waterproofing and moisture control measures.What tends to be the most costly aspect of basement finishing?
The most expensive aspects often include professional services like plumbing and electrical work, along with the cost of materials such as drywall and insulation.RECENT BLOGS


Our Reviews

Glenda Lanier Prowell
1721758635
I have ordered an 11 yard dumpster to be delivered to my house.Lonier was extremely helpful and answered all my questions. The rate was very reasonable.

Cedric Smikle
1721660395
Amber was extremely professional and courteous. She answered all of my questions and even some that I didn’t know I needed to ask.

Cait Kaider
1721243051
I highly recommend Waste Removal USA for their responsiveness and how the staff work hard to provide exceptional customer service. They have done well by us and our clients. Thank you!

Easom Family
1721223306
Louiner Pierre-Louis Is awesome! Did a great job. Will definitely be using this same company for all my dumpster needs because of his awesome customer service! Thank you!!!

tabitha Vazquez
1720539988
Wonderful and fast customer service!
LATEST BLOGS
