February 6, 2024 - Benjamin Ehinger
How to Finish a Basement: A Step-by-Step Guide
CALL NOW 844-762-8449
Learning how to finish a basement can transform underutilized space into a vibrant and functional area of your home. Whether you’re adding extra bedrooms, a home office, or a dedicated play area for children, the process requires thorough planning and a good understanding of construction principles. To ensure the best results, it’s essential to address moisture control and insulation, select appropriate materials, and design the space to suit your needs. Along the way, you’ll generate a substantial amount of waste from old materials and construction debris, which is where a construction dumpster rental becomes invaluable to maintain a clean and organized worksite.
You’ll need to consider legal aspects, including permits and building codes, before embarking on your basement renovation project. Proper planning prevents costly mistakes and legal issues down the line. It’s also critical to ensure that waterproofing, foundational work and proper framing are in place to avoid future structural or moisture-related problems.
Integrating essential services like electrical wiring, and plumbing, and ensuring adequate lighting and ventilation will make the space both comfortable and functional. When these steps are completed with attention to detail, the final inspection should be a seamless process, affirming your basement’s safety and adherence to code.
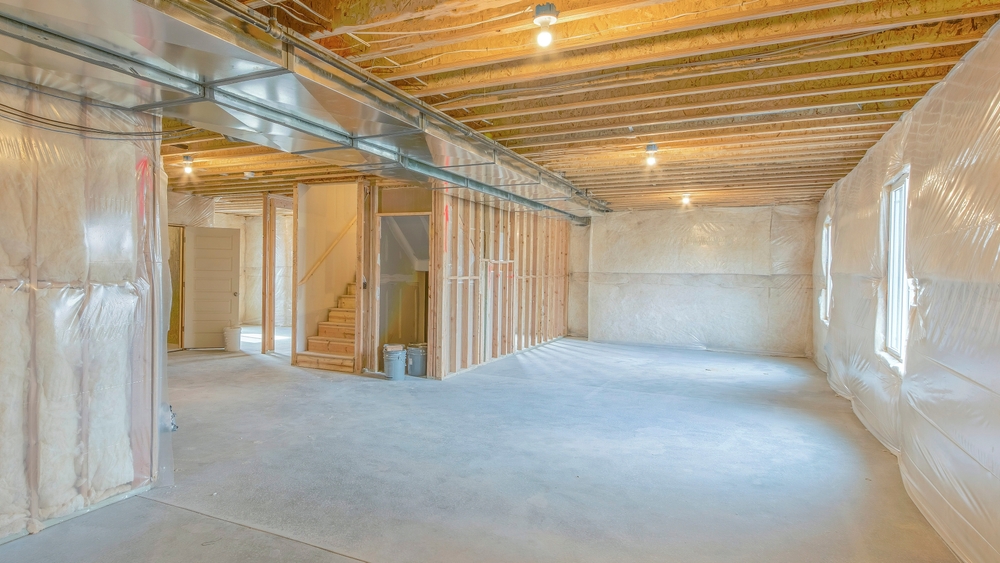 Before transforming your basement into a comfortable living space, it’s vital to properly frame the walls and install insulation. These steps will ensure structural stability and energy efficiency.
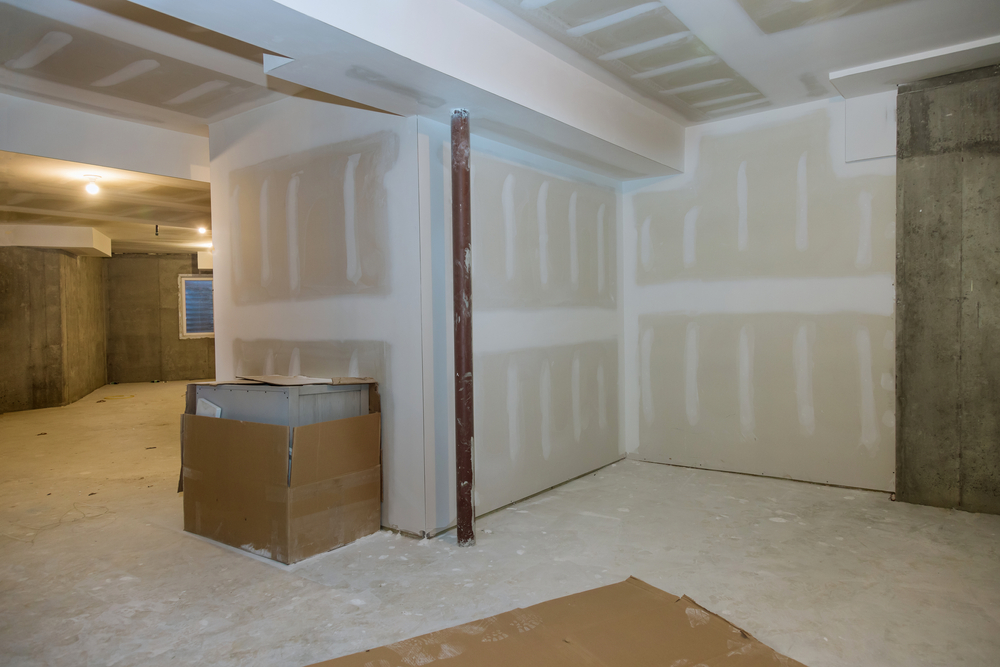 When finishing your basement, the installation of drywall and the choice of ceiling type are crucial for both aesthetics and functionality. These elements define the look and feel of your space.
Key Takeaways
- Proper planning and waste management with a dumpster rental are keys to a successful basement finish.
- Addressing legal, structural, and waterproofing aspects early on ensures a durable and compliant space.
- Focusing on the integration of services and final touches results in a comfortable, functional basement area.

Planning Your Basement Finish
Proper planning is crucial to transforming your basement into a functional and comfortable living space. This involves assessing current conditions, establishing a budget, and designing the optimal layout.Assessing Your Space
Before you begin, inspect your basement for any signs of dampness or water damage that need to be addressed. Make sure that you have adequate headroom, especially if you’re planning to add drop ceilings or needing to conceal ductwork. Consult professionals if structural changes are required.Setting a Budget
Start by determining how much you’re willing to spend on your basement project. Break down your budget to account for labor, materials (like drywall, insulation, and flooring), permits, and a contingency for unexpected costs. Use a simple table to help visualize and allocate your funds:| Expense Category | Allocation |
|---|---|
| Labor | 40% |
| Materials | 30% |
| Permits | 10% |
| Contingency | 20% |
Designing the Layout
Define the purpose of your finished basement—will it be a family room, home office, or a guest suite? Use tape on the floor to mark out wall placements and the locations of windows and doors. Take the time to strategically plan for electrical outlets, lighting fixtures, and any special features like a wet bar or home theater. For guidance on incremental layout planning, visit What is the best way to incrementally finish an unfinished basement?.Legal Considerations
When finishing your basement, adhering to legal requirements is non-negotiable. You’ll navigate two main legal checkpoints: building codes and the permit process.Understanding Building Codes
Building codes are essential regulations that determine how construction projects are executed. These codes ensure safety, structural integrity, and adherence to construction standards. Before starting your basement project, review your local building codes to see the specific criteria your basement renovation must meet. Standards commonly include requirements for ceiling height, ventilation, electrical wiring, and egress.Securing Permits
Permits are official documents that authorize you to commence construction within compliance of local codes. The permit process involves submitting detailed plans of your proposed project to local authorities, which they review against the building codes. Not securing the necessary permits can lead to fines, mandatory changes, or even removal of unauthorized work, so it’s crucial to obtain them before construction begins.Waterproofing and Foundation
Before finishing your basement, it’s imperative to ensure that your foundation is secure and moisture issues are addressed. Failure to properly waterproof can lead to significant damage and costly repairs.Addressing Moisture Issues
You must assess your basement for any signs of moisture before beginning any finishing work. Moisture can manifest as damp walls, a musty smell, or efflorescence—a white powdery substance on concrete surfaces. To prevent water intrusion, ensure that your gutters and downspouts are correctly installed and direct water away from your foundation. Additionally, apply interior waterproofing methods such as sealants or water-resistant paints to protect against moisture seeping through walls.Repairing Foundation Cracks
Inspect your foundation walls for cracks—these can be pathways for water to enter your basement. Small cracks may be repaired with epoxy or polyurethane foam injections, which provide a flexible and waterproof seal. However, if you observe larger cracks or structural issues, it is crucial to consult a professional for assessment and potential repair. Properly addressing these issues before finishing your basement will help ensure a dry and stable environment.Framing and Insulating
Before transforming your basement into a comfortable living space, it’s vital to properly frame the walls and install insulation. These steps will ensure structural stability and energy efficiency.
Choosing Materials
When selecting materials for framing your basement, opt for metal studs or treated lumber, as these resist moisture better than regular wood studs. Treated lumber is particularly resilient against potential basement dampness. Insulation material should either be extruded polystyrene foam or spray foam. Both provide excellent insulation and resist moisture.Installing Insulation
Begin the installation process by applying 3/4-inch extruded polystyrene foam insulation directly to your foundation walls and rim joists to create a moisture barrier. If you choose spray foam, ensure it fills the gaps between framing and foundation walls for a seamless vapor barrier. When using foam boards, tape all the seams to prevent air leaks. For the framing, secure your chosen materials directly to the basement floor and ceiling, keeping them insulated and creating the framework for your wall coverings. Always follow local building codes to ensure proper safety and energy efficiency standards are met.Electrical and Plumbing
When finishing your basement, it’s crucial to plan for both electrical and plumbing needs. Proper wiring ensures safe power distribution, while plumbing installation allows for functional bathrooms and wet bars.Wiring Your Basement
Before adding any electric outlets or fixtures, determine the total power requirements and decide on the source of electricity. It’s wise to have a circuit map to avoid overloading. Here are the steps for wiring:- Assess Current Electrical System: Ensure your current electrical service can handle additional basement circuits.
- Plan Your Circuit Layout: Position outlets every 6 feet at minimum and include GFCI outlets in wet areas.
- Install Conduits and Wires: Follow building codes for placement and securing of conduits.
Adding Plumbing Systems
Adding plumbing to your basement involves more than just connecting pipes. It often requires breaking into the concrete slab, which should align with your overall basement design.- Map Out Your Plumbing: Early planning ensures that water and waste lines are properly routed.
- Plan for Bathroom and Kitchen/Bar Areas: These areas require careful planning for both supply and waste lines.
- Understand Venting Requirements: Proper venting is crucial for the plumbing system to function correctly.
- Get the Right Permits: Plumbing often requires permits; check with your local building department.
Drywall and Ceiling
When finishing your basement, the installation of drywall and the choice of ceiling type are crucial for both aesthetics and functionality. These elements define the look and feel of your space.
Hanging Drywall
To properly hang drywall, you’ll need to measure and cut the sheets to fit each section of your wall. Start by installing panels on the ceiling before moving to the wall to help support the edges of the ceiling panels. Use a drill to attach the drywall to the framing with screws, spacing them about 16 inches apart. It’s essential to ensure that the screws are inset but do not break the paper surface. For further guidance, you might find the video on How to Hang Drywall Ceilings particularly helpful.Ceiling Options
Your basement ceiling contributes significantly to the room’s insulation and soundproofing. One efficient approach is to paint the exposed ceiling for an industrial look which also provides easy access to any wiring or plumbing above. If you prefer a more traditional look, consider installing drop ceilings which allow for easy repair and maintenance, or drywall ceilings for a seamless finish. Both options can be enhanced with recessed lighting for a modern touch. For creative ceiling solutions, you may want to explore Ideas and Tips for Finishing a Basement Ceiling. Remember to account for any ductwork or pipes by creating soffits or using drywall to conceal them neatly.Flooring Choices
When finishing your basement, the flooring you choose not only has to suit your aesthetic preferences but also needs to cope with the unique environment of a below-grade space.Selecting Materials
Your basement floors require materials resilient to moisture and humidity, as these conditions are common in underground areas. Options like epoxy provide a waterproof seal, while vinyl planks or tiles offer durability and ease of maintenance. If you prefer a more natural look, engineered wood is designed to handle moisture better than traditional hardwood. Here’s a quick glance at some viable flooring materials for your basement:- Paint: Economical but offers limited protection and aesthetic appeal.
- Epoxy: Creates a durable, moisture-resistant surface.
- Tile: Ceramic or porcelain tiles are long-lasting and moisture-resistant.
- Rubber Tiles/Sheets: Provide comfort and water resistance.
- Vinyl Planks/Tiles: Mimic hardwood and are moisture resistant.
- Sheet Vinyl: Seamless and offers excellent water resistance.
- Engineered Wood: Structurally stable and suitable for damp environments.
Installation Techniques
The method you use to install your flooring depends on the material selected and the current state of your basement’s concrete floor. For example, vinyl flooring can be directly applied to dry, level concrete or over a plywood subfloor, if additional insulation or moisture barriers are deemed necessary. It’s crucial to ensure the subfloor is level and dry regardless of the material; for materials like tile, a proper underlayment is essential to prevent cracking and ensure a lasting finish. Remember that certain materials like engineered wood might require a floating floor installation to accommodate for the potential expansion and contraction due to basement humidity levels. Always check the manufacturer’s guidelines for specific installation instructions to guarantee optimal performance and preservation of your chosen flooring.Interior Finishing Touches
Once the major work of finishing your basement is complete, it’s time to focus on the details that transform the space into a polished area. Interior finishing touches such as the right paint colors and well-crafted trim can substantially enhance the appearance and feel of your basement.Choosing Paint Colors
When deciding on paint colors for your basement, consider the lighting and natural ambiance of the space. Basements often have less natural light, so opting for light or bright colors can help open up the area, making it feel larger and more inviting. For a cohesive look, align your color choices with the overall color scheme of your home.- Light Pastels: Create a sense of spaciousness
- Rich Tones: Add depth and warmth to specific areas
Trim and Molding Installation
Trim and molding add both style and structure to your finished basement. They frame windows, doors, and walls, contributing to the overall aesthetic.- Baseboards: Typically 3-5 inches in height, baseboards bridge the gap between your flooring and the wall.
- Crown Molding: Positioned between the wall and ceiling, crown molding provides an elegant transition.
- Door and Window Casings: Define the perimeter of these features and provide a finished look.
Lighting and Ventilation
In a well-finished basement, adequate lighting and proper ventilation are critical for comfort and safety. Lighting should accommodate the various activities the space will host, while ventilation is essential to maintain air quality and prevent moisture issues.Installing Light Fixtures
When installing light fixtures, think layered lighting: ambient, task, and accent. Use recessed lighting for a clean, streamlined look that provides widespread illumination. For tasks such as reading or crafting, consider LED strip lights under cabinets or shelving. Accent lighting can highlight architectural features or artwork. Remember to place them strategically to optimize light spread and avoid shadows. Consider incorporating dimmer switches to adjust lighting levels according to the time of day or the mood you wish to set.Ensuring Proper Ventilation
The key to maintaining air quality in your basement is a ventilation system that replaces stale air with fresh air. To prevent mold and eliminate musty odors:- Install exhaust fans to remove humid air, especially if the basement includes a bathroom or kitchenette.
- Use dehumidifiers to maintain a healthy humidity level, generally between 30-50%.
- Incorporate air purifiers to capture airborne particles and improve overall air quality.
- If possible, extend your home’s HVAC system into the basement for a consistent and controlled environment.
- Natural ventilation is also beneficial. Utilize existing windows or install new egress windows to facilitate airflow and provide an emergency exit route.
Final Inspection and Safety
Completing your basement involves adhering to local building codes and implementing safety measures to pass the final inspection. This section guides you through these critical steps to ensure your basement is up to standard.Passing Final Inspection
To pass the final inspection, your basement renovation needs to meet specific criteria set by local regulations. This involves a thorough check of electrical wiring, plumbing, HVAC systems, and egress points. Ensure that:- Electrical: All wiring conforms to the National Electrical Code. This includes proper circuit breaker installations and fault protection.
- Plumbing: No leaks are present and that all fixtures have been tested.
- HVAC: Any installed systems for heating, ventilation, and air conditioning are up to code, with adequate venting and insulation.
- Egress: There is at least one accessible egress window or door in case of emergency, as stipulated by the International Residential Code (IRC).
Implementing Safety Measures
Safety in your finished basement is paramount and should be addressed in every area:- Smoke and Carbon Monoxide Detectors: Install these devices in accordance with the recommendations for life safety.
- Fire Extinguishers: Keep at least one fire extinguisher on each level of your home, including the basement.
- Escape Routes: Clearly mark and keep unobstructed paths to egress windows or doors.
Frequently Asked Questions about How to Finish a Basement
What are effective strategies to finish a basement on a budget of $5,000?
To finish a basement on a budget of $5,000, prioritize the essentials such as insulation and drywall installation, and consider doing the painting and flooring yourself. Look for cost-saving materials and perhaps reuse or repurpose items when possible.Which part of the basement finishing process typically incurs the highest cost?
Structural repairs and waterproofing are typically the most expensive aspects of a basement finishing project. It’s crucial to address these foundational issues before proceeding with cosmetic updates and furnishings.Can a homeowner undertake the basement finishing process independently, and what should they consider?
A homeowner can undertake the basement finishing process independently, provided they have the necessary skills and knowledge. It’s essential to understand building codes, acquire the appropriate permits, and be prepared to invest a significant amount of time and effort into the project.What is the recommended sequence of steps for finishing a basement efficiently?
To finish a basement efficiently, start with inspecting and repairing any foundational issues, then move on to waterproofing, framing, electrical and plumbing work, insulation, drywall, painting, flooring, and finally, trim and finish work.What approaches are best for dealing with concrete walls when finishing a basement?
For concrete walls, options include applying waterproof paint, installing rigid foam insulation panels followed by framing, and using drywall for a finished look. Ensure the walls are moisture-free prior to covering them to prevent mold.How should one approach finishing a basement floor to ensure durability and aesthetic appeal?
For basement floors, consider using moisture-resistant materials such as vinyl planks, ceramic tiles, or epoxy coatings. These materials can resist damp conditions common in basements and come in a range of designs to enhance the space’s appearance.Which dumpster rental size should I use for a basement finishing project?
The size of the dumpster rental for a basement finishing project depends on the extent of the renovation. For a typical basement remodel, a 20-yard dumpster is often sufficient to handle the waste and debris.RECENT BLOGS


Our Reviews

Glenda Lanier Prowell
1721758635
I have ordered an 11 yard dumpster to be delivered to my house.Lonier was extremely helpful and answered all my questions. The rate was very reasonable.

Cedric Smikle
1721660395
Amber was extremely professional and courteous. She answered all of my questions and even some that I didn’t know I needed to ask.

Cait Kaider
1721243051
I highly recommend Waste Removal USA for their responsiveness and how the staff work hard to provide exceptional customer service. They have done well by us and our clients. Thank you!

Easom Family
1721223306
Louiner Pierre-Louis Is awesome! Did a great job. Will definitely be using this same company for all my dumpster needs because of his awesome customer service! Thank you!!!

tabitha Vazquez
1720539988
Wonderful and fast customer service!
LATEST BLOGS
