April 5, 2024 - Benjamin Ehinger
DIY Attic Insulation: A Step-by-Step Installation Guide
CALL NOW 844-762-8449
Ensuring your home is properly insulated can save on energy costs and enhance the comfort of your living space. Many homeowners overlook the attic when thinking about insulation, but it’s a critical area where heat can easily escape during the winter and accumulate during the summer. DIY attic insulation is a feasible project that can lead to significant benefits, and it’s important to understand the various steps and considerations involved. Getting familiar with insulation types and R-value is essential, as this will determine the insulation’s ability to resist heat flow. The right choice can make a dramatic difference in your home’s energy efficiency.
Before starting your DIY attic insulation project, assessing your attic space is necessary. It’s crucial to check for any existing insulation, measure the space accurately, and determine what additional materials you may need. Preparing for the project includes sealing air leaks, which can hinder the performance of your insulation, and ensuring proper ventilation with baffles and vents to prevent moisture build-up. Installing the insulation itself can be done with batts or rolls, or through a blown-in method, both of which have their own advantages and best-use scenarios.
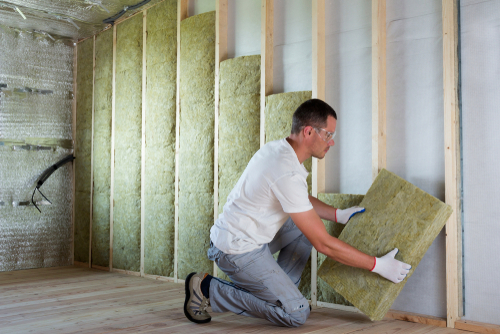 Before you start insulating your attic, it’s essential to prepare the area and ensure your safety. You will need to gather the right tools and materials, and take necessary safety precautions to prevent any potential hazards.
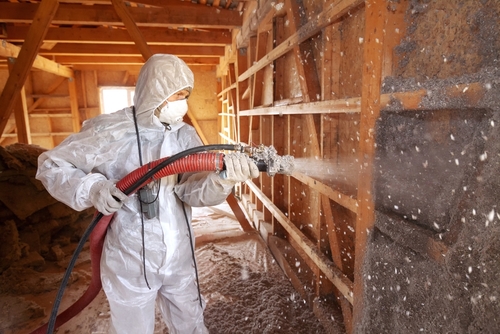 When you decide to insulate your attic, choosing the right materials and installation method can greatly impact the effectiveness of your insulation. Batt insulation, commonly made from fiberglass, provides a cost-effective and easy-to-install option. It’s essential to handle the material properly and avoid any unnecessary compression to maintain its insulative properties.
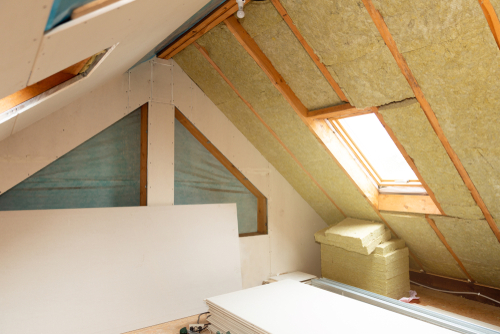 Before diving into DIY attic insulation, it’s imperative to take into account the materials you might encounter and the functionality of your attic space. Considering these factors ensures a safe and efficient insulation process.
Keep in mind, selecting the right insulation material and ensuring proper installation are key factors in achieving the best results for your DIY attic insulation project. Consider consulting with a professional or utilizing reliable DIY guides to add more insulation to your attic effectively.
Key Takeaways
- Proper attic insulation can lead to significant energy savings and increased home comfort.
- Understanding the insulation process involves choosing the right type of insulation and preparing the attic space.
- The DIY installation can involve batt or blown-in insulation, with attention to sealing leaks and ensuring adequate ventilation.
Understanding Insulation and R-Value
When it comes to improving your home’s energy efficiency and comfort, the right attic insulation is key. It is essential to understand the types of insulation available and the role of R-value in insulation performance.Types of Attic Insulation
Your choices for attic insulation are varied, each with its own applications and benefits. Fiberglass batt insulation is commonly used due to its ease of installation and effectiveness. It comes in pre-cut panels that fit neatly between attic rafters. Loose fill insulation, on the other hand, comprises small particles that can fill nooks and crannies, which is excellent for attics with irregular joist spacing or numerous obstructions. Cellulose insulation falls into this category and is known for its eco-friendly nature as it often contains recycled materials. Another convenient form is roll insulation, similar to batts but comes in continuous rolls that you can cut and fit as needed.What Is R-Value?
The term “R-value” refers to the capacity of an insulation material to resist heat flow, a critical factor in your insulation choice. The higher the R-value, the greater the insulation’s effectiveness. Energy Star recommends specific R-values for different climatic zones. For instance, in colder regions, you may need a higher R-value, such as R-49, while in milder climates, R-38 may suffice. Remember, adding insulation with a higher R-value to your attic can significantly reduce your heating and cooling costs while also making your home more comfortable.Assessing Your Attic
Before adding new insulation to your attic, it’s essential to evaluate the existing condition thoroughly. A comprehensive assessment will inform you of necessary upgrades and help maintain your home’s energy efficiency.Inspecting Existing Insulation
Inspect your current insulation to see if it’s up to the job. Look for insulation that is level with or below the attic joists – this indicates you might need to add more. Insulation well above the joists suggests adequate coverage; however, be alert for areas where it may be compressed or uneven. Remember to check the perimeter of your attic, as well as areas near the eaves and rafter vents, which are prone to insufficient insulation.Identifying Air Leaks
Air leaks can undermine insulation’s effectiveness. Focus your search around attic hatches, plumbing vents, exhaust fans, and wiring holes. Signs of air leaks include:- Dusty insulation: May indicate air is moving through it.
- Drafts around attic entry: A sign you might need weatherstripping.
Preparing for Insulation
 Before you start insulating your attic, it’s essential to prepare the area and ensure your safety. You will need to gather the right tools and materials, and take necessary safety precautions to prevent any potential hazards.
Safety Precautions
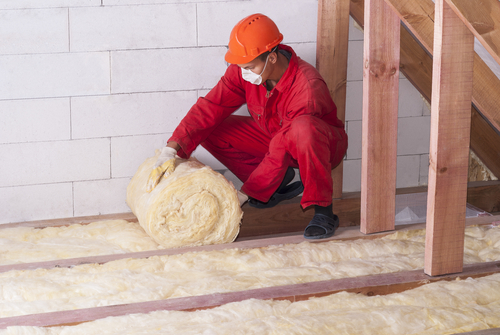
When handling insulation materials, you must protect yourself to prevent irritation and injuries. Always wear gloves and a dust mask to shield your skin and lungs from fiberglass particles or other irritants. Wearing knee pads is advisable since you’ll likely be moving around on your knees in the attic. Ensure your work area is well-lit and clear of any obstacles that might cause trips or falls, keeping safety as your top priority.Tools and Materials
To effectively insulate your home, you’ll need a few key tools and materials:- Gloves: to protect your hands from irritation.
- Dust Mask: to avoid inhaling insulating particles.
- Knee Pads: for comfort when moving across the attic floor.
- Caulk: to seal any gaps or cracks where air may leak.
Sealing Air Leaks
Sealing air leaks in your attic is essential for enhancing energy efficiency and maintaining a comfortable temperature in your home. By tackling this project, you can prevent warm or cool air from escaping, which can lead to significant savings on your energy bills.Caulking and Weatherstripping
- Caulking: Identify and seal gaps and cracks that are up to 1/4 inch wide using caulk. This method is ideal for non-moving components like window frames and the attic floor. Use a steady hand to apply the caulk smoothly, ensuring a tight seal.
- Weatherstripping: Install weatherstripping around movable components such as attic access doors and windows. This will help create a durable barrier against air leaks. Be sure to choose the appropriate type for the specific area you’re addressing.
Addressing Ductwork and Flues
- Ductwork: Inspect all your ductwork for leaks. Use mastic sealant or metal tape to seal any gaps. Remember to never use standard duct tape as it doesn’t hold up well over time. Pay special attention to the areas where ducts connect to vents and the attic floor.
- Flues: When sealing around flues or any heat-generating equipment, it’s paramount to use heat-resistant materials such as metal flashing and high-temperature caulk. This is to avoid creating fire hazards and to ensure a long-lasting seal.
Installing Baffles and Vents
Before you begin installing insulation, it’s essential to address proper attic ventilation. Baffles and vents prevent insulation from blocking airflow, reducing the risk of moisture buildup and temperature extremes that can damage your home.Soffit and Ridge Vents
Soffit Vents: Begin by ensuring your soffit vents, which are located along the underside of your roof’s overhang, are clear of obstructions. These vents allow fresh air to enter the attic. Ridge Vent: Positioned along the peak of your roof, a ridge vent works in tandem with soffit vents. It allows warm, moist air to escape from the attic. For effective performance, maintain a clear pathway for airflow, which can be achieved using rafter vents.Ensuring Proper Ventilation
Installation of Baffles:- Step 1: Check that each space between rafters aligns with a soffit vent below.
- Step 2: Insert baffles, also known as rafter vents, into these spaces. They should run from the soffit up along the underside of the roof deck.
- Tip: Pay attention to the size of your rafters to select baffles that fit well; they typically require at least 16 inches of space.
Installing Batt Insulation
 When you decide to insulate your attic, choosing the right materials and installation method can greatly impact the effectiveness of your insulation. Batt insulation, commonly made from fiberglass, provides a cost-effective and easy-to-install option. It’s essential to handle the material properly and avoid any unnecessary compression to maintain its insulative properties.
Fitting Fiberglass Batts
It is important to cut the fiberglass batts to fit snugly between the floor joists without leaving gaps. Start by measuring the length and width between the joists. If you come across any obstructions such as wiring or plumbing, carefully split the batt to fit around these without squeezing the material. You can learn more about fitting batts around cables through the Family Handyman’s guide on how to install fiberglass batt insulation. For areas where you need to install rafter vents, ensure you place them before laying the batts. This keeps the soffit vents clear and prevents any blockage of airflow. The batts should be unfaced, meaning they do not have a paper or foil facing, to prevent moisture from being trapped within the insulation.Layering and Compression Issues
Batt insulation works best when it retains its full thickness. To avoid compression issues:- Do not step on or otherwise compress the batts during or after installation.
- When applying a second layer of insulation, run it perpendicular to the first layer over the floor joists to minimize heat loss through the joists themselves.
Installing Blown-in Insulation
Blown-in insulation is an effective way to insulate your attic and improve your home’s energy efficiency. It requires specific tools and techniques to ensure it’s done correctly.Using a Blowing Machine
To install loose fill insulation, you’ll need a blowing machine, which can often be rented from your local hardware store. Before you begin, make sure you have your safety gear on, including goggles, gloves, and a dust mask.- Set up: Position the blowing machine at a convenient location, typically near your attic entry. Ensure the machine is stable and ready to use.
- Fill the hopper: Carefully pour the loose fill insulation into the hopper of the machine, avoiding spills. The hopper feeds the material into the blower.
- Operation: Turn on the machine and use the attached hose to direct the flow of insulation into the attic. Work systematically back and forth to cover the surface evenly.
Achieving Uniform Coverage
For optimal insulation, achieving uniform coverage of the blown-in material is critical. Inadequately covered areas can lead to heat loss and diminished insulation effectiveness.- Depth markings: Use depth markers to indicate the target insulation level across the attic. These can be simple markings on joists or trusses.
- Blow evenly: Move the hose in a sweeping motion to distribute the blown insulation evenly. Start from the farthest corner, and backtrack toward the attic entry.
- Fill nooks and crannies: Ensure you fill spaces around and over obstacles like wiring and pipes. Insulate up to the attic floor’s level, but don’t block soffit vents which are needed for proper ventilation.
Finishing Touches
When insulating your attic, it’s imperative to address the final details that will secure the effectiveness of your project. Ensuring proper installation of vapor barriers and careful insulation around obstacles are crucial to maximizing energy efficiency and preventing moisture problems.Installing Vapor Barriers
A vapor barrier is essential in preventing moisture from seeping into your attic insulation and compromising its effectiveness. Install a vapor barrier directly against the warm side of your attic space, typically on the floor beneath the insulation, to create an impermeable layer. This can be particularly important if you live in colder climates, as it prevents water vapor from entering and potentially condensing within the insulation.- Materials: Typically 6-mil polyethylene plastic sheeting is used.
- Installation: Lay the sheeting flat across the attic floor. Overlap sections by at least 12 inches and seal them with tape.
- Areas of caution: Avoid covering electrical boxes or vents.
Insulating Around Obstacles
Effective attic insulation requires meticulous work around obstacles such as recessed lighting, chimneys, and electrical boxes.- Recessed Lighting: Non-IC rated lights need a safety clearance to prevent fire hazards. Use metal hardware cloth or wire mesh to create a barrier, and keep at least 3 inches of space between the light fixture and insulation.
- Chimneys: Leave a safety gap around chimneys. Use metal flashing to keep insulation away and prevent a fire risk.
- Electrical Boxes: Insulate carefully around electrical boxes, using fiberglass batts or cut-to-fit rigid foam. However, never cover boxes completely as this can create a fire hazard.
- Roof Sheathing: When adding attic insulation, ensure it does not block any soffit vents, as proper ventilation is needed to protect the roof sheathing from moisture damage.
Additional Considerations
 Before diving into DIY attic insulation, it’s imperative to take into account the materials you might encounter and the functionality of your attic space. Considering these factors ensures a safe and efficient insulation process.
Handling Asbestos Materials
If your home was built before the 1980s, you may find asbestos within your attic insulation. It’s crucial to identify and not disturb asbestos materials, as they can pose serious health risks. Instead, hire a professional who is trained in safe asbestos removal or encapsulation.Attic Storage and Usage
In a finished attic that doubles as a living space, balance insulation with usability. Ensure you insulate the area adequately while considering the impact on storage and living areas. For DIY attic insulation, it’s vital to maintain accessibility without compromising on insulation effectiveness.Benefits of Attic Insulation
Attic insulation is a practical upgrade to your home that can yield significant benefits. Here’s how it can improve your living space:- Comfort: Proper insulation helps maintain a comfortable indoor climate year-round. It reduces the heat loss during cold months and minimizes heat gain during hot months.
- Energy Efficiency: An insulated attic acts as a barrier against temperature extremes. This leads to less energy required to heat or cool your home, which can result in lower energy bills.
- Cost-Effective: While the initial investment may seem significant, the cost of attic insulation often pays for itself over time through savings on your energy bills. It’s a cost-effective way to make your home more energy-efficient.
- Home Value: Adding insulation is seen as a valuable improvement to potential buyers. It can increase the market value of your property.
- Environmental Impact: By reducing the energy needed to maintain a comfortable temperature in your home, you’re contributing positively to the environment by lowering your carbon footprint.
| Insulation Form | Placement | Benefits |
|---|---|---|
| Fiberglass Batts | Between joists | Easy to install, moderately priced |
| Loose Fill | On top of existing insulation | Can fill in gaps, adaptable to irregular spaces |
| Spray Foam | Hard-to-reach areas | Provides an airtight seal, excellent for preventing moisture |
Frequently Asked Questions
When undertaking DIY attic insulation, it’s essential to know what materials to use, the safety precautions for old insulation removal, cost-effective tactics, and procedures for installation. Let’s address some common queries to ensure your attic insulation project is successful.What are the different types of insulation suitable for attics?
Your attic can be insulated with several types of materials such as fiberglass batts, loose-fill fiberglass, cellulose, and spray foam. Each has its advantages depending on your attic’s specific needs and your energy efficiency goals. For more detailed information, you may find the Comprehensive Attic Insulation Guide helpful.How can I safely remove old attic insulation by myself?
Before removing old insulation, ensure you’re equipped with protective gear like a respirator, goggles, and gloves. Seal off the area to prevent contaminants from spreading to other parts of your home. Use tools such as an insulation vacuum for loose-fill or trash bags for batts, and dispose of the waste properly. Review safety practices at ENERGY STAR’s DIY Guide to Insulation.What are the most cost-effective methods for insulating an attic on a budget?
To insulate your attic cost-effectively, consider using blankets or batts of fiberglass insulation, as they are usually less expensive and easier to install than some other options. Check for any rebates or energy-efficiency incentives offered in your area, which can reduce costs further.Can I install batt insulation in my attic without professional help, and how?
Yes, you can install batt insulation in your attic as a DIY project. Begin by measuring your attic’s dimensions to purchase the correct amount of insulation. Lay the batts between the joists without compressing them, and remember to ensure ventilation is not obstructed. The DIY Attic Insulation installation step-by-step guide can be a valuable resource.What is the best technique for insulating attic roof rafters?
Insulating your attic roof rafters usually involves applying rigid foam insulation or spray foam directly to the rafters, leaving an air gap between the insulation and the roof sheathing for ventilation. This process is particularly important for finished attics or where you want to maintain the rafter’s look.How do you use a blown-in insulation machine for a DIY attic project?
Using a blown-in insulation machine involves feeding insulation material into the machine’s hopper and then using the attached hose to distribute the insulation evenly across the attic floor. Always start from the farthest point from the hatch and work backward. Make sure to maintain a steady pace for an even spread. You can find specific guidelines and safety tips at this energy-saving at home resource.RECENT BLOGS
Our Reviews
Glenda Lanier Prowell
1721758635
I have ordered an 11 yard dumpster to be delivered to my house.Lonier was extremely helpful and answered all my questions. The rate was very reasonable.
Cedric Smikle
1721660395
Amber was extremely professional and courteous. She answered all of my questions and even some that I didn’t know I needed to ask.
Cait Kaider
1721243051
I highly recommend Waste Removal USA for their responsiveness and how the staff work hard to provide exceptional customer service. They have done well by us and our clients. Thank you!
Easom Family
1721223306
Louiner Pierre-Louis Is awesome! Did a great job. Will definitely be using this same company for all my dumpster needs because of his awesome customer service! Thank you!!!
tabitha Vazquez
1720539988
Wonderful and fast customer service!
LATEST BLOGS

