Transforming the look and feel of a room often starts from the ground up, and installing new carpet is an efficient way to achieve this. To install carpet successfully, you need to properly prepare the room, remove old flooring, and invest in the right tools and materials. Understanding the steps involved in this process can make the difference between a professional finish and a project filled with pitfalls.
During preparation, removing the old carpet and underlay is crucial. A small dumpster rental can be beneficial when disposing of the old flooring and debris, ensuring you can work in a clear, organized space. Next, measure and cut your carpet carefully to avoid wastage and secure it with tack strips. Properly installed carpet not only adds aesthetic appeal but also increases comfort and warmth underfoot.
 Installing carpet involves several key steps that ensure a smooth, long-lasting finish. The following techniques cover everything from setting up the tackless strips to accurately stretching and attaching the carpet. Understanding these elements is essential for a successful installation.
 Exploring various carpet types can help you choose the most suitable option for your space. Understanding the installation methods can ensure a successful carpet fitting tailored to your preferences and needs.
Key Takeaways
- Proper preparation ensures a smooth carpet installation.
- Consider a small dumpster rental for efficient debris disposal.
- Accurate measurement and cutting are essential for a perfect fit.

Preparation for Carpet Installation
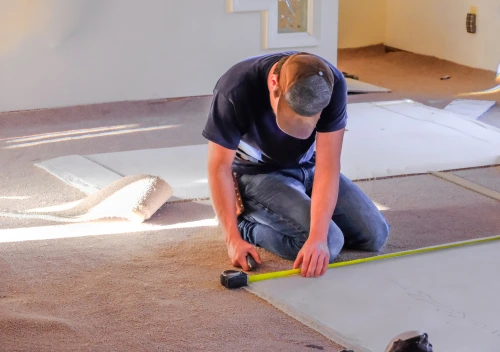
Proper preparation is crucial for a successful carpet installation. This includes accurate measurement of the installation area, selection of an appropriate carpet pad, and gathering necessary tools and materials.Measuring and Estimating Square Footage
Accurate measurement of your space is essential to ensure you purchase the right amount of carpet. Begin by measuring the length and width of each room in feet, then multiply these numbers to calculate the square footage. It’s wise to add an extra 10% to the total square footage to account for any cutting mistakes or pattern matching. Consider using online calculators or services like those offered by Flooring America to double-check your measurements. Accurate dimensions help avoid costly errors and delays in the installation process.Choosing the Right Carpet Pad
Selecting an ideal carpet pad is key to extending the life of your carpet and improving comfort. Carpet pads come in various thicknesses and materials, such as foam or rubber. For high-traffic areas, a dense, thin pad is recommended, while thicker pads may be suitable for less trafficked zones. Make sure the pad choice complies with the carpet manufacturer’s recommendations, as an inappropriate pad can void warranties. Consult resources like Home Depot to understand different padding options and their benefits.Tools and Materials Needed
Gathering the right tools and materials beforehand will streamline the installation. Essential tools include a carpet knife, knee kicker, carpet stretcher, seaming tape, carpet roller, and tack strips. A carpet knife is necessary for cutting the carpet to size, while a knee kicker helps position the carpet properly. The stretcher ensures a snug fit, eliminating wrinkles. Use seaming tape and a carpet roller to secure seams. Secure the carpet edges with tack strips. You can easily find these tools at retailers like Home Depot. Preparation ensures a smooth and efficient carpet installation process.Removal of Old Carpet
Removing old carpet is a crucial first step in the process to install new flooring. With the right tools and approach, you can execute this task efficiently, ensuring the space is ready for any new material you plan to lay down.Step-By-Step Removal Process
Start by gathering essential tools such as a utility knife, pliers, and protective gloves. Begin in a corner of the room or at the top of stairs. Cut the carpet into smaller sections, which makes handling and removal simpler. Be cautious around carpet tack strips, as they are sharp and can cause injury. Once a section is cut, pull it away from the tack strips using gloved hands or pliers for a better grip. Roll each section tightly and secure it with duct tape to avoid unraveling. This makes the carpet easier to handle and transport. Repeat these steps until the entire carpet is free.Proper Disposal of Carpet Waste
After removing all the carpet sections, proper disposal is essential. Check with local waste management services to understand disposal guidelines for your area. In some places, you might need to take the carpet to a specific facility or schedule a pickup. Roll up the carpet and tie it with twine or duct tape. This makes it compact, avoiding environmental hazards associated with loose debris. Proper disposal not only keeps your workspace clean but also adheres to regulations, making your DIY carpet installation smoother. Consider recycling options if available, as some facilities accept carpet materials for repurposing.Carpet Laying Techniques
Installing carpet involves several key steps that ensure a smooth, long-lasting finish. The following techniques cover everything from setting up the tackless strips to accurately stretching and attaching the carpet. Understanding these elements is essential for a successful installation.
Positioning Tackless Strips
Begin by positioning the tackless strips around the perimeter of the room, approximately half an inch from the walls. Make sure the pins on the strips face the walls to hold the carpet securely. It’s essential to leave a gap between doorways for easy transition and installation. Secure the strips to the subfloor using nails or adhesive, depending on the surface. This setup prevents movement and aids in carpet stretching later. These strips allow you to install carpet without visible nails, which enhances the aesthetic appeal.Laying Carpet Padding
Carpet padding is crucial for comfort and durability. Unroll the padding across the room, ensuring it’s flush against the tackless strips. Use a utility knife to trim any excess material for a snug fit. Padding should cover the entire floor but not overlap the tack strips. Secure the padding using staples or glue, ensuring flat and even coverage. This layer prevents the carpet from wearing out and adds an extra cushion, improving the overall feel. Make sure to seal the seams with tape to avoid shifting.Cutting and Seaming Carpet
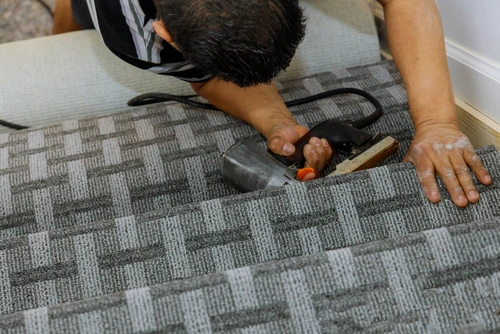
After laying the padding, measure the room carefully and cut the carpet accordingly. Always cut slightly larger than needed, as adjustments can be made on site. Use a straightedge for precise lines, especially where rooms meet. For areas requiring multiple pieces, align the carpet seams carefully. Use seam tape and a heated seaming iron to join the edges. Press firmly to ensure the seams are secure. This helps create a seamless appearance that blends well with the overall layout.Stretching and Attaching the Carpet
To ensure a tight fit, use a knee kicker and carpet stretcher. Start in a corner and push the carpet onto the tackless strips using the knee kicker. This secures the carpet edges. Use a power stretcher for larger areas. Position it against the opposite wall and stretch the carpet over the strips. This tool ensures the carpet is taut and secured, preventing future wrinkles and movement. Trim any excess carpet for a clean finish.Finishing Touches and Detail Work
Completing a carpet installation requires careful attention to detail. The process involves trimming the excess carpet, securing transition strips, and attaching binder bars to ensure a polished, professional appearance. Each of these steps is crucial to the longevity and aesthetics of your wall-to-wall carpet.Trimming Excess Carpet
Begin by using a carpet knife or utility knife to trim the excess carpet along the edges. Ensure you have a steady hand and a sharp blade to achieve clean cuts. Gently pull the carpet taut against the walls to avoid any gaps or bunches. Cut along the perimeter, leaving just enough carpet to tuck under the baseboards. This will help in maintaining a seamless look. Pay extra attention to corners, carefully cutting them to follow the room’s shape without any rough edges. Accurate trimming ensures the carpet fits perfectly, providing a smooth and tidy finish.Securing Transition Strips
Transition strips are essential where your carpet meets a different type of flooring. Utilize these strips to prevent fraying and to create an even transition between different surfaces. There are various types of transition strips available, such as T-molding or reducer strips, depending on the adjoining flooring type. Position the transition strip over the seam, ensuring it lays flat and aligns with both flooring materials. Secure it with screws or adhesive, following the manufacturer’s instructions. This step not only enhances appearance but also protects the carpet edges from wear and tear.Attaching Binder Bars
Binder bars are used to secure carpet edges, especially in doorways or open rooms, where there is no wall to tuck under. These metal or plastic strips hold the carpet in place and prevent it from unraveling. Choose a binder bar that complements your carpet and existing décor. To attach, place the binder bar over the carpet’s edge, making sure it’s flush with the floor. Tap it down gently using a rubber mallet, ensuring it grips the carpet securely. This step adds durability to your installation and ensures a clean, professional look.Types of Carpets and Installation Variants
Exploring various carpet types can help you choose the most suitable option for your space. Understanding the installation methods can ensure a successful carpet fitting tailored to your preferences and needs.
Wall-to-Wall Carpet Installation
Wall-to-wall carpet installation provides a seamless appearance across a room. It’s typically installed using a power stretcher, which tightens the carpet and secures it in place over the underlay with adhesive or tack strips. This method is best for large areas because it minimizes any visible seams and offers a smoother finish. You’ll need certain tools, such as a knee kicker and a carpet cutter, to fit the carpet precisely around corners and edges. The use of a power stretcher is essential for larger rooms to eliminate any wrinkles or bumps. Proper installation ensures durability and a long-lasting aesthetic.Berber Carpet Characteristics
Berber carpets are known for their looped pile construction, offering durability and resistance to wear. They come in various fiber types, such as wool, nylon, and olefin, each contributing to different performance characteristics. Nylon varieties are particularly good for high-traffic areas because of their resilience, whereas wool offers a softer, eco-friendly option. The loop structure of Berber can be tricky to install over uneven surfaces, so proper floor preparation is vital. Consider using a professional installer for optimal results, especially in complicated room layouts or where pattern alignment is critical. Berber’s texture provides a modern, casual look, making it a popular choice for many homes.Carpet Tiles as an Alternative
Carpet tiles offer a versatile and user-friendly option for covering floors. These tiles are easy to install and replace, making them ideal for DIY projects in residential or commercial spaces. They come with adhesive backing or can be laid loosely for easy rearrangement. One of the primary advantages of carpet tiles is their ability to be mixed and matched, allowing you to create custom designs or patterns. Maintenance is straightforward since individual tiles can be replaced if they become stained or worn. This option suits varied spaces where flexibility and ease of maintenance are priorities.Frequently Asked Questions
Installing carpet can be a manageable task with the right tools and techniques. Whether you’re tackling flooring from stairs to concrete surfaces or using different methods for securing it, understanding these topics can help ensure a smooth installation.What tools are needed for self-installing carpet?
Key tools for carpet installation include a carpet knee kicker, power stretcher, seam roller, and tack strips. A stapler and hammer are also essential for securing the padding and ensuring the carpet is firmly attached to the subfloor.What is the correct way to install carpet on stairs?
To install carpet on stairs, begin by cutting the carpet to fit each step properly. Use a knee kicker to secure the carpet over the stair treads and risers, attaching it to tack strips where possible according to Angi.How do you lay carpet tiles for a professional finish?
Ensure the subfloor is clean and level before positioning the tiles. Start from the center of the room and work towards the walls. Press the tiles firmly onto the adhesive, aligning them carefully to create even seams.What steps should be followed when installing carpet in a bedroom?
Start by preparing the floor surface, removing any nails or debris. Roll out the carpet pad and secure it. Cut the carpet to size, attach it to the tack strips, and stretch it with a power stretcher for a smooth finish as suggested by This Old House.What techniques are there for laying carpet on concrete surfaces?
First, use a waterproof adhesive to attach tack strips to the concrete. Lay a moisture barrier before placing the carpet padding and carpet. Use a power stretcher to pull the carpet tight, removing any wrinkles.Can carpet be secured without a stretcher and if so, how?
You can use a carpet knee kicker for small areas or when a power stretcher isn’t available. This tool helps secure the carpet onto the tack strips. Ensure a tight fit by working slowly and methodically across the space.RECENT BLOGS
 A Homeowner’s Guide to Flash Flood Preparation, Cleanup, and Long-Term Protection
Date: May 27 ,2025
 Everything You Need to Know About Garbage Bin Rental: Sizes, Costs, and Practical Tips for Every Project
Date: May 14 ,2025

 Safe Disposal Methods for Refrigerators: Recycling, Donation, and Removal Options
Date: April 29 ,2025

Our Reviews


LATEST BLOGS
