April 9, 2024 - Benjamin Ehinger
Do It Yourself Bathroom Remodel: Essentials for a Successful Transformation
CALL NOW 844-762-8449
Embarking on a DIY bathroom remodel can be a deeply rewarding project that not only breathes new life into your space but also adds value to your home. With careful planning and a bit of elbow grease, you can transform your bathroom into a stylish and functional sanctuary. The key to a successful remodel lies in a detailed plan that considers all phases of the project, from the initial layout changes and demolition to the final decorative touches.
Before diving into the demolition, it’s crucial to figure out the logistics involved in handling construction waste. A smart move is securing a home dumpster rental from a reliable service like Waste Removal USA to manage debris efficiently. Then, assess your plumbing and electrical setups to ensure they meet your design needs and current building codes. As you select materials and fixtures, aim for a balance between quality, functionality, and aesthetic appeal to create a cohesively designed space that reflects your personal taste.
 Renovating your bathroom involves crucial updates to two key systems: plumbing and electrical. Both require a detailed plan, adherence to safety standards, and often, securing the proper permits. Ensure any changes meet current building codes.
 When planning your bathroom remodel, selecting the right materials and fixtures is paramount for both aesthetics and functionality. The choices you make will define the look of your bathroom and determine its durability over time.
Key Takeaways
- A successful DIY bathroom remodel requires thorough planning and consideration of all project phases.
- Renting a dumpster is a practical step for efficient debris management during the project.
- Careful selection of materials and fixtures can enhance both the function and design of your bathroom.
Planning Your DIY Bathroom Remodel
Embarking on a DIY bathroom remodel requires meticulous planning. The success of your project hinges on setting a realistic budget, creating a solid design plan, and establishing a feasible timeline.Establishing a Budget
Your bathroom remodel starts with determining how much you’re willing to spend. Begin by itemizing estimated costs for materials, labor you can’t do yourself, and a contingency for unforeseen expenses. If you’re on a tight budget, prioritize function over form without compromising quality. Utilize resources such as Redo Shower’s step-by-step guide to help allocate funds wisely among the different aspects of your bathroom remodel.- Materials: Include tiles, fixtures, paint, etc.
- Labor: Only if professional help is needed.
- Extras: Always add 10-20% for unexpected costs.
Creating a Design Plan
Developing a design plan is essential to visualize your end goal. Research budget-friendly design ideas that align with your personal style and functionality requirements. Use online tools or software to mock-up your bathroom layout, considering aspects like storage, lighting, and the movement within the space. Factor in the compatibility of new fixtures with existing plumbing to avoid extra costs.- Layout: Keep fixtures close to existing plumbing.
- Style: Choose a theme that resonates with your taste.
- Function: Ensure practicality and ease of use.
Timeline and Scheduling
Creating a timeline lays out the sequence of events and helps track progress. Break down the remodel into stages, estimating time for each task, and adding buffer days for delays. Account for lead times on ordering materials and potential scheduling conflicts if you’re relying on professional help for specific tasks.- Demolition: Allocate time to safely remove old fixtures.
- Construction: Schedule plumbing and electrical work before closing walls.
- Finishing Touches: Reserve time for painting, tiling, and detailing.
Initial Steps and Demolition
Before starting your do-it-yourself bathroom remodel, it’s crucial to have a plan for the demolition phase, including preparation and safety measures, as well as the right tools for the job.Preparation and Safety
Your first step is to protect yourself and the work area. Turn off water and power supply to the bathroom to prevent accidents. Have safety goggles, work gloves, and sturdy boots to shield yourself from potential hazards. It’s also wise to rent a construction dumpster from Waste Removal USA to handle the debris. Ensure walkways are clear to navigate safely around the work area.Demolition Process
Begin the demolition by removing the bathroom fixtures. You’ll need tools such as a hammer and a utility knife for prying and cutting tasks. Start with the drywall, using your utility knife to score the walls before tearing them down. Carefully remove tiles and plumbing fixtures, wielding the hammer as needed to break apart and remove pieces. Keep in mind that precision is better than force, to avoid damaging plumbing or electrical that will be reused. As you proceed, place debris directly into your rented dumpster to maintain a clean workspace. Remember, taking your time can save effort in the long run by minimizing clean-up and repairs.Plumbing and Electrical Work
Renovating your bathroom involves crucial updates to two key systems: plumbing and electrical. Both require a detailed plan, adherence to safety standards, and often, securing the proper permits. Ensure any changes meet current building codes.
Updating Plumbing
When updating plumbing, your first step is to turn off the water supply to avoid leaks and water damage. If you’re installing a new sink faucet or repositioning fixtures, you may need to alter the existing plumbing configuration. Keep in mind that new installations should maintain easy access for future maintenance. Document all changes, as this information will be critical for future renovations or repairs.Electrical Considerations
Your bathroom’s electrical work should always prioritize safety, especially given the proximity to water sources. Plan for adequate and well-placed lighting along with GFCI (Ground Fault Circuit Interrupter) outlets to prevent electrical shock. If you’re not experienced with electrical systems, hiring a licensed electrician is strongly recommended. They can ensure that your electrical layout supports all new and existing fixtures according to code.Inspection and Permits
Before beginning your project, investigate the inspection and permit requirements of your local building authority. Securing the necessary permits is not merely a formality; it’s a vital step to ensure the safety of your remodel. Inspections verify that the plumbing and electrical work is safe and up to the current standards, which protects you and future inhabitants of the home.Framing and Structural Elements
When embarking on a DIY bathroom remodel, it’s essential to focus on framing and structural elements. This ensures that your update, whether it includes a new shower, bathtub, or vanity, is built on a solid foundation.Adjusting Bathroom Layout
If you’re considering adjusting the layout of your bathroom, it’s critical to plan the placement of major fixtures. For example, when framing for a new shower, precise measurement and location marking are imperative. You need to take into account the existing plumbing and how to integrate it with the new design. Remember, moving a bathtub or shower involves more than just the outer frame; you must accommodate drainage and water supply lines.Ensuring Structural Integrity
Reinforcing structural integrity is key when modifying any rooms in your home. If walls are to be moved or removed, you may need a general contractor or structural engineer to assess load-bearing capabilities. Hiring a professional ensures that any changes you make do not compromise the home’s structure. For a bathroom remodel, this is especially important when installing heavy elements such as a bathtub. Always check your local building codes and work with contractors or a handyman who can verify the structural soundness of your plans.Choosing Materials and Fixtures
When planning your bathroom remodel, selecting the right materials and fixtures is paramount for both aesthetics and functionality. The choices you make will define the look of your bathroom and determine its durability over time.
Selecting Tiles and Flooring
Tiles: Your choice in tiles directly impacts the bathroom’s style and maintenance. For walls, ceramic or porcelain tiles offer longevity and are available in various sizes and finishes. Consider using larger tiles to minimize grout lines and ease cleaning. Flooring: Durability and slip-resistance should be your top priorities. You might opt for textured porcelain tiles which effectively resist moisture and are non-slippery, or consider natural stone for a high-end look but remember that it requires regular sealing.Picking Fixtures and Features
- Sink and Faucets: Matching the sink to your countertop is crucial. You can choose an undermount sink for ease of cleaning or a vessel sink for a modern touch. Faucets should not only complement the sink but also offer practical benefits – like water-saving features.
- Toilet: Modern designs can offer both style and water efficiency. Look for options that provide a strong flush while using less water.
- Countertop: Materials range from natural stone to manufactured quartz. Natural stones, like granite or marble, while beautiful, require regular maintenance.
- Hardware: This includes things like draw pulls and towel bars. Selecting hardware that complements your fixtures ties the design together.
- Shower/Tub: For the ultimate relaxation experience, a freestanding tub as a centerpiece can make a statement. If space or budget is limited, a combined shower/tub with quality glass doors may be the way to go.
- Mirror and Lighting: A well-placed mirror can make a small space feel larger, and choosing the right lighting can affect both the room’s ambiance and practicality. Consider LED lights that offer a wide range of tones and save on energy.
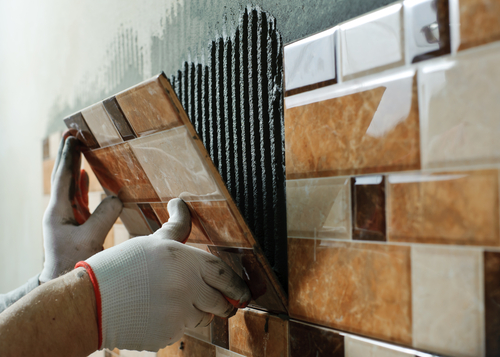
Walls, Floors, and Tile Work
When it comes to DIY bathroom remodeling, precision and the right materials are crucial. Your walls and floors form the foundation of your bathroom’s aesthetics and durability.Tiling and Grouting
For the tiling process, you’ll first want to use a chalk line to ensure straight lines and even patterns. Choose a tile size that minimizes cutting and is proportionate to the space to simplify installation. When it comes to grouting, select a grout color that complements your tiles—darker grout can hide dirt but also change the look of the tiling pattern.- Materials: Tiles, Grout, Tile Adhesive, Chalk Line, Spacers
- Tools: Tile Cutter, Trowel, Float, Sponge, Bucket
- Tip: Apply tiles carefully to prevent uneven lines or spaces.
Wall Finishes and Painting
For wall finishes beyond tiling, such as painting or applying wallpaper, proper surface preparation is key. Repair any holes or imperfections with spackle, and ensure walls are smooth and clean. When painting, use a mold-resistant bathroom paint and apply with rollers for larger surfaces, using brushes for edges and tight spaces.- Preparation: Clean and Sand Walls, Apply Spackle, Tape Edges
- Applying: Prime Walls, Paint Two Coats, Let Dry Completely
- Tip: Ventilation is important both during and after painting to avoid moisture damage.
Installing Flooring
Selecting floor tiles involves not just aesthetic choice but also consideration of slip-resistance and water absorption. Once chosen, prepare the floor by cleaning and leveling. Make sure to use a chalk line for alignment. Lay tiles carefully, and seal with appropriate grout, considering color as it will influence the room’s overall look.- Preparation: Level Floor, Mark Guide Lines
- Installation: Apply Adhesive, Place Tiles, Apply Grout
- Maintenance: Seal Grout, Clean Regularly, Avoid Harsh Chemicals
Installation of Essentials
In bathroom remodels, properly installing essentials such as toilets, sinks, vanities, showers, and bathtubs is crucial. Each installation process requires a keen eye for detail and the right tools to ensure functionality and durability.Toilet, Sink, and Vanity Installation
When installing your toilet, make sure you have a new wax ring and mounting bolts. Position the toilet over the ring, press down firmly, and secure it with the bolts. For the sink and vanity, align and mount the vanity to the wall, ensuring it’s level. Attach the sink to the vanity or countertop, then connect the faucets and water supply lines using an adjustable wrench. Don’t forget to apply silicone caulk around the sink for a watertight seal.- Tools Required:
- Adjustable wrench
- Silicone caulk
- Level
Shower and Bathtub Installation
For the bathtub, you need to start by setting it on a mortar base to prevent shifting. Seal the edges with caulk once it’s in place. The shower installation can be more complex, often requiring a cordless drill to attach the enclosure or tile backer board. Install your faucets and showerhead, then finish with the backsplash and countertops as needed.- Installation Steps:
- Set bathtub on mortar base and seal with caulk.
- Install shower enclosure or backer board using power tools.
- Fix faucets and showerhead.
- Place backsplash and countertops, if applicable.
Final Touches and Decor
When giving your bathroom a DIY makeover, the final touches and decor are crucial in bringing your desired design style to life. These elements will complement your color scheme, enhance your storage options, and enable the functionality that aligns with modern bathroom necessities.Lighting and Accessories
Choose lighting fixtures that not only illuminate but also reflect your design style. If your bathroom benefits from natural light, a dimmable LED ceiling fixture can maintain that calm ambience during evening hours. Meanwhile, wall-mounted sconces beside the mirror add both clarity and elegance. Choose a light switch that matches the finish of your other fixtures. Accessories:- Toilet Paper Holder: Install a holder that coordinates with other metal finishes in your bathroom, ensuring it is both functional and stylish.
- Medicine Cabinet: Upgrade to a new, modern medicine cabinet with built-in lighting for a sleek look and added visibility.
- Think about the finishing touches, like a unique soap dispenser or a plush bath mat to solidify your decor.
Storage Solutions
Storage:- Shelving: Incorporate open shelving for an airy feel that can display decorative items and keep essentials within reach. This creates an efficient use of space without compromising on design.
- Medicine Cabinet: Ensure it’s recessed and mirrored to save space and amplify light.
- Combine the practicality of bathroom storage with aesthetics. Target solutions like drawers with inserts for organization or a vanity with ample cabinet space.
- Integrate a pop of color through storage bins or baskets that complement your color scheme.
Frequently Asked Questions
Embarking on a DIY bathroom renovation can lead to a beautiful and cost-effective new space, but it often presents challenges and questions. The following are some of the most common inquiries you might have before starting your project.What are the initial steps to take when starting a DIY bathroom renovation?
When commencing a DIY bathroom renovation, your first course of action should involve a clear plan and budget. Assess your space, outline the scope of what you wish to change, and prepare well in advance for both expected and unexpected requirements.What ideas can I consider for remodeling a bathroom by myself?
To remodel by yourself, consider ideas such as updating fixtures, painting walls, replacing hardware, or even changing the layout if you’re experienced with more complex tasks. A fresh DIY bathroom remodel can include anything from installing a new vanity to simple upgrades like new towel racks.What are common pitfalls to avoid during a DIY bathroom remodel?
Avoid underestimating the complexity of plumbing and electrical work, skimping on materials, and rushing the process. Be sure to address all modifications adequately and prepare the plumbing if you’re changing major fixtures.How can I keep costs down while remodeling a bathroom on my own?
To keep costs down, do as much of the work as you can yourself, look for sales and discounts on materials, and reuse or refurbish existing items. Setting a budget range and sticking to it is crucial in achieving an economical DIY renovation.Can you provide guidance on DIY tiling for a bathroom renovation?
For DIY tiling, ensure you have the correct tools, prepare your surfaces thoroughly, and choose a suitable type of tile for the bathroom environment. Begin by tiling from the center point and work your way out to ensure an even layout.What budget-friendly options are available for updating a small bathroom?
For small bathrooms on a budget, consider repainting with a fresh, light color to make the space feel larger, updating fixtures like faucets or lighting, or adding new accessories. Focus on changes that will make a big impact without extensive costs, and refer to resources such as the Kitchen Cabinet Kings guide for more tips.RECENT BLOGS


Our Reviews

Glenda Lanier Prowell
1721758635
I have ordered an 11 yard dumpster to be delivered to my house.Lonier was extremely helpful and answered all my questions. The rate was very reasonable.

Cedric Smikle
1721660395
Amber was extremely professional and courteous. She answered all of my questions and even some that I didn’t know I needed to ask.

Cait Kaider
1721243051
I highly recommend Waste Removal USA for their responsiveness and how the staff work hard to provide exceptional customer service. They have done well by us and our clients. Thank you!

Easom Family
1721223306
Louiner Pierre-Louis Is awesome! Did a great job. Will definitely be using this same company for all my dumpster needs because of his awesome customer service! Thank you!!!

tabitha Vazquez
1720539988
Wonderful and fast customer service!
LATEST BLOGS
