February 9, 2024 - Benjamin Ehinger
DIY Screened-In Porch: A Step-by-Step Guide to Building Your Own Oasis
CALL NOW 844-762-8449
Creating a DIY screened-in porch is an excellent way to extend your living space while keeping out pesky insects. It allows you to enjoy the fresh air and view of your garden without having to worry about bugs or the elements. Planning is crucial, as you need to decide on the size, design, and materials for your porch. Moreover, acquiring a residential dumpster rental might be necessary to manage waste materials efficiently during the construction process.
The construction of a screened-in porch involves several steps including building the frame, installing the screen, and adding a door. You will require tools such as a saw, hammer, level, staple gun, and others, along with materials like lumber, screening, and roofing components. Safety is paramount when undertaking such a project, so it’s important to be well-equipped and to follow proper procedures. Additionally, after completing the basic structure, you can add finishing touches like trim and paint to match your home’s aesthetic.
 Constructing a steady and durable frame forms the foundation of your DIY screened-in porch. Attention to detail during this phase ensures a long-lasting structure that will withstand the elements.
Materials: You’ll need to decide whether to purchase materials yourself or have the expert provide them.
Remember, while a DIY approach can be satisfying and cost-effective, consulting with professionals can ensure long-term durability and satisfaction with your screened-in porch. Choose wisely based on your skill level, the complexity of the project, and your budget.
Key Takeaways
- A DIY screened-in porch extends your living area and offers protection from insects and the weather.
- Efficient waste management, for example through a residential dumpster rental, is crucial for maintaining a clean work area.
- Proper planning, safety measures, and obtaining the right tools and materials are essential for building a sturdy and attractive screened-in porch.
Planning Your DIY Screened In Porch
Creating a DIY screened in porch involves careful planning to ensure that the final product meets your needs, complements your home, and adheres to local building regulations. By addressing key aspects such as space requirements, design options, and building codes upfront, you can set your project up for success.Assessing Space and Size Requirements
Before you pick up any tools, it’s crucial to determine how much space you have available for your screened in porch. Measure your intended area and consider how you’ll use the space. Do you want a cozy nook for morning coffee or enough room to host dinner parties? Keep in mind that a larger porch will require more materials and potentially more complex construction techniques.- Measure the length and width of the area where your porch will be.
- Consider how the porch will impact yard space and existing outdoor features.
Selecting a Design and Style
Choosing a design that complements your home’s existing architecture will result in a seamless addition that adds both value and aesthetic appeal. Look at different porch styles and think about the overall look and function you desire.- Select materials that match or complement your home’s exterior.
- Decide between removable or permanent screens based on your climate and lifestyle preferences.
Understanding Local Building Codes
Before beginning any construction, it’s critical to be aware of local building codes and permit requirements. Regulations can impact various aspects of your porch project, from structural elements to electrical wiring.- Make a phone call or visit your local building authority to inquire about necessary permits.
- Ask about specific construction regulations such as footing depth, railing height, and types of allowable screen materials.
Materials and Tools Required
Constructing a DIY screened-in porch requires careful selection of materials and an array of tools to ensure a sturdy and aesthetic outcome. Proper preparation will lead to a successful project.Choosing Screening Materials
Selecting the right screening materials is essential for both the durability and functionality of your screened-in porch. Options include:- Fiberglass screens, which are cost-effective and easy to install.
- Aluminum screens, known for higher durability.
- Solar screens, to reduce heat gain and protect against UV rays.
Tool Checklist for DIY Installation
To embark on your porch screening project, gather the following tools:- Measuring tools: tape measure and speed square
- Saws: circular saw, miter saw for precise cuts, and reciprocating saw or jigsaw for more intricate work
- Chalk line and mason’s line for marking and leveling
- Cordless drill with a drill bit set
- Stapler for attaching the screen to the frame
- Level to ensure a perfectly horizontal and vertical structure
- Hammer or screwdriver depending on the fasteners used
- Tin snips for cutting metal elements
- Safety equipment: safety glasses, hearing protection, and a tool belt for convenience
Preparation and Safety Measures
Before transforming your outdoor space into a comfortable, bug-free zone, ensuring a well-prepared work area and observing safety precautions are essential for a successful DIY screened-in porch project.Preparing the Work Area
- Clear the Space: Begin by removing any furniture, decorations, or plants from your porch area. This creates a safe and unobstructed space to work in.
- Inspect the Structure: Check existing deck posts, frames, and walls for stability. Any signs of rot or damage should be repaired before adding screens to ensure the longevity and safety of your porch.
Safety Gear and Precautions
- Personal Protective Equipment (PPE): Always wear:
- Safety glasses to protect your eyes from debris
- Gloves to safeguard your hands from splinters and cuts
- A dust mask if sanding or sawing is involved, to prevent inhalation of particles
- Tool Safety: Verify that all your power tools and equipment are in good working order. Familiarize yourself with their manuals, especially if you’re using them for the first time.
- Ladder Safety: If your work requires height, use a stable ladder. Place it on an even surface and never lean too far to one side to prevent falls.
Building the Frame
Constructing a steady and durable frame forms the foundation of your DIY screened-in porch. Attention to detail during this phase ensures a long-lasting structure that will withstand the elements.
Constructing the Base
Begin by measuring and marking the perimeter of your porch to establish where the base will lie. Dig footing holes below the frost line for stability through temperature changes. Pour concrete footings and allow them to cure fully. When they’re set, position the base plates—pressure-treated lumber recommended for outdoor use—securing them to the footings to outline your porch’s footprint.Erecting Posts and Beams
Your next step is to install the vertical supports, or posts, which should be anchored to the base using galvanized post anchors for optimal strength. Ensure that each post is perfectly vertical by using a level. Once the posts are in place, securely attach the horizontal beams at the top to create the main frame. Fasten these with heavy-duty bolts or screws to ensure a solid structure that can support the weight of the roof.- Materials Needed:
- Posts: pressure-treated 4x4s or 6x6s
- Beams: pressure-treated 2x8s, 2x10s, or 2x12s
- Hardware: galvanized post bases, heavy-duty bolts or screws, washers, and nuts
- Tools Required:
- Level
- Drill
- Hammer
- Circular saw
Installing the Roof Structure
With the posts and beams in place, focus on the roof. Construct roof trusses or rafters to span across the top of your porch. Attach these to the beams, and cover them with a sheathing material, which can be plywood or oriented strand board (OSB), to act as a base for your roofing material. If you opt for a gabled roof, ensure the pitches are consistent and that you include sufficient overhang to provide extra protection from the weather.- Roof Considerations:
- Pitch: suitable for your climate and matching your home’s existing roof line
- Sheathing: plywood or OSB, typically 1/2″ thick
- Roofing Material: shingles, metal roofing, or other suitable outdoor materials
Screen Installation Techniques
Installing screens on your porch can enhance your outdoor experience by keeping bugs out and allowing a breeze in. The process involves fitting screen frames and ensuring the screen material remains taut for durability.Attaching Screen Frames
To start, measure your porch to determine the size of the screen frames you’ll need. Construct wooden frames using 1×4 or 2×4 lumber, cutting it to the desired lengths. You’ll then attach the screen mesh to the frames. Begin by laying the frame flat and placing the screen over the top. Use a staple gun to affix the screen at one corner, then move diagonally across to secure the opposite corner. This alternating pattern helps maintain even tension. Steps to Attach Screen Mesh:- Cut screen material to size, leaving a slight overhang.
- Staple one corner of the screen mesh to the frame.
- Pull the screen taut and staple the diagonal corner.
- Continue to opposite corners, then secure all sides.
- Trim excess screen material for a clean edge.
Ensuring Tension and Durability
Maintaining tension is vital; it prevents sagging and tears in your screen. After stapling, use a screen rolling tool to press the mesh into a groove around the frame, followed by inserting a spline. This rubber gasket holds the screen firmly in place and adds a layer of durability against wear and tear. Materials for Tension and Durability:- Screen mesh (fiberglass or aluminum)
- Spline
- Screen rolling tool
Door Installation
Proper door installation is a crucial step in your DIY screened-in porch project, as it ensures seamless access while maintaining the structure’s integrity. Careful attention to framing and hanging your screen door will result in a functional and visually appealing entry point.Framing the Doorway
To begin, you’ll need to measure and create a rough opening for your screen door. Ensure that the dimensions you choose will accommodate the size of the door you intend to install. Here’s a quick guide for framing:- Measure the height and width of your screen door.
- Add 2 inches to both the height and width to get the rough opening size.
- Cut the lumber to size for the doorway frame.
- Use level and plumb to ensure the frame is perfectly vertical and square.
- Secure the frame using galvanized screws or nails to maintain structural integrity.
- Check the corners with a framing square to ensure they are 90 degrees.
Hanging the Screen Door
Once your door frame is set, it’s time to hang the screen door:- Align the door within the framed doorway, ensuring it has even spacing on all sides.
- Install hinges on the door frame, using screws that are long enough to anchor securely into the wood.
- If your screen door includes its own hardware kit, follow the manufacturer’s instructions for specific placement and installation tips.
- Before securing the door completely, check that it swings freely and that the gap between the door and frame is consistent.
- Attach the door handle and any additional hardware like closers or latches.
Roofing Options
When building your DIY screened-in porch, selecting the right roofing materials and understanding the installation process are crucial for a durable and aesthetically pleasing result.Selecting Roofing Materials
You should choose materials for your screened-in porch roof that not only match your home’s existing roof but also handle your climate’s demands. Common choices include:- Asphalt Shingles: Widely used due to their cost-effectiveness and ease of installation. They come in various colors and styles to complement your home.
- Metal Roofing: Durable and long-lasting, it’s an excellent option for its resistance to extreme weather conditions.
- Polycarbonate Panels: These are a lightweight and transparent option, allowing natural light to penetrate your porch area.
- Cedar Shakes: If you’re aiming for a more rustic look, cedar shakes, while more labor-intensive to install, provide a beautiful, natural aesthetic.
Roofing Installation
The installation process involves several steps that must be followed meticulously to ensure structural integrity and leak prevention: Step 1: Attach a ledger board to your home to support the roof’s weight. Step 2: Assemble and raise roof trusses or rafters on the top of your porch’s frame. Your roof may have a shed, gable, or hip design depending on the existing structure and aesthetic preference. Step 3: Install roofing felt over the rafters followed by your selected roofing material. Step 4: For a polished look and additional protection, fit flashing in the areas where the new roof meets your home. Remember, this is a simple overview and your specific project may require additional steps or considerations. Always follow local building codes and obtain requisite permits before beginning construction.Finishing Touches and Details
After you’ve successfully constructed your DIY screened-in porch, the final steps to ensure its aesthetic appeal and longevity involve trim and molding installation, as well as painting and staining. These finishing touches not only enhance the look of your porch but also protect it from the elements.Trim and Molding Installation
Trim and molding serve as both decorative and functional components of your screened-in porch. You should:- Measure and cut each piece of trim to fit precisely between the porch’s columns or along the base and ceiling.
- Use a nail gun or hammer and finishing nails to secure the trim and molding in place.
- Ensure that corners are cut at 45-degree angles to fit together for a clean, professional appearance.
- Consider caulk to seal any gaps, which helps in preventing bugs and moisture from entering the porch area.
Painting and Staining
Painting or staining your DIY screened-in porch not only adds color but also an extra layer of protection. Before beginning this process:- Choose a paint or stain that is suitable for outdoor use and has properties to resist mildew and fading.
- Prepare the surface by sanding any rough spots and wiping away dust for a smooth application.
- Use a high-quality brush or roller for even application of paint or stain.
- Apply at least two coats for a consistent finish, allowing sufficient drying time as specified by the product instructions.
- If your porch is made of wood, staining can highlight the natural wood grain, while paint can offer a wide range of color choices.
Maintenance Tips
Proper maintenance is essential for keeping your DIY screened-in porch in top condition. Regular cleaning and timely repairs will go a long way in extending the life of your screens and structure.Cleaning and Repairing Screens
Cleaning: Your porch screens act as a barrier against dust, pollen, and insects. To maintain clarity and airflow, regularly vacuum or brush away debris, and gently wash the screens using a solution of mild soap and water. For thorough instructions on cleaning methods, refer to How to Clean Porch Screens for Spotless Views.- Materials Needed:
- Soft brush or vacuum with brush attachment
- Bucket of soapy water (mild dish soap)
- Soft cloth or sponge
- Materials Needed:
- Screen repair kit
- Replacement screening (if necessary)
- Staple gun (for fastening)
Seasonal Upkeep
Spring and Summer: After winter, check for any damage to the structure and screens. Clean all surfaces and apply a fresh coat of paint or sealant to wooden parts if needed to protect against moisture and insects.- To-Do List:
- Inspect and repair any damage
- Clean surfaces and screens
- Apply protective coatings
- To-Do List:
- Clear debris
- Install weatherproofing panels if desired
- Perform a final clean before winter sets in
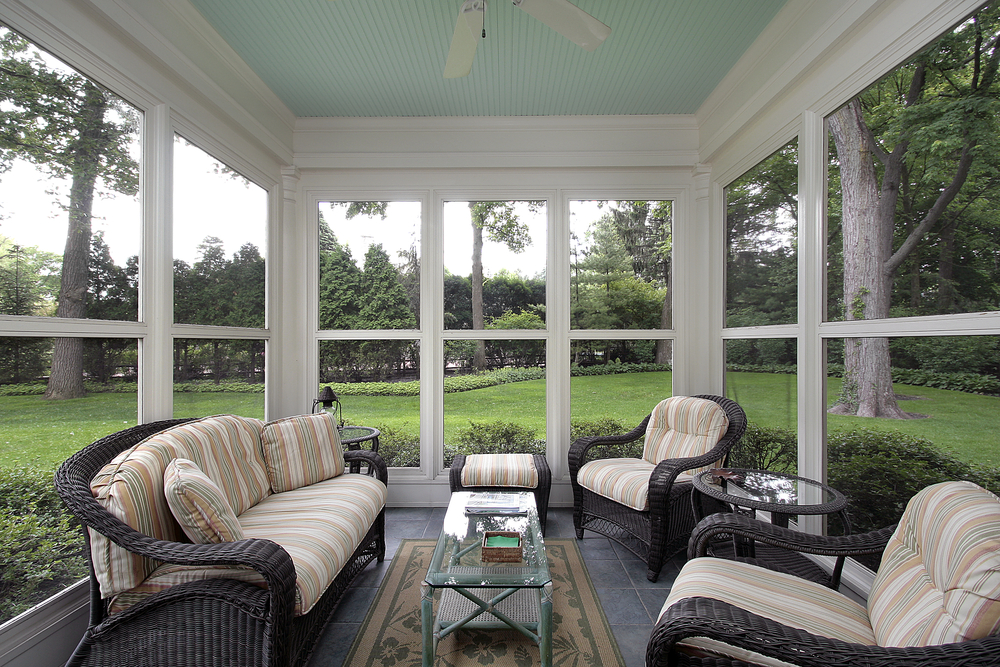
Customization Ideas
Transforming your DIY screened-in porch into a personalized retreat can be both enjoyable and fulfilling. By adding the right accessories and incorporating strategic lighting, you can create a space that reflects your style and meets your needs for relaxation and entertainment.Adding Accessories and Furniture
To enhance the comfort and functionality of your porch, consider selecting furniture that complements both your aesthetic preferences and the available space. A well-chosen outdoor rug can define the seating area and add a touch of warmth, while weather-resistant seating such as wicker or teak ensures durability. Consider adding side tables for convenience, and don’t forget a sturdy coffee table for shared items. If you enjoy dining al fresco, a picnic table or a modern dining set can be both practical and inviting.Incorporating Lighting
Ambient lighting is essential for creating the right mood in your screened-in porch. String lights draped along the ceiling can offer a soft, cozy glow, while wall-mounted fixtures or recessed lighting can provide more focused illumination. For a more dynamic setup, adjustable LED lights give you control over brightness and color temperature. Be sure to align your lighting choices with the primary activities you envision occurring on your porch, ensuring adequate visibility where needed.Professional Help and Consultation
When undertaking a project to build a screened-in porch, you may consider seeking professional help. Engaging an expert can be invaluable in ensuring structural integrity, compliance with local building codes, and achieving a high-quality finish. Reasons to Hire Professionals:- Expertise: Professionals possess the necessary skills.
- Safety: They ensure the project adheres to safety standards.
- Permits: Assistance with obtaining the proper permits.
- Research: Look for reputable local contractors with experience in porch screening.
- Get Quotes: Request detailed quotes from multiple experts.
- Check References: Validate their past work and customer satisfaction.
| Considerations | Expectations |
|---|---|
| Budget | Align professional costs with your budget. |
| Timeline | Understand how long the project will take. |
| Customization | Discuss any specific features you desire. |
Frequently Asked Questions
What materials are recommended for a DIY screened in porch to ensure durability and cost-effectiveness?
For durability and cost-effectiveness, fiberglass screens are typically recommended due to their flexibility and resistance to rust and corrosion. Combining these with a sturdy aluminum or wooden frame can ensure a lasting structure.How can one enclose a porch inexpensively without compromising on quality?
You can enclose a porch affordably by using prefabricated panels or creating frames and installing the screening yourself. Choosing materials like aluminum for frames and fiberglass screens can offer a balance between quality and cost.Will a dumpster rental help me with a DIY Screened-in Porch?
Renting a dumpster may be useful if your project involves significant construction or demolition, as it provides a convenient way to dispose of debris and old materials.What are the estimated costs associated with screening in a porch by yourself?
Costs can vary widely but screening in a porch by yourself typically ranges from a few hundred to a few thousand dollars, depending on the size of the porch, materials chosen, and whether you need to purchase tools.Could you provide guidance on building a screened in porch with a roof for DIY enthusiasts?
To build a screened-in porch with a roof, start by ensuring your existing porch structure can support the added weight. Use weather-resistant materials and seal all joints to prevent leaks. Consider prefabricated roof panels for easier installation.What steps are involved in screening in a porch using an aluminum frame system?
Screening a porch with an aluminum frame system involves measuring and cutting the frame to fit the porch dimensions, attaching the base strips, and rolling the screen material over the frame. Use a spline tool to secure the screen into the grooves of the frame.Are there options for removable screen porch panels for those seeking seasonal or temporary solutions?
Yes, there are removable screen systems that allow you to switch between screen panels and glass pane inserts. These systems offer flexibility for changing seasons or temporary screening needs.RECENT BLOGS


Our Reviews

Glenda Lanier Prowell
1721758635
I have ordered an 11 yard dumpster to be delivered to my house.Lonier was extremely helpful and answered all my questions. The rate was very reasonable.

Cedric Smikle
1721660395
Amber was extremely professional and courteous. She answered all of my questions and even some that I didn’t know I needed to ask.

Cait Kaider
1721243051
I highly recommend Waste Removal USA for their responsiveness and how the staff work hard to provide exceptional customer service. They have done well by us and our clients. Thank you!

Easom Family
1721223306
Louiner Pierre-Louis Is awesome! Did a great job. Will definitely be using this same company for all my dumpster needs because of his awesome customer service! Thank you!!!

tabitha Vazquez
1720539988
Wonderful and fast customer service!
LATEST BLOGS
