April 17, 2024 - Benjamin Ehinger
Building a Screened-In Porch: Your Essential Guide to a Perfect Addition
CALL NOW 844-762-8449
Building a screened-in porch can add a charming and functional space to your home, where you can enjoy the outdoors without the nuisance of insects or adverse weather conditions. By adding this feature, you’re creating a transitional area that combines the comforts of indoor living with the pleasures of the outdoor environment. Whether you’re planning to entertain guests, enjoy meals, or simply relax, a screened-in porch provides a versatile space that enhances your home’s living area.
Undertaking the construction of a screened-in porch requires careful planning and attention to detail. From the initial design to the selection of materials and the building process, every step should be meticulously executed to ensure the structure is both aesthetically pleasing and durable. Remember to factor in the disposal of construction debris; renting a driveway dumpster can facilitate a clean and organized worksite, ultimately making your building project more seamless and efficient.
 Selecting the right materials for your screened-in porch is critical to ensuring durability, aesthetics, and function. Your choices in wood and screening will impact the overall quality and longevity of your project.
 When installing screens for your porch, you’ll need to focus on two critical steps: properly stretching the screen material to prevent wrinkles and sagging, and securing the screens to the framework to ensure they stay in place and serve their purpose effectively.
Key Takeaways
- A screened-in porch offers additional living space and protection from the elements.
- Detailed planning and precise execution are crucial for a successful build.
- Efficient waste management, such as renting a driveway dumpster, is essential for site cleanliness.
Understanding the Basics of Screened-In Porches
When planning your screened-in porch, considering its purpose, location, and size upfront can set the foundation for a successful addition to your home.Design and Location
Your screened-in porch design should harmonize with your home’s existing structure and aesthetic. Begin by assessing potential locations; ideal choices often include the back or side of the house to provide privacy and the best views. Also, take into account the direction of the sun and prevailing winds, as these can greatly impact your comfort and the usability of the space.Porch Sizing and Layout
Consider the intended use of the porch to determine its necessary size and layout. You might only need a modest space for dining or you may prefer a larger area to include seating and entertainment zones. Be mindful of the proportions of your home to ensure your new porch is balanced and well-integrated. If starting with an existing porch, its footprint will often dictate the extent to which you can expand or adapt.Planning and Permits
Before embarking on the construction of a screened-in porch, you must tackle two critical steps: understanding your local building codes and obtaining the proper permits. These are essential to ensure that your new addition is compliant and legally approved.Research Building Codes
Your journey begins with a thorough examination of the local building codes that govern constructions in your area. These regulations are specific to locations and will dictate the design, materials, and methods you can use. It’s imperative that you consult with your municipality’s Code Enforcement or building department to get accurate information. Failure to comply can lead to costly fines or even the requirement to dismantle your new porch.- Check Zoning Laws: Ensure your plans align with local zoning restrictions, including property line setbacks and height limitations.
- Structural Requirements: Determine the specific requirements for structural integrity, which may influence the type of materials and construction methods you’ll need to use.
Acquiring the Necessary Permits
Securing a building permit is typically a requirement for adding a screened-in porch, especially if you’re altering the existing structure of your home. The permitting process varies, but generally, you’ll need to submit detailed plans of your proposed project for approval.- Submit Detailed Plans: Provide the planning department with detailed drawings of your porch design, including dimensions and materials.
- Application Process: Fill out the necessary permit application forms, which may require a fee. Be prepared for a waiting period while your application is under review.
Selecting Materials
Selecting the right materials for your screened-in porch is critical to ensuring durability, aesthetics, and function. Your choices in wood and screening will impact the overall quality and longevity of your project.
Choosing the Right Wood
When it comes to building your porch, the type of wood you choose plays a crucial role in the structure’s stability and resistance to the elements. Cedar and redwood are excellent choices for their natural resistance to moisture, decay, and insects. For a more cost-effective option that does not forgo durability, consider treated lumber, which has been chemically treated to ward off rot and pests.Screen and Framing Options
Your screen and framing materials determine the level of visibility, airflow, and protection your porch will have.- Aluminum: Aluminum frames are lightweight, durable, and resistant to rust, making them a solid choice for most climates.
- Fiberglass: When it comes to screens, fiberglass is a popular material due to its flexibility and lower cost. It won’t corrode and is easier to install. However, it can stretch and tear more easily than metal screens.
- Stainless Steel: For a stronger, more durable option, stainless steel screens are a top-notch choice, especially in areas with heavy weather or high insect traffic.
- Vinyl-Coated Polyester: Known for being exceptionally durable, this fabric is perfect for high-traffic areas. It’s a bit more costly, but its robust nature makes it a worthwhile investment.
- Solar Screen: This specialized screen material reduces heat transfer and protects against UV rays, making it an ideal choice for porches in sunnier climates.
| Screen Type | Benefits | Considerations |
|---|---|---|
| Fiberglass Screen | Economical, flexible | Less durable than metal screens |
| Aluminum | Rust-resistant, sturdy | More expensive, can dent |
| Stainless Steel | Durable, ideal for heavy weather | Higher cost |
| Vinyl | Strong, ideal for areas with children or pets | Can have limited visibility |
| Solar Screen | UV protection, reduces heat | Reduces natural light, alters color perception |
- Mesh Size: Pay attention to the mesh size of the screen. Smaller mesh sizes keep out smaller insects but can also reduce airflow and visibility.
Tools and Hardware Essentials
Before starting your project to build a screened-in porch, you’ll need the right tools and hardware essentials. Ensure you have a comprehensive toolset and all necessary fastening and installation supplies on hand to streamline the building process.Basic Toolset
Your basic toolset should include a tape measure for precise measurements and a level to ensure everything aligns correctly. A circular saw or power saw is crucial for cutting lumber to the right dimensions. Don’t forget a drill, both for pre-drilling holes and driving screws, which provides a more secure attachment than nails for most components of your porch.- Circular saw or hand saw: Essential for cutting wood to size.
- Cordless drill: To drill holes and insert screws.
- Hammer: For driving nails, when necessary.
- Tape measure and Level: For accurate measurements and alignment.
- Staple gun: To attach screen material to the wood frame.
- Utility knife: For trimming screen material and other miscellaneous tasks.
Fastening and Installation Supplies
When considering fastening and installation supplies, include a variety of screws and nails to cover different parts of the construction. Wood screws are generally preferred for their holding power. You’ll also need a spline, a flexible strip that secures the screen material into the frame. Hardware stores often offer pre-made kits containing screws, nails, and other fasteners specifically for outdoor projects like a screened-in porch.- Screws: Wood screws (various lengths) for robust fastening.
- Nails: Finishing nails can be useful for non-load bearing attachments.
- Spline: For securing screen material into the frame grooves.
- Hardware items: Hinges for doors, brackets for joining, and anchors for securing to the building structure.
Building the Foundation and Frame
Laying a solid foundation and constructing a stable frame are crucial for your screened-in porch. This involves precise ground preparation and methodical framing to ensure a level and enduring structure.Preparing the Ground
Before you lay any concrete, it’s essential to prepare the ground. Start by removing any sod and leveling the soil beneath. It’s critical that you achieve a flat surface; any irregularities could compromise the stability of your porch. To level, spread a layer of gravel and compact it thoroughly. Then, set up your formwork—the temporary molds into which you will pour your concrete.Constructing the Frame
With the foundation set, begin framing by securing a ledger board against your home to support the rafters. You must ensure the ledger is fastened correctly and at a precise horizontal level. Now, erect the vertical framework, utilizing treated lumber to withstand the elements. For the porch deck, install joist hangers at regular intervals along the ledger and outer framework. These will secure the joists in place. When it’s time to add the rafters, make certain they are perfectly parallel to each other and perpendicular to the ledger board. The decking comes next—carefully lay it down, maintaining uniform gaps between boards for drainage and expansion. Throughout the construction, keep checking that all elements are level and square, as precision here is key to the integrity of your screened-in porch.Screen Installation Techniques
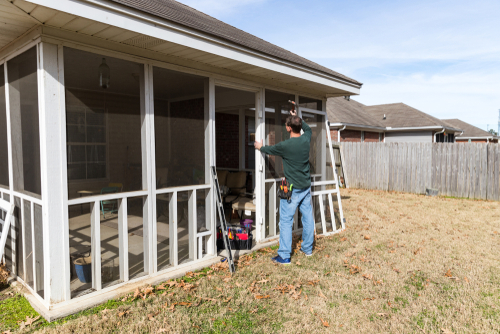
When installing screens for your porch, you’ll need to focus on two critical steps: properly stretching the screen material to prevent wrinkles and sagging, and securing the screens to the framework to ensure they stay in place and serve their purpose effectively.
Stretching the Screen Material
To begin, select a high-quality screen material such as fiberglass screen fabric or aluminum screening, considering its durability and visibility. For a clearer view and improved airflow, high-visibility screen fabric may be your best choice. Lay the screen over the frame and affix it at the top center using either staples or a screen tight system, depending on your screen’s design. It’s essential to apply uniform tension when pulling the screen tight to the opposite side to avoid any creases or loose areas. To ensure the material is adequately stretched:- Start at the center and work towards the corners.
- Use a screen spline tool to roll the spline into the frame’s groove and keep the screen in place.
- Keep the screen flat and smooth as you move along, adjusting the tension as needed.
Securing the Screens
Once stretched, securing the screen is your next step. For porch screen panels, it may be as simple as attaching pre-framed sections directly to the porch with screws or another fastening method. If using a DIY screen installation:- Align the frame’s edges and use a screw gun to fasten it securely.
- Screws or nails should be spaced evenly around the perimeter for a uniform look.
- Screen tight systems often require a vinyl cap that snaps over the base to keep the screen taut.
Adding Roof and Railings
Before adding a roof and railings to your screened-in porch, it’s crucial to use sturdy materials and follow precise measurements for structural integrity and aesthetic appeal. Carefully constructing the roof with trusses and applying shingles will ensure durability, while accurately installing railings and posts contributes to the safety and character of your porch.Constructing the Roof
To construct the roof, start with the roof trusses, which provide the framework for your porch roof. It’s essential for you to ensure that the trusses are spaced evenly — typically 24 inches on center is standard, but always comply with local building codes. Once the trusses are securely installed, cover them with roofing plywood and a water-resistant barrier. Finally, lay the shingles in an overlapping fashion from the bottom edge of the roof up to facilitate proper water runoff.Installing Railings and Posts
When installing the railings and posts, begin by setting the vertical posts firmly in place. These posts should be anchored to both the porch floor and the overhead structure to provide strong support for the railings. Attach diagonal braces to the posts to enhance stability. Once the posts are secured, install your choice of railing material between them – remember that the spacing of the railings should meet local building codes to ensure safety.Enhancing Comfort and Durability
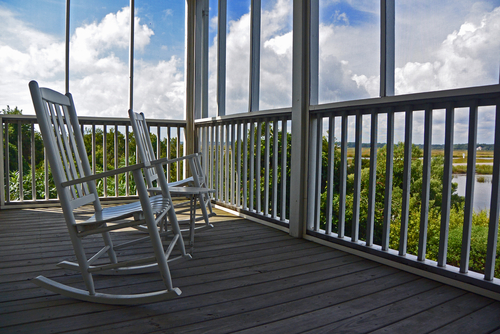
When building your screened-in porch, focusing on protection against the elements and creating a cozy environment will maximize year-round use and enjoyment. Here’s how you can achieve both comfort and durability in your outdoor haven.Protecting Against Weather
Enclosure Materials:- Summer & Winter: Choose high-quality screens that can withstand the heat of summer and the harshness of winter. Durable materials like aluminum or vinyl will ensure your enclosure stands up to all seasons.
- Fall & Other Seasons: For the fall, consider screens that reduce the amount of fallen leaves and debris entering your porch.
- Ensure your porch has a sturdy roof to protect against rain, snow, and sun. Consider insulated panels to maintain temperature and comfort.
Making the Porch Comfortable
Furniture and Rugs:- Choose all-weather furniture that can endure varying temperatures and moisture levels.
- Place outdoor rugs to add warmth and enhance aesthetic appeal. Ensure rugs are specifically designed to resist mold and fading.
- Install outdoor lighting to ensure your screened-in porch is usable both day and night.
- Consider ceiling fans for circulation in the summer or portable heaters for cooler seasons, transforming your porch into a comfortable sunroom alternative.
- Use throw pillows and blankets for extra warmth and comfort. Select materials that are outdoor-friendly and easy to clean.
Final Touches and Maintenance
After constructing your screened-in porch, it’s essential to put the final touches that will transform this additional space into a personalized retreat and to consider ongoing maintenance that will keep it in top condition through the changing seasons.Decorating Your Porch
To enhance the comfort and appeal of your porch, introduce weather-resistant furniture that withstands the elements, ensuring durability. Accentuate the space with a table lamp for a warm glow during evenings, and add vibrant planters to bring a touch of nature closer. Incorporating these elements, you can create a serene nook perfect for enjoying the outdoors without the worry of bugs or harsh sunlight.Seasonal Maintenance and Repairs
Treat your screened-in porch as a DIY project; become familiar with seasonal upkeep. In spring, inspect the screens for rips and perform necessary repairs to keep pests out. Regularly clean the screens to maintain visibility and airflow, and check for any damage to the structure caused by winter weather. By addressing these areas promptly, you ensure that your porch remains a bright and inviting extension of your home throughout the year.Hiring Professionals vs DIY
When considering a screened-in porch, you’re faced with the decision to hire professionals or take on the project as a DIY. Budget Considerations Assessing your budget is essential. A key factor is the potential cost savings of a DIY approach. You could save significant labor costs, with a projected range between $1,000 to $4,000. Time and Skill DIY requires a substantial time investment, as well as a confident skill set in construction and reinforcement. If you have these, you might find the personal involvement in the DIY project satisfying. Quality and Efficiency Professional contractors bring expertise that ensures quality and efficiency. They can navigate any unexpected issues, avoiding common pitfalls that might challenge less experienced individuals. DIY Considerations Pros | Cons Customizable project | Risk of errors Hands-on involvement | Requires tools and skills Potential saving | Time-consuming Professional Services Pros | Cons Expertise assurance | Higher cost Faster completion | Less personal involvement Warranty options | — Your decision should weigh the satisfaction and potential savings of DIY against the expertise, time efficiency, and peace of mind that professional installers offer. Choose the path that aligns best with your skills, time availability, and budget.Frequently Asked Questions
When considering adding a screened-in porch to your home, you’ll have several questions about the process, materials, and costs. This section aims to provide concise answers to common inquiries.What are the steps involved in building a screened-in porch on an existing deck?
You will need to start by inspecting the existing deck to ensure it can support the added structure. Attaching base strips to the edges of the porch, installing screen frames, and then adding the screen material are key steps in the process.How can I construct a screened-in porch on a concrete slab?
To construct on a concrete slab, begin by creating a wooden framework anchored to the slab. Then, install base strips around the perimeter, followed by the screen frames and screen material.Where can I find free plans for building a screened-in porch?
Free plans can often be found through a detailed online search or by visiting home improvement websites and forums that cater to DIY projects.What is the estimated cost for constructing a 12×12 screened-in porch?
The cost will vary depending on factors like materials and regional prices, but a 12×12 screened-in porch generally ranges from $2,000 to $5,000.Do I need a foundation for a screened-in porch, and what are the requirements?
Yes, a sturdy foundation is crucial for a screened-in porch. It must be level, stable, and capable of supporting the weight of the structure. Check local building codes for specific requirements.What potential drawbacks should I consider before adding a screened-in porch to my home?
Consider potential issues such as additional costs, maintenance requirements, and the possibility of reduced natural lighting in adjacent rooms.RECENT BLOGS


Our Reviews

Glenda Lanier Prowell
1721758635
I have ordered an 11 yard dumpster to be delivered to my house.Lonier was extremely helpful and answered all my questions. The rate was very reasonable.

Cedric Smikle
1721660395
Amber was extremely professional and courteous. She answered all of my questions and even some that I didn’t know I needed to ask.

Cait Kaider
1721243051
I highly recommend Waste Removal USA for their responsiveness and how the staff work hard to provide exceptional customer service. They have done well by us and our clients. Thank you!

Easom Family
1721223306
Louiner Pierre-Louis Is awesome! Did a great job. Will definitely be using this same company for all my dumpster needs because of his awesome customer service! Thank you!!!

tabitha Vazquez
1720539988
Wonderful and fast customer service!
LATEST BLOGS
