Building a tool shed is a rewarding DIY project that provides a functional, organized space for your garden tools and backyard equipment. The key to a successful tool shed project is thorough planning and preparation. Whether you are an experienced builder or a complete beginner, this guide will walk you through the step-by-step process, ensuring you have all the information needed to complete your shed efficiently.
Before you start building, you’ll need to plan out the dimensions based on your storage needs and the available space in your backyard. Measure the area and gather the required materials, including treated lumber to ensure longevity. Additionally, consider renting a small home dumpster to manage debris and trash, keeping your workspace clean and organized.
From preparing the foundation and constructing the frame, to assembling the walls and roof, each step requires careful attention to detail. By following these guidelines, you’ll create a sturdy and practical tool shed that not only serves your storage needs but also enhances the overall appeal of your backyard.
 Building the frame of your tool shed is fundamental to ensuring its stability and longevity. This entails careful assembly of the floor frame, erecting sturdy wall frames, and adding a secure roof structure.
 After constructing the main structure of your tool shed, it’s crucial to add those finishing touches that increase functionality and aesthetic appeal.
Key Takeaways
- Plan and measure your tool shed dimensions carefully.
- Use treated lumber to ensure durability and longevity.
- Rent a small home dumpster for easy debris and trash management.
Planning Your Tool Shed
When planning your tool shed, consider the available space, the design that best fits your needs, and adhere to local zoning laws. It’s essential to assess all these factors to ensure a smooth building process.Assessing Space and Location
Begin by measuring the area where you plan to build your tool shed. Determine how much square footage is available and consider the dimensions of the shed. Typical sizes range from 8×10 feet to 12×16 feet. Identify any obstacles like trees, rocks, or uneven terrain that may affect your project. Take into account the sunlight and shade patterns throughout the day to optimize the shed’s placement. Ensure the location allows for easy access to tools and equipment. Additionally, think about how the shed will fit into your existing landscaping.Choosing Shed Plans and Design
Selecting the right shed plans and design is crucial. Decide whether you prefer a store-bought shed kit or a custom DIY project. If you choose to build, you’ll need basic woodworking tools, such as lumber, wall studs, and screws. Look for plans specifically designed for tool sheds, as these will include detailed instructions and material lists. Consider the aesthetic of your property to find a design that complements it. For example, lean-to sheds are simple and space-efficient. Ensure plans include features such as windows for natural light, shelves for organization, and doors that fit securely.Understanding Zoning Laws and Building Permits
Before construction, familiarize yourself with local zoning laws and building regulations. Check if you need a building permit for your project. Permit requirements vary, but they often pertain to the shed’s size, height, and proximity to property lines. Visit your local planning department or their website to obtain the necessary permits. Keep documentation on hand to avoid any legal issues. Complying with these regulations ensures your shed is safe and durable, and protects your investment. Proper planning is the cornerstone of a successful tool shed project. By considering space, design, and legal requirements, you’ll set a solid foundation for the work ahead.Preparing the Foundation
Ensuring a solid foundation is crucial to the stability and longevity of your tool shed. You’ll need to choose the right type of foundation and ensure it has proper drainage to prevent moisture damage.Types of Foundations
When building a tool shed, you can select from various foundation types. Concrete slab foundations offer durability and a moisture-resistant base. If you prefer a quicker installation, a gravel foundation might be suitable, providing ample support and drainage. For those looking for an eco-friendly option, consider a pier foundation using concrete blocks or treated lumber skids, which can be cost-effective and easy to level.Laying a Concrete Slab
A concrete slab is one of the most popular choices for a shed foundation due to its strength and durability. To lay a concrete slab, you’ll need to clear and level the ground, then set up a form using treated lumber. Pour the concrete into the form, ensuring it is evenly spread and leveled. Use a trowel to smooth the surface and allow it to cure for several days before placing your shed. This method provides a stable, long-lasting base that can withstand heavy loads and resist shifting.Ensuring Proper Drainage
Proper drainage is essential to protect your shed foundation from moisture damage. Start by grading the site to slope away from the shed, ensuring water does not pool around the base. Install a layer of gravel beneath the foundation to facilitate water runoff. If you’re using a concrete slab, ensure there are weep holes or drainage channels to allow water to escape. Including gutters and downspouts on your shed can also help direct water away from the foundation area, further preventing water accumulation and prolonging the life of your shed.Constructing the Frame
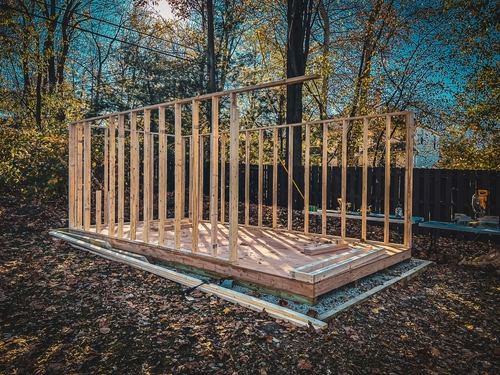
Building the frame of your tool shed is fundamental to ensuring its stability and longevity. This entails careful assembly of the floor frame, erecting sturdy wall frames, and adding a secure roof structure.
Building the Floor Frame
Start by preparing your site and laying out your shed’s dimensions. Use treated 2×6 lumber for the joists and perimeter. Lay your joists 16 inches apart, securing them to the perimeter frame with metal joist hangers for added stability. Nail or screw the joists into place, ensuring they are level. Install blocking between joists to prevent twisting. This enhances the floor’s strength and rigidity. Use a carpenter’s square to check for right angles, making sure everything is perfectly aligned. After constructing the joists, add a plywood or OSB subfloor, screwing it down every 8 inches along the joists. This base provides a solid foundation for the rest of your shed.Erecting Wall Frames
To build wall frames, use 2×4 lumber for vertical studs and horizontal plates. Cut the studs to length, ensuring they are all identical to keep the walls even. Assemble the wall frames on a flat surface, attaching each stud to the top and bottom plates with screws or nails. Once assembled, stand up each wall frame and attach it to the floor frame. Use a level to confirm the walls are plumb. Secure the frames together at the corners using screws or nails driven through the studs. Install temporary bracing to hold the walls in place until the roof structure is added. Add sheathing material, such as plywood, to the outside of the wall frames to enhance stability and provide a surface for exterior finishing.Adding the Roof Structure
Construct the roof structure using either roof trusses or individual rafters. Trusses are pre-assembled and simple to install, while rafters may require more precise measurement and cutting. If using rafters, cut them to your desired pitch and attach them to a ridge board at the top and to the wall plates at the bottom. Use metal hurricane ties to secure the rafters or trusses to the wall plates, providing extra resistance against strong winds. Add blocking between rafters for added support. Cover the rafters or trusses with plywood or OSB sheathing, securing it every 8 inches along the structure. Finally, apply a waterproof roofing material such as shingles or metal panels to finish the roof, ensuring your shed is well-protected against the elements.Assembling Walls and Roof
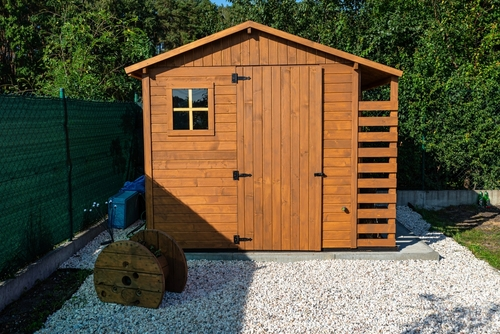
Building the walls and roof of the shed involves installing siding and sheathing, applying roofing material, and setting up doors and windows. Properly executing these tasks ensures the shed is sturdy, weather-resistant, and functional.Installing Siding and Sheathing
Start by assembling the wall frames with 2×4 beams. Mark your measurements and cut the beams accurately. Affix the frames to the floor securely. Next, use plywood sheets for sheathing. Attach these sheets to the frames using screws or nails spaced approximately every 8 inches along the edges. When installing the siding, select a durable material such as vinyl or wood. Align each piece carefully and fasten it with nails. Ensure that the siding overlaps properly to prevent water infiltration. Sealing the edges with caulk is advisable to enhance durability.Applying Roofing Material
Cut and assemble the roof trusses from 2x4s. Secure these trusses to the top plate of the walls, ensuring they are evenly spaced. Once the trusses are in place, cover them with roof sheathing. Plywood is commonly used here, and should be secured with nails or screws. Apply a layer of roofing felt over the sheathing to provide an extra barrier against moisture. Install shingles starting from the bottom edge of the roof, working your way upwards. Staple or nail them in place, ensuring each layer slightly overlaps the previous one. Trim the edges for a neat finish.Setting Up Doors and Windows
Prepare the openings in the walls for the doors and windows by marking and cutting the necessary spaces during framing. Install the window frames first. Secure them into the openings using screws or nails, ensuring they fit snugly. Caulk around the edges to seal any gaps. Position the door, making sure it’s level and fits properly. Attach the door hardware, such as hinges and handles. Screw the hinges to the door and the frame, and check that the door swings smoothly. For added security, consider adding a locking mechanism.Finishing Touches
After constructing the main structure of your tool shed, it’s crucial to add those finishing touches that increase functionality and aesthetic appeal.
Interior and Exterior Painting
Choosing the right paint or stain for your tool shed can both protect it from the elements and enhance its appearance. Use exterior-grade paint for the outer walls to ensure durability against weather conditions. When painting the interior, opt for lighter colors to brighten the space. Don’t forget to paint the trim to add a polished look. Before starting, wear safety gloves to protect your hands, and use painter’s tape to ensure clean lines.Installing Shelves and Storage Solutions
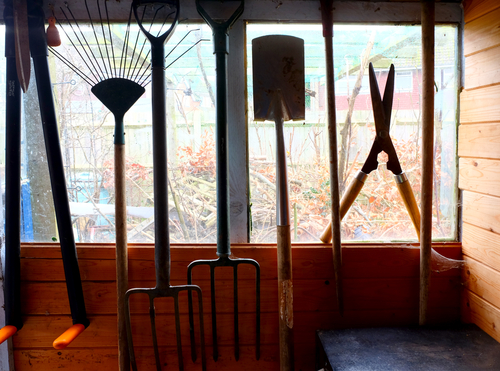
Effective organization enhances usability. Install shelving and tool storage solutions to keep your tools organized. Consider various shelves sizes to accommodate different tool sizes and weights. Use screws and nails appropriate for your wall material to ensure stability. Pegboards are excellent for hanging tools, offering easy access and visibility. Additionally, magnetic strips can be installed for metal tools. This maximizes space and keeps the shed clutter-free.Final Inspections and Safety Checks
Thorough inspections are essential to ensure your tool shed’s safety and longevity. Check that all screws and nails are secure, and there are no sharp edges that could pose a hazard. Make sure doors and windows are properly aligned and functional. Verify electrical installations, if any, are up to code. Routine safety checks should also include making sure no chemicals are leaking and that your shelving units can bear the load they’re intended for. Your diligence in these final steps will ensure a safe and efficient tool shed.Frequently Asked Questions
Building a tool shed involves steps like planning, selecting materials, and meeting legal requirements. Cost-efficient strategies and reliable resources can guide you through the process effectively.What are the necessary steps for constructing a tool shed from scratch?
To build a tool shed from scratch, you need to start with a solid plan. First, choose an appropriate location in your yard. Then, gather all the required materials and tools. Follow detailed instructions for foundation preparation, framing, roofing, and adding doors and windows.Can you provide cost-efficient strategies for building a storage shed?
You can save money on your shed by using reclaimed or recycled materials. For example, building a tool shed from pallets can be a cost-effective option. Additionally, doing as much labor as possible yourself will cut down on costs.What are some reliable resources to find free building plans for a tool shed?
Reliable resources for free building plans include online DIY platforms, community forums, and specific websites dedicated to shed construction. For instance, Storables offers step-by-step guidelines for building various types of sheds.How do you create a sturdy foundation and floor frame for a tool shed?
Begin by selecting a flat area and clearing it of any debris. Use concrete blocks, gravel, or a concrete slab to establish a firm foundation. Next, construct a floor frame using pressure-treated lumber, ensuring it is level and secure. Proper anchoring prevents shifting or settling.What materials are required to build a durable and cost-effective tool shed?
Key materials for a durable shed include pressure-treated lumber for the frame, plywood or siding for walls, and roofing materials like shingles or metal sheets. Use galvanized nails and screws to prevent rust. Cost-effective choices can include pallet wood for additional savings.What are the legal considerations and permits required for building a tool shed?
Before starting construction, check local zoning laws and building codes. Permits are often required for structures over a certain size. Visit your local municipal office or its website for specific regulations. Non-compliance can result in fines or having to modify or remove your shed.RECENT BLOGS
 A Homeowner’s Guide to Flash Flood Preparation, Cleanup, and Long-Term Protection
Date: May 27 ,2025
 Everything You Need to Know About Garbage Bin Rental: Sizes, Costs, and Practical Tips for Every Project
Date: May 14 ,2025

 Safe Disposal Methods for Refrigerators: Recycling, Donation, and Removal Options
Date: April 29 ,2025

Our Reviews


LATEST BLOGS
