March 29, 2024 - Benjamin Ehinger
Easy to Install Wood Flooring: A Guide to Effortless Home Upgrades
CALL NOW 844-762-8449
When considering a new floor for your home, wood flooring stands out for its timeless appeal and durability. But the thought of installation can be daunting. Thankfully, not all wood flooring is equally complex to install. There are varieties specifically designed to be easy for homeowners to put down themselves, significantly reducing the cost and time involved in a flooring upgrade. Options such as engineered hardwood, with its tongue-and-groove systems, and other click-lock wood flooring options simplify the process so that even novices can feel confident taking on a DIY project.
Understanding the different types of wood flooring and the method of installation is vital. The tools and materials needed will vary depending on the type of wood flooring you choose. Pre-installation preparation, such as acclimating the wood to your home environment and ensuring a clean, level subfloor, is important for the longevity of your flooring. Clear, step-by-step guidance can walk you through the process from start to finish, ensuring each plank is secured properly and leaving you with a beautiful new floor that’s built to last.
Maintenance doesn’t end with installation. The long-term beauty of your wood flooring depends on proper care, including regular cleaning and protection from moisture and scratches. Whether you encounter questions along the way or you’re troubleshooting common problems, having a solid understanding of the installation and care process will help you maintain your floor’s luster and stability for years to come.
 When installing wood flooring, having the right tools and materials is crucial for a successful and efficient installation process. The right equipment can make the difference between an adequate job and a remarkable finish.
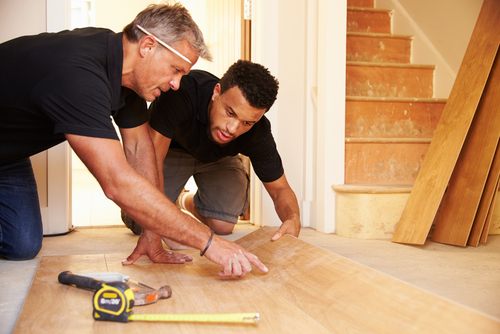 Before diving into the installation of hardwood floors, familiarize yourself with the necessary tools and materials. You will need a trowel for adhesive, spacers to maintain an expansion gap, and the appropriate finishing materials like baseboard and shoe molding to cover the perimeter gaps after installation.
When making your decision, assess your personal situation alongside these factors. If you opt for a DIY approach, research thoroughly and prepare meticulously to ensure success. If you choose a professional, scrutinize the installer’s reputation and past work to confirm quality.
Key Takeaways
- Engineered hardwood and click-lock wood options are beginner-friendly flooring choices.
- Proper preparation and following detailed installation instructions lead to successful flooring projects.
- Post-installation care is crucial to maintaining the beauty and longevity of wood flooring.
Understanding Wood Flooring Types
When considering wood flooring options for your home, it’s important to understand the differences between the varieties such as solid hardwood, engineered wood, and alternatives like laminate, vinyl, and bamboo. Each type offers unique characteristics in terms of durability, installation, and aesthetic appeal.Solid Wood Varieties
Solid hardwood flooring denotes planks milled from a single piece of timber. Traditional and coveted, it’s known for longevity and the ability to be sanded and refinished multiple times. Notable options include:- Oak: Renowned for its grain and durability.
- Maple: Praised for a lighter hue and subtle grain.
- Cherry: Sought after for its rich, deep color.
- Walnut: Valued for its dark tone and sophisticated look.
Engineered Wood Composition
Engineered hardwood consists of a thin layer of hardwood atop a base of high-quality plywood. This structure imparts stability, reduces swelling and shrinking from humidity changes, and is suitable for underfloor heating systems. Features include:- Dimensional stability ideal for moisture-prone areas.
- Easier to install, often designed with interlocking pieces.
- Numerous wood species options available, similar to solid hardwood.
Comparing Laminate, Vinyl, and Bamboo
- Laminate: A photo-realistic layer mimics wood atop a composite board. Advantages—cost-efficient, scratch-resistant, and DIY-friendly.
- Vinyl Flooring: Available as luxury vinyl tile (LVT), vinyl is water-resistant, has a softer feel underfoot, and is straightforward to install.
- Bamboo Flooring: An eco-friendlier option, bamboo is harder than some woods and offers a distinct, modern aesthetic.
Tools and Materials
When installing wood flooring, having the right tools and materials is crucial for a successful and efficient installation process. The right equipment can make the difference between an adequate job and a remarkable finish.
Essential Tools for Installation
To begin, you’ll need a series of essential tools to ensure the installation goes smoothly:- Measuring Tape: Your go-to tool for precise measurements.
- Saw: A Table Saw and Miter Saw for straight cuts, and a Jigsaw for any intricate cutting work.
- Hammer & Nail Gun: For securing the planks to the subfloor.
- Tapping Block: To snugly fit each plank together without damage.
- Pry Bar: To remove planks or tiles and for fitting the last plank.
- Drill: With a variety of bits for any pre-drilling or hardware installations.
- Moisture Meter: To ensure your subfloor is dry enough for installation.
- Spacers: To maintain a consistent expansion gap along the perimeter of the room.
- Nail Set, Chisel, and Long Level: For trim and detail work, and to verify evenness across the floor.
- Staple Gun: Depending on the type of installation, a staple gun may be preferable to a nail gun.
- Compressor: If using pneumatic tools, a compressor is essential.
Choosing the Right Materials
Selecting the correct materials for your wood flooring project is just as important as the tools you’ll use:- Flooring Materials: Choose high-quality wood according to your personal preference and the room’s usage requirements. Options range from solid hardwood to engineered wood varieties.
- Subfloor: A clean, level, and stable subfloor is vital to avoid any movement post-installation.
- Underlayment: This acts as a barrier against moisture and helps to soundproof the floor, besides providing additional cushioning.
- Fasteners (Nails, Staples): The type of fastener will depend on the method of installation and the flooring material you’ve selected.
Pre-Installation Process
Before laying your new wood flooring, ensure success by addressing the critical steps of preparation. Acclimating the wood to your home’s environment, preparing the subfloor, conducting moisture tests, and calculating expansion gaps are foundations to a flawless installation.Acclimating Wood Flooring
Wood is a natural material that responds to changes in temperature and humidity. To prevent future warping or gaps:- Store your flooring in the room where it will be installed for at least 3 to 5 days.
- Ensure the room’s temperature is consistent with usual living conditions.
Subfloor Preparation
Your subfloor is the base for your new flooring, and it should be solid, flat, and clean:- Check that the subfloor is free of protruding nails and debris.
- Ensure it’s level; sand down or fill any uneven areas.
- Subfloor materials like plywood should be securely fastened to floor joists.
Moisture Testing
To avoid expansion issues caused by moisture, perform a thorough:- Moisture test on both the wood flooring and the subfloor.
- Use a moisture meter; ideal readings typically should not exceed 12%.
Calculating Expansion Gaps
Wood expands and contracts with environmental changes, making expansion gaps vital:- Calculate a gap around 1/4 inch to 1/2 inch around the room’s perimeter.
- These gaps get covered by baseboards and will not be visible after installation.
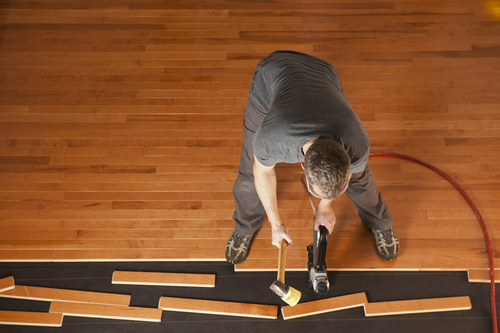
Installation Techniques
When installing wood flooring, you have various methods to choose from, each suitable for different types of wood and subfloor conditions. The three main techniques are nailing, gluing, and floating the floor, and selecting the correct method will ensure a stable and enduring finish.Nail-Down Method
For traditional solid hardwood floors, the nail-down method is commonly used. Here, you will face nail the first row of boards, then blind nail through the tongue at a 45-degree angle for the subsequent boards. This requires drilling pilot holes to prevent splitting the wood and using a flooring nailer to drive the nails. It’s important to leave an expansion gap between the flooring and the wall, typically using spacers.- Tools needed: Hammer, flooring nailer, drill
- Materials: Nails, spacers, hardwood flooring
Gluing Down Flooring
Gluing down flooring is an excellent choice for concrete subfloors or for engineered hardwood. Apply flooring adhesive with a trowel in small sections to prevent it from drying out, and place the boards down firmly. It’s crucial to align the boards properly and keep a clean work area to avoid adhesive mishaps.- Tools needed: Trowel, cleaning cloth
- Materials: Flooring adhesive, engineered hardwood or specific solid wood boards
Floating Floor Installation
The floating floor installation is a versatile and less permanent method where boards are not fastened to the subfloor. Instead, tongue and groove planks are clicked or glued together and laid over an underlayment. This method allows the floor to expand and contract without direct attachment to the subfloor, making it suitable for areas with significant temperature and humidity changes.- Tools needed: Tapping block, mallet
- Materials: Underlayment, floating-compatible flooring planks
Step-by-Step Installation Guide
Before diving into the installation of hardwood floors, familiarize yourself with the necessary tools and materials. You will need a trowel for adhesive, spacers to maintain an expansion gap, and the appropriate finishing materials like baseboard and shoe molding to cover the perimeter gaps after installation.
Laying the First Rows
Start by spreading the flooring adhesive with a trowel in small sections to prevent it from drying out. Position the first plank with its tongue side facing the center of the room, and the groove toward the wall. Use ¾-inch spacers along the length and end to keep an expansion gap. The alignment of your first rows is critical, as they set the precedent for the entire installation process.Securing Planks with Nails or Staples
After laying the initial rows, you can begin securing the planks with nails or staples. If your planks have tongue-and-groove edges, lock them together by inserting the tongue of one plank into the groove of the adjacent plank. Use a nail setter to drive flooring nails at an angle through the tongue. For racking, ensure to stagger the end joints between rows to give a natural and appealing look.Finalizing with the Finish Rows
As you approach the finish rows, cut planks to fit and maintain the expansion gap using a pull bar to snugly fit the planks without damaging the tongue-and-groove edges. Install a threshold if necessary, where your hardwood meets other types of flooring or exterior doors. Lastly, install the baseboard and shoe molding to conceal the expansion gap, securing them to the wall, not to the flooring, to allow for natural movement.Post-Installation Tips
Once your wood flooring is installed, it’s time to check that everything is secure and give it the finishing touches that will protect your investment and enhance its appearance.Checking for Loose Planks
After installation, walk over the flooring to detect any loose planks. Use your body weight to feel for any movement or give in the wood. Should you find a loose area, it may require securing. Employ a pry bar carefully to lift the plank, apply wood putty to fix any gaps, and replace it snugly.- Step 1: Inspect each plank for movement
- Step 2: Lift loose planks with pry bar if necessary
- Step 3: Apply wood putty and reposition the plank
Applying Finishing Touches
Applying the finishing touches involves securing baseboards and adding shoe molding, if desired, for a polished look. When reattaching baseboards:- Make sure you leave an adequate expansion gap beneath the baseboard to accommodate wood movement.
- Nail the baseboards to the wall, not the flooring, to prevent restricting wood floor movement.
- Cut and attach along the baseboards to cover the expansion gap.
- Nail the molding to the baseboard, never directly to the floor.
Maintenance and Care
Proper maintenance is crucial to prolong the life of your hardwood floors, especially in high-traffic areas. By adhering to a routine cleaning schedule and taking measures to protect your floors from damage, you can ensure they remain a timeless and enduring feature of your home.Routine Cleaning
Daily Tasks:- Sweeping: Regular sweeping with a soft-bristled broom helps remove dirt and debris that can scratch hardwood floors.
- Vacuuming: A weekly vacuum, with a hardwood-friendly attachment, keeps high-traffic areas clean without damaging the finish.
- For an extra layer of cleanliness, use a recommended hardwood floor cleaner every couple of months to remove residue and keep the floors shining.
Protecting from Damage
Preventive Measures:- Mats and Rugs: Place mats at exterior doors and use area rugs in high-traffic zones to minimize wear.
- Felt Pads: Attach felt pads to furniture legs to avoid scratches when items are moved.
- Spill Response: Quickly wipe up any spills to prevent water damage.
- Polish your hardwood floors quarterly to renew the protective coating and maintain their luster.
Troubleshooting Common Problems
Proper installation techniques are crucial to enjoying your wood flooring, but sometimes issues may arise, such as squeaks or visible damage. Knowing how to address these problems quickly and effectively will ensure your flooring remains in top condition.Addressing Squeaks and Pops
Squeaky floors are often due to wood’s natural expansion and contraction or the loosening of the nail-down or stapling fasteners. If you’re hearing squeaks:- Identify the squeak’s location by walking over the floor and marking the noisy spots.
- Secure the board from above using finishing nails, or from below with screws, if you have access to the subfloor.
Repairing Scratched or Damaged Planks
Scratches and damage on wood floors are common, but fixable. For minor scratches:- Use a wood filler that matches your floor color, apply it to the scratch, and wipe away the excess.
- For deeper scratches or damaged planks, consider replacing the individual sections if possible.
DIY Considerations
When considering a DIY flooring project, it’s crucial to assess your skill level and the time you can dedicate. These factors will determine the success of your DIY hardwood floor installation.Skill Level and Complexity
Your comfort with tools and understanding of flooring principles play a pivotal role in the installation process. Hardwood flooring requires careful measurement to allow for expansion gaps and precise cutting to fit boards around corners and between doorways. If you’ve never taken on a DIY project like this, consider starting with a small, less visible room to build your confidence. Remember, a simple misstep can lead to wasted materials and time.Time Commitment for DIY Projects
DIY flooring is a significant time investment. Depending on the size of the area and the complexity of the work, it could take several weekends to complete. It’s not just about laying the boards—the preparation of the subfloor, acclimation of the wood, and the finishing touches like sealing or staining are all time-consuming steps. While some floors, like luxury vinyl tile, boast a quicker installation process, hardwood floors will require patience and a clear schedule. Do not underestimate the commitment you’re making; it’s essential to carve out sufficient time to maintain a consistent pace and avoid rushed and potentially sloppy work.Choosing the Right Flooring for Your Home
Selecting the ideal flooring for your home involves balancing aesthetics, functionality, and budget. Your choice will impact your home’s comfort and value, so consider each factor thoroughly.Factors for Selection
When selecting flooring, consider the material’s durability and maintenance requirements. For instance, solid wood offers timeless beauty and can be refinished multiple times but requires more care to prevent damage from moisture or scratches. Engineered wood is more stable in varying humidity levels and can be easier to install due to its interlocking planks. On the other hand, laminate flooring, made of compressed fiberboard with a photographic image of wood and a protective overlay, provides a wood-look alternative that is cost-effective and easy to maintain, though less durable than real wood. Choosing between tile vs. laminate can depend on where in the home you intend to install the flooring. Tile is highly durable and water-resistant, making it suitable for bathrooms and kitchens, while laminate is often preferred in living areas for its warmth underfoot and ease of installation. Additionally, if you desire the plush feel of carpet but the modularity of tiles, carpet tiles could serve as an innovative solution, offering easy replacement and various design options.Comparing Cost and Longevity
Wood flooring comes in a range of prices and lifespans:- Solid Wood: Ranges from $6-$18 per sq. ft. for installation. Can last for decades with proper care.
- Engineered Wood: Slightly less expensive than solid wood, offering a similar look. It typically lasts for 20-40 years.
- Laminate Flooring: Significantly more affordable, prices range from $1-$5 per sq. ft. Generally lasts 15-25 years.
Professional Installation vs. DIY
When choosing between professional installation and DIY for installing hardwood floors, consider both the complexity of the job and your skills.- Cost: If you’re on a budget, DIY can be cost-effective. You can save a significant amount by tackling the project yourself, provided you have the necessary tools. On the other hand, hiring a professional ensures all costs, including labor and materials, are factored in from the start.
- Expertise: Installation quality is paramount. A professional will bring years of experience and expertise, ensuring a high-quality finish. If you’re a hands-on learner and have done similar projects, DIY might be a good fit. Remember, however, complex patterns or spaces might require a professional’s precision.
- Time: Consider the value of your time. A professional team can usually complete the job faster than a DIY approach. If you have the free time and patience, DIY installation can be a satisfying project.
- Equipment: Professional installers come with all the necessary equipment. For a DIY project, you will need to rent or purchase tools, which can increase overall costs.
- Warranty: Some warranties may be voided if the flooring isn’t installed by a certified professional. Ensure you understand the terms before proceeding with a DIY installation.
| Aspect | DIY | Professional Installation |
|---|---|---|
| Cost | Lower, but requires tool investment | Higher, includes labor and assurance |
| Installation Quality | Varies with skill | Generally high, with expertise |
| Time Commitment | Potentially significant | Less personal time involved |
| Equipment Needed | Must acquire separately | Provided by the installer |
| Warranty & Insurance | Risk of voiding warranty | Often comes with warranty protection |
Frequently Asked Questions
In this section, you’ll find detailed answers to common queries about installing wood flooring, which cover everything from preparation to cost considerations.What are the steps for installing wood flooring on a concrete base?
To install wood flooring on a concrete base, you need to start with a moisture barrier to prevent potential damage from moisture. Then, you can either glue the wood directly onto the concrete or float engineered wood planks over an underlay.Can solid wood flooring be installed over an existing wood subfloor?
Yes, solid wood flooring can be installed over an existing wood subfloor, provided it is flat, dry, and clean. Secure the planks with nails or staples into the subfloor for a stable and long-lasting fit.What are the cost considerations for hardwood flooring installation?
The cost of hardwood flooring installation varies based on the type of wood, complexity of the pattern, and the condition of your existing floor. It’s imperative to factor in the cost of materials, underlayment, tools, and potential labor.How do I lay a wood flooring pattern correctly?
When laying a wood flooring pattern, ensure that you stagger the seams for structural integrity and visual appeal. Start from a focal point and follow the manufacturer’s guidelines for specific patterns, like herringbone or chevron.What are the advantages of click lock hardwood flooring?
Click lock hardwood flooring simplifies installation with its interlocking design, eliminating the need for glue or nails. This type of flooring is user-friendly and reduces installation time, making it a great option for DIY projects.How can I determine the easiest wood flooring type to DIY?
To determine the easiest wood flooring type for DIY, look for options like luxury vinyl tile (LVT) or engineered wood with click lock systems. These choices offer swift installation processes and typically require less specialized tools or expertise.RECENT BLOGS


Our Reviews

Glenda Lanier Prowell
1721758635
I have ordered an 11 yard dumpster to be delivered to my house.Lonier was extremely helpful and answered all my questions. The rate was very reasonable.

Cedric Smikle
1721660395
Amber was extremely professional and courteous. She answered all of my questions and even some that I didn’t know I needed to ask.

Cait Kaider
1721243051
I highly recommend Waste Removal USA for their responsiveness and how the staff work hard to provide exceptional customer service. They have done well by us and our clients. Thank you!

Easom Family
1721223306
Louiner Pierre-Louis Is awesome! Did a great job. Will definitely be using this same company for all my dumpster needs because of his awesome customer service! Thank you!!!

tabitha Vazquez
1720539988
Wonderful and fast customer service!
LATEST BLOGS
