April 22, 2024 - Benjamin Ehinger
Driveway Sinking Repair: Proven Solutions for a Stable Surface
CALL NOW 844-762-8449
When you notice that portions of your driveway have begun to sink, it’s crucial to address the issue promptly to avoid further damage and potential safety hazards. Sinking can occur due to a variety of factors, such as water infiltration and soil erosion, which compromise the support under the driveway surface. Identifying the underlying cause of the sinking is the first step towards effective repair. Common repair methods are tailored to the type of driveway you have – whether it’s concrete or asphalt.
To begin repairing a sinking driveway, it’s important to prepare the site properly to ensure a lasting fix. Proper drainage solutions are necessary to prevent water from undermining the driveway again, and this might involve correcting the gradient or installing additional drainage. Understanding the differences between do-it-yourself options and when to seek professional repair services can also inform your approach to fixing the problem and can greatly influence the cost and longevity of the repair. Remember that getting it right the first time can help avoid common mistakes that could lead to the need for more frequent repairs in the future.
 Effective drainage is crucial to prevent your driveway from sinking. Proper drainage solutions can divert water away from your driveway, reducing the risk of soil erosion and substrate instability that causes sinking.
 Choosing between a DIY approach and hiring a professional for driveway sinking repair hinges on several factors, including your skills, the complexity of the job, and the potential cost savings versus quality of work.
Key Takeaways
- Address driveway sinking promptly to prevent safety risks and further damage.
- Preparation and proper drainage are critical for a long-term driveway repair solution.
- Evaluate whether DIY or professional repair is appropriate for your situation to ensure cost-effective and durable repair.
Diagnosing the Problem
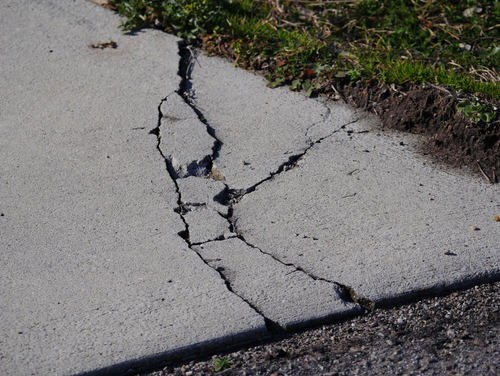
When your driveway begins to sink, it’s critical to assess the situation carefully to address the underlying issues effectively. Early diagnosis can save you from more extensive and expensive repairs down the line.Identifying Common Signs of Sinking
A sinking driveway is often accompanied by easily noticeable indicators. Cracks and depressions in the surface are clear signs that there’s an issue below. If you observe portions of your driveway appearing lower than the surrounding area or find voids along the edges or beneath the surface, these are strong indications that sinking is taking place.Understanding Soil Erosion and Compaction
Soil erosion and improper compaction are chief culprits behind a sinking driveway. Erosion occurs when water washes away the supporting soil, creating voids. On the other hand, if the soil beneath your driveway wasn’t compacted sufficiently during construction, it can gradually compress and cause the surface to sink. It is essential to determine if soil erosion or compaction issues are causing the problem to address it appropriately.Preparation for Repair
Before you start the repair process for a sinking driveway, it’s essential to have the right materials at hand and ensure the work area is safe. Whether you’re dealing with concrete, asphalt, or gravel, appropriate preparation can help achieve a durable result.Gathering Necessary Materials
To address concrete driveway repairs, you’ll need materials like hydraulic cement, masonry chisel, and sand. For an asphalt driveway, prepare cold patch asphalt and pothole tamper. If you’re working on a gravel driveway, gather fresh gravel and a landscaping rake.- Concrete Driveway:
- Hydraulic cement
- Masonry chisel
- Sand
- Asphalt Driveway:
- Cold patch asphalt
- Pothole tamper
- Gravel Driveway:
- Fresh gravel
- Landscaping rake
Ensuring a Safe Work Area
Safety is paramount when performing driveway repairs. Clear the area of any debris and set up cones or barricades to alert passersby. Always wear protective gear such as safety glasses and gloves, especially when handling tools or mixing concrete.- Protective Gear:
- Safety glasses
- Gloves
- Area Setup:
- Remove debris
- Set up cones/barricades
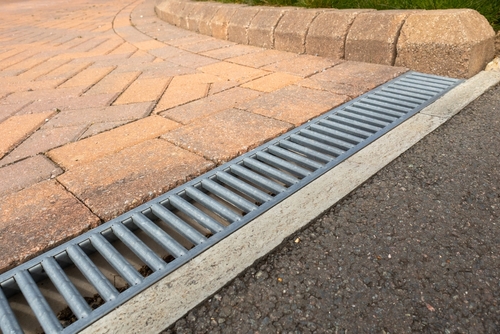
Drainage Solutions
Effective drainage is crucial to prevent your driveway from sinking. Proper drainage solutions can divert water away from your driveway, reducing the risk of soil erosion and substrate instability that causes sinking.
Improving Surface Water Drainage
- Channel Drains: Installing a channel drain is an effective method to improve surface water drainage. These drains efficiently capture and redirect water, reducing the accumulation of standing water.
- Permeable Paving: Consider permeable paving materials which allow water to soak through the driveway instead of pooling on the surface. This promotes good drainage and helps manage water runoff.
Adjusting Downspouts and Grading
- Downspout Direction: Ensure your downspouts are adjusted away from your driveway. This minimizes the risk of water pooling and helps maintain proper drainage around the driveway area.
- Regrading: If necessary, regrade the land around your driveway. Slope the terrain away from your driveway to prevent standing water, which can undermine the integrity of your driveway structure.
Repair Techniques for Concrete Driveways
When your concrete driveway starts to sink, it can lead to serious structural issues and water damage. Repairing it promptly and effectively is crucial for longevity and usability. Two common repair techniques are the Mudjacking Process and the use of Epoxy and Other Fillers.Mudjacking Process
Mudjacking, also known as “slabjacking,” is a method to lift your sunken concrete driveway back to its original level. It involves drilling holes into the affected areas of the concrete and pumping a mixture of soil, water, and cement, often referred to as “slurry,” underneath. This process raises the driveway by filling voids and reinforcing the subsoil, providing a stable foundation to prevent further sinking.Using Epoxy and Other Fillers
For smaller cracks and gaps, epoxy and other concrete fillers can be an effective solution to prevent further damage. These products act as a glue to hold the concrete together. Epoxy fillers penetrate deep into the cracks, creating a strong bond that helps to reinforce the structural integrity of the driveway. They also form a resistant seal to ward off water infiltration, which is a common cause of sinking and soil erosion under the driveway. Before applying any filler, make sure the area is clean and dry to ensure the best adhesion. Here’s detailed advice on how to use these fillers properly.Repair Techniques for Asphalt Driveways
When your asphalt driveway starts to sink, it’s crucial to address the issue promptly to prevent further damage. Several repair techniques can be utilized depending on the severity of the sinking. Here, you’ll learn about the effectiveness of cold patching for minor issues and the importance of proper compaction methods for a more lasting solution.Cold Patching and Resurfacing
Cold Patching involves using a ready-made asphalt repair mix to fill in small areas where your driveway has sunk or started to form potholes. It’s a quick and cost-effective method for small-scale repairs:- Step 1: Clean the area, removing debris and loose asphalt.
- Step 2: Apply the cold patch material, following the manufacturer’s instructions.
- Step 3: Tamp down the patch thoroughly to ensure it is well seated and level with the surrounding surface.
- Step 1: Contractors will clean the existing surface and fix any major damages.
- Step 2: A new layer of asphalt is applied over the old one.
- Step 3: This new layer is then smoothed and compacted to create a solid, even driveway surface.
Proper Compaction Methods
For Compacted Soil underneath the asphalt, proper compaction methods are fundamental to prevent future sinking. Proper compaction ensures a solid foundation, reducing the likelihood of sinking and cracking over time:- Step 1: Remove the existing asphalt and assess the soil’s condition.
- Step 2: If necessary, add new gravel or soil, ensuring it’s evenly spread.
- Step 3: Use a mechanical compactor to compress the soil or gravel, creating a stable base for the asphalt layer.
Avoiding Future Sinking
To secure the longevity and stability of your driveway, certain measures are essential. Continuous maintenance and a methodical approach can prevent the premature sinking and deterioration.Maintaining Driveway Health
- Regular Inspection: Proactively check for cracks, holes, or depressions. Address these issues promptly with patch repairs to maintain structural integrity.
- Proper Water Drainage: Ensure that your drainage systems are properly directing water away from the driveway. Gutter downspouts should be positioned to channel water away from the pavement to prevent erosion.
Long-Term Strategies for Stability
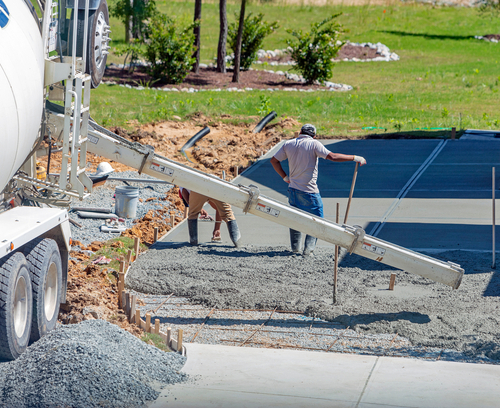
- Solid Foundation: Emphasize the importance of a solid foundation during driveway installation. The ground should be properly prepared before any asphalt or concrete is laid down to ensure a level and firm base.
- Quality Materials and Installation: Use high-grade materials and reliable contractors for installation. This investment pays off in the enhanced life span of your driveway.
DIY vs Professional Repair
Choosing between a DIY approach and hiring a professional for driveway sinking repair hinges on several factors, including your skills, the complexity of the job, and the potential cost savings versus quality of work.
Assessing DIY Capabilities
Your skills and tools: Evaluate your familiarity with home improvement projects; if you regularly take on DIY tasks and have a good set of tools, you might be ready to tackle minor repair work. For example, fixing small cracks or patching can be a DIY job if you’ve done similar repairs before. Scope of work: If your driveway has minor imperfections or shallow sinkage, then DIY driveway repair could be a suitable project. Bear in mind the physical labor involved and your ability to source the correct materials.When to Hire a Contractor
Expertise and equipment: Significant sinking issues generally require the expertise and heavy machinery that only professionals can provide. Contractors will handle everything from evaluation to reconstruction which is essential for extensive repairs. Long-term investment: When addressing severe sinking, consider that a professional job often comes with guarantees and can offer longevity for your driveway. Look at hiring a contractor as an investment in your property — proper driveway drainage system repair by experts can save you from future issues and expenses. Advice and permits: Contractors can also offer valuable advice on maintaining your driveway and take care of any necessary permits. If your repair needs to adjust to building codes, a professional can ensure everything is up to standard.Cost Considerations
When planning for driveway sinking repair, it’s crucial to consider the expenses involved and how they fit into your overall maintenance budget. The cost will be influenced by the extent of the damage and the repair method.Estimating Repair Expenses
To accurately estimate your repair expenses, start by evaluating the severity of the sinking. Minor sinking can often be resolved with patching, which is a cost-effective solution, generally ranging from $5 to $10 per square foot for sealant. More substantial repairs, like slabjacking or mudjacking, elevate the sunk concrete and will increase the price, possibly to **$4 to $4.50 per square foot. If the driveway is extensively damaged, full replacement might be necessary, which can be significantly more expensive. Specific pricing details can be found through resources like Bob Vila which state that repair costs can range from $798 to $2,635, with a national average around $1,715.Budgeting for Driveway Maintenance
Regular maintenance can prevent small issues from becoming larger, more expensive problems. Your annual maintenance budget should account for routine inspections and minor repairs like filling small cracks to extend the life of your driveway. For unexpected repairs, it’s beneficial to have a contingency fund, especially since emergency fixes can be costly. Setting aside a fund that covers at least 50% of total driveway replacement costs can provide peace of mind and financial readiness. Keep in mind, proactive steps in maintenance will likely reduce long-term expenses.Common Mistakes in Driveway Repair
When repairing your driveway, certain missteps can lead to further damage or a shorter lifespan for your repair work. Understanding these common mistakes will help ensure a more durable fix.Ignoring Small Problems
- Driveway Cracks: Neglecting small cracks when they first appear can lead to significant issues. These cracks often signal more severe structural problems and, when ignored, can result in poor drainage, leading to a weakened base and more prominent sinking.
- Mineral Spirits & Oil Stains: Failing to clean oil stains with mineral spirits or a similar cleaning agent can prevent patching materials from adhering correctly, reducing the effectiveness of your repair.
Improper Material Use
- When selecting materials for patching or filling, using inferior or inappropriate materials will likely lead to premature failure. It’s essential to match the patching material to the driveway type and conditions.
- Utilizing the wrong materials for sealing over patches can also prevent proper bonding, rendering your patch ineffective. Always choose a sealer compatible with both the existing driveway material and the patching substance used.
Finishing and Protecting Your Driveway
After repairing your sinking driveway, it’s critical to apply the proper finishing touches and protect your driveway. This will ensure long-lasting performance and curb appeal, whether you’ve opted for concrete or asphalt surfaces.Sealing and Curing
For concrete driveways, it’s crucial to seal the surface to prevent water penetration and protect against stains. After installation, allow your concrete to cure for at least 28 days before applying a high-quality sealant. Meanwhile, asphalt surfaces benefit from a sealcoat, which acts as a barrier against oils, gas, and water. Both sealing and curing processes will extend the life of your driveway and improve resistance to cracks and erosion.- Concrete:
- Cure Time: Minimum of 28 days
- Sealant Type: Penetrating sealers recommended
- Asphalt:
- Cure Time: Generally 6-12 months before initial sealcoat
- Sealant Type: Acrylic or coal tar-based sealcoats preferred
Routine Inspection and Maintenance
Regular inspections can catch issues like seal cracks, water leaks, or erosion before they become significant problems. For concrete driveways, look for cracks and seal them promptly with a concrete crack sealer. With asphalt, you can fill small cracks with asphalt patching products. It’s also beneficial to maintain the borders of your driveway by ensuring topsoil and edges are intact, as this supports the surface’s structure and prevents edge breakdown.- Maintenance Tasks:
- Inspect quarterly for new or expanding cracks
- Check for signs of water pooling or leaks
- Reapply sealants every 2-3 years, or as needed
Frequently Asked Questions
In this section, you’ll find concise answers to some of the most common questions regarding the repair of sunken driveways.What are common methods for repairing a sunken concrete driveway?
To address a sunken concrete driveway, concrete lifting techniques such as mudjacking or slabjacking are often utilized. These processes involve pumping a material underneath the concrete to raise it back to its original level.How much does it typically cost to fix a sinking driveway?
The cost of repair can vary widely based on several factors such as the size of your driveway and the severity of the sinking. Simple DIY fixes may cost a few hundred dollars, whereas professional repairs like mudjacking can run into the thousands.Can sunken asphalt driveways be effectively repaired, and if so, how?
Yes, sunken asphalt driveways can be repaired. The process usually involves removing the affected section, re-establishing a solid base, and applying a new layer of asphalt.What potential dangers arise from an untreated sinking driveway?
An untreated sinking driveway can pose risks such as tripping hazards, water damage to your property, and can increase the likelihood of damaging your vehicle.To what extent does homeowners insurance cover repairs for sunken driveways?
Homeowners insurance coverage for driveway repairs can vary. Typically, if the cause of sinking is sudden and accidental, such as a burst pipe, it may be covered. However, damage due to gradual deterioration or lack of maintenance might not be.What are the primary causes behind driveway sinking?
Driveway sinking can be attributed to several causes including insufficient compaction of the base material, erosion from water runoff, and the decay of organic materials beneath the driveway.RECENT BLOGS


Our Reviews

Glenda Lanier Prowell
1721758635
I have ordered an 11 yard dumpster to be delivered to my house.Lonier was extremely helpful and answered all my questions. The rate was very reasonable.

Cedric Smikle
1721660395
Amber was extremely professional and courteous. She answered all of my questions and even some that I didn’t know I needed to ask.

Cait Kaider
1721243051
I highly recommend Waste Removal USA for their responsiveness and how the staff work hard to provide exceptional customer service. They have done well by us and our clients. Thank you!

Easom Family
1721223306
Louiner Pierre-Louis Is awesome! Did a great job. Will definitely be using this same company for all my dumpster needs because of his awesome customer service! Thank you!!!

tabitha Vazquez
1720539988
Wonderful and fast customer service!
LATEST BLOGS
