March 22, 2024 - Benjamin Ehinger
Ceiling Replacement: Essential Guide for Homeowners
CALL NOW 844-762-8449
Ceiling replacement is an important aspect of maintaining the structural integrity and aesthetics of your interior space. It encompasses a range of tasks from updating the visual appeal with modern materials to addressing the safety concerns associated with damaged or aging structures. If you’re facing issues like sagging, water damage, or simply want to enhance the look and feel of your room, replacing your ceiling might be the necessary course of action. When embarking on this home improvement journey, identifying signs of wear and understanding the scope of the project are your first steps.
Deciding to replace a ceiling involves considering various factors such as the type of ceiling that fits your design vision, the materials appropriate for your space, and balancing the cost against your budget. Whether you’re contemplating a DIY project or leaning towards hiring professionals, preparation is key. This includes renting a dumpster from Waste Removal USA to manage the debris from your ceiling replacement, ensuring a clean and organized workspace throughout the process.
 When it comes to revamping your home, the ceiling plays a crucial role in the overall ambiance and functionality of your space. It’s not just about aesthetics; factors like acoustics, durability, and cost also dictate the ideal material for your ceiling renovation.
 When replacing your ceiling, you’ll be navigating two primary phases: removing the old ceiling and installing a new one. This process requires precise measurement and careful handling of materials to ensure a level finish complying with your home’s aesthetic and structural requirements.
Key Takeaways
- Assessing the condition of your current ceiling is critical before initiating replacement.
- Understanding the broad scope of materials and budgeting is vital for a successful ceiling replacement.
- Proper preparation, including waste management, underpins a smooth ceiling replacement project.
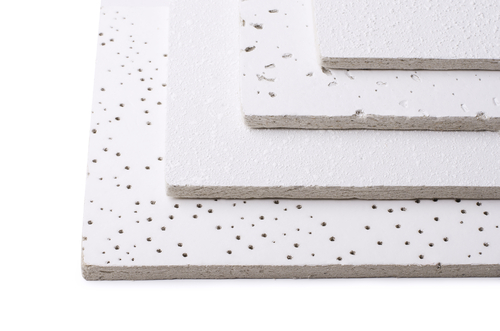
Understanding Ceiling Types
Before choosing a replacement, it’s essential to familiarize yourself with the various types of ceilings available. Each has distinctive characteristics and costs that can influence both the appearance and function of your home.Drywall Ceilings
Drywall, comprised of pressed gypsum boards, is the staple for most modern homes due to its simplicity and relatively low cost. Smooth and paintable, a drywall ceiling unifies your space with a clean look and easily hides wiring or piping.Drop Ceilings
Also known as a suspended ceiling, a drop ceiling involves a grid system that holds ceiling tiles below the structural ceiling. This creates a space for insulation, soundproofing, and concealing ductwork, making it a practical choice for basements or commercial spaces.Coffered Ceilings
Coffered ceilings are an architectural feature defined by a series of recessed panels. They add a three-dimensional look that can elevate the aesthetics of a room. They can also improve acoustics and can be found in refined spaces, as indicated by Bob Vila.Metal Tiles
Metal tiles provide a unique aesthetic and were popular historically for their fire resistance. Available in numerous patterns, these tiles can bring a vintage or sophisticated look and are a durable option for ceiling renovation.Tongue-and-Groove Ceiling
This option consists of wood panels that interlock with a ‘tongue’ into a ‘groove’, creating a tongue-and-groove ceiling. Often made from cedar, pine, or redwood, this type of ceiling adds warmth and charm and can serve as a stylish alternative to traditional drywall or drop ceilings.Signs You Need Ceiling Replacement
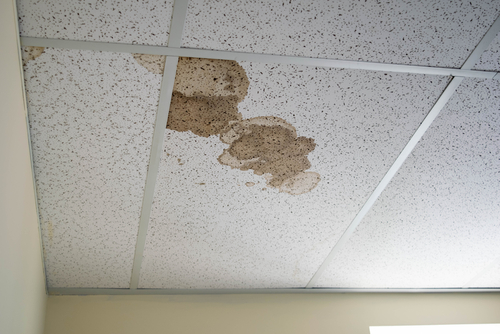
When assessing your ceiling for potential replacement, look out for physical indicators of damage and structural concerns that compromise safety or aesthetic appeal.Visible Damage
- Cracks: Small, hairline cracks may be typical due to settling but large, widening cracks are a warning sign. Your ceiling could be at risk, particularly if these cracks are around the edges or spread across large areas.
- Discoloration and Stains: Water spots or yellowish stains often point to ongoing leaks. Ignoring these signals could lead to significant water damage and mold growth, necessitating a full ceiling replacement.
- Popcorn Ceilings: These textured ceilings, common in older homes, aren’t just aesthetically dated; they can also harbor dirt and are hard to repair. If damaged, replacement with a more modern finish might be your best option.
Structural Issues
Sagging Ceiling: If you notice a dip or bow in your ceiling, this indicates that it’s no longer structurally sound. This sagging could be due to water damage or failure of the ceiling material, and you should seek immediate repair or replacement. Compromised Joists or Beams: Should you see your ceiling bending or feel it give way when touched, the stability of the joists or beams could be compromised. This is a serious safety hazard and requires your immediate attention.Choosing the Right Materials
When it comes to revamping your home, the ceiling plays a crucial role in the overall ambiance and functionality of your space. It’s not just about aesthetics; factors like acoustics, durability, and cost also dictate the ideal material for your ceiling renovation.
Drywall Options
For those seeking a smooth finish, drywall is a go-to choice for ceiling renovations. It’s versatile and provides a seamless look that can complement any decor. Consider using branded options like Armstrong ceiling products for a guarantee of quality. Drywall is also cost-effective, making it an affordable solution that doesn’t sacrifice durability.Tile Selection
Tiles bring decorative and functional elements to your ceiling update. Acoustic ceiling tiles, particularly, enhance sound quality, making them suitable for rooms where noise reduction is desired. Be selective about the type and style to ensure it suits your taste and meets your space’s requirements. If you’re aiming for a high-end look, decorative plaster tiles might be your best bet, though they come at a higher cost.Specialized Ceilings
For a unique or rustic aesthetic, ceiling planks are an excellent option. These can range from authentic wood to faux materials, offering a variety of styles to match your design vision. Wood planks can add warmth and character to a room, though they require a bit more investment. Remember to weigh the visual impact against the practical considerations, like ease of installation and maintenance.Preparation for Ceiling Replacement
Before you embark on the journey of ceiling replacement, there are vital steps you need to undertake to ensure a smooth process. From safeguarding your space to acquiring the necessary materials, attention to these details will pave the way for a successful project.Room Preparation
First, clear the location of all furniture and decor to prevent any damage and create a workspace. Cover your floors and remaining fixtures with heavy-duty plastic sheeting or drop cloths to protect against dust and debris. Keep in mind that products such as ceiling panels or plaster may not be immediately available, so check for product availability and arrange for delivery if necessary.Safety Measures
Wear protective gear including safety glasses, gloves, and a dust mask or respirator. Before any work begins, turn off electricity in the area to avoid electrical hazards. Also, ensure you have a stable ladder or scaffolding for safe access to the ceiling.Material Acquisition
Once your room is prepped and safety protocols are in place, it’s time to acquire the required materials. Purchase or rent the tools you’ll need, such as ladders, drills, and drywall saws. Recommendations for materials can vary, but always opt for quality over cost-savings to avoid future repairs. Confirm that all materials and tools are ready and on-site before starting to minimize disruptions.Cost Estimates and Budgeting
When planning for a ceiling project, understanding your potential expenses and working within your budget is crucial. Accurate cost estimates and smart budgeting strategies can help ensure that your ceiling upgrade is both high-quality and affordable.Cost Factors
The total cost to drywall a ceiling will vary based on several key factors. Size is a primary determinant—as the surface area increases, so too will the cost. The complexity of the ceiling design also influences the price, with options such as vaulted or coffered ceilings being more expensive due to the additional materials and labor involved. If your ceiling replacement involves intricate designs or a higher grade of materials, expect to see higher quotes.- Drywall ceiling cost: Typically ranges from $2 to $4 per square foot.
- Vaulted ceiling: Can reach up to $70 per square foot.
Budgeting for Materials and Labor
Your budget should allocate funds for both materials and labor. It’s essential to include a little extra in your projections for unexpected costs or complications that could arise during the installation process.- Materials: This includes drywall sheets, screws, joint tape, and finishing compounds.
- Labor: Normally calculated by the hour or square footage, and it varies regionally.
Cost-Saving Tips
To keep your ceiling project within an affordable range, consider these strategies:- Compare quotes: Get multiple estimates from contractors to find the best price.
- Time your project: Off-peak seasons may lead to lower labor costs.
- Do it yourself: If you’re handy, tackling parts of the project on your own can save on labor costs.
Installation Process
When replacing your ceiling, you’ll be navigating two primary phases: removing the old ceiling and installing a new one. This process requires precise measurement and careful handling of materials to ensure a level finish complying with your home’s aesthetic and structural requirements.
Removing the Old Ceiling
Your first task is to safely remove the old ceiling. This involves clearing any furniture from the room and covering floors and walls with protective sheeting. You’ll then need to:- Disconnect any fixtures, such as lights or fans.
- Carefully dismantle the old ceiling by removing tiles or panels, starting from the edges and working inwards.
- Remove the grid system, unscrewing and lowering it piece by piece to prevent damage to the surrounding area.
Installing the New Ceiling
Once the old ceiling is out, it’s time to install the new one. Here’s a structured approach:- Ensure the room’s dimensions are measured accurately, establishing a reference point for a level installation.
- Install the grid system that will support your new ceiling:
- Begin by setting up the perimeter trim. Use a laser level to maintain an even plane around the room. The line from the laser will act as the guide for aligning the perimeter trim (How to Install a Drop Ceiling: A Step-by-Step Guide – The Spruce).
- With the borders set, suspend the main beams and cross tees to form the grid. Ensure the grid remains level and square throughout the process.
- Once the grid is place, insert the new ceiling panels or tiles by tilting them slightly and lifting them above the grid framework, then letting them settle into place.
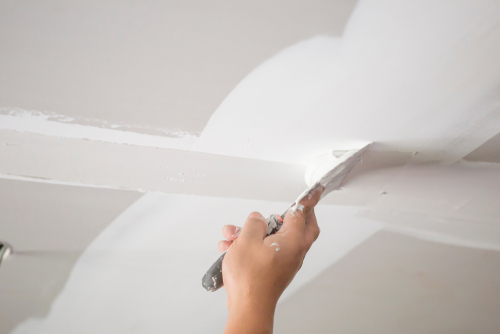
Finishing Touches
Once your new ceiling is in place, it’s crucial to give attention to the finishing touches. These details will transform your ceiling from functional to fantastic, adding both professionalism and aesthetic appeal to your space.Sanding and Painting
After installing your ceiling tiles, you may find slight imperfections or uneven joints. Sanding is your next step. You’ll want to gently smooth any rough areas or ridges between the tiles. Once the surface is even, painting can begin. Use a high-quality primer to ensure uniform adhesion, followed by at least two coats of paint for a consistent and durable finish. Remember, the right paint can not only protect but also brighten up your room.Final Inspections
Your final task is a thorough inspection of the work. Check for any gaps or misalignments and assess the overall appearance. Every tile should sit flush with its neighbor, and there should be no visible adhesive or material remnants. Rectify any issues before considering the project complete. A meticulous final check guarantees a polished look and endorses the hard work you’ve put into your ceiling replacement.Hiring Professionals vs DIY
When considering ceiling replacement in your home, you have the option of turning it into a DIY project or hiring professionals. Each path offers distinct advantages and challenges. DIY Ceiling Replacement- Pros:
- Cost Savings: Performing ceiling replacement yourself can save you the cost of labor.
- Personal Satisfaction: There’s a sense of accomplishment in completing a home improvement project on your own.
- Cons:
- Time Commitment: It may take considerable time to learn and correctly perform the replacement.
- Risk of Error: Without proper experience, you risk making mistakes that could lead to more extensive repairs.
- Pros:
- Expertise: Professionals bring experience and expertise, ensuring the job is done correctly.
- Efficiency: Professionals can complete the job faster due to their skills and tools.
- Cons:
- Cost: Professional services include labor costs, which are typically higher than the cost of materials alone.
- Availability: Scheduling with professionals might mean waiting for an opening, depending on their demand.
Frequently Asked Questions
Replacing your ceiling can be a substantial undertaking. These questions will guide you through the various factors that influence cost, alternative solutions, and the installation process.What are common factors that affect the cost of replacing a ceiling?
The average cost of replacing a ceiling typically ranges between $3 and $7 per square foot, including the cost of materials and labor. Factors influencing the price include the size of the ceiling, the complexity of work such as decorative finishes, and the cost of any structural adjustments required.How can water damage impact drywall ceiling replacement?
If you’re dealing with a water damaged ceiling, expect the costs to be higher due to potential structural issues that need to be assessed and repaired before new drywall is installed. Also, water damage might lead to mold, which would require remediation.What are some cost-effective alternatives for redoing a ceiling?
For a quick and budget-friendly update, consider replacing old ceiling tiles instead of a complete ceiling overhaul. Utilizing “scored” products designed to mimic smaller panels can make the process simpler and cheaper.What steps are involved in fitting a new ceiling?
The process includes the removal of the old ceiling, repairing any structural damage, preparing the area, and then installing the new ceiling material. This may involve framing, drywall panel fitting, seam taping, mudding, and sanding before the final finishes are applied.How do replacement costs vary for different ceiling materials?
Replacement costs vary significantly based on the material you choose. Basic drywall is often the least expensive, whereas architectural tiles or custom-designed ceilings will be at the higher end of the cost spectrum. Additionally, specialty materials like tin or coffered ceilings will be more costly.Can you suggest some creative ideas for drop ceiling replacements?
Consider modern tiles that offer a range of designs, including those that mimic traditional coffered ceilings. Changing the layout of the grid or introducing new lighting fixtures can also enhance the overall aesthetic of the room.RECENT BLOGS


Our Reviews

Glenda Lanier Prowell
1721758635
I have ordered an 11 yard dumpster to be delivered to my house.Lonier was extremely helpful and answered all my questions. The rate was very reasonable.

Cedric Smikle
1721660395
Amber was extremely professional and courteous. She answered all of my questions and even some that I didn’t know I needed to ask.

Cait Kaider
1721243051
I highly recommend Waste Removal USA for their responsiveness and how the staff work hard to provide exceptional customer service. They have done well by us and our clients. Thank you!

Easom Family
1721223306
Louiner Pierre-Louis Is awesome! Did a great job. Will definitely be using this same company for all my dumpster needs because of his awesome customer service! Thank you!!!

tabitha Vazquez
1720539988
Wonderful and fast customer service!
LATEST BLOGS
